Tools / Woodworking Tools
Triton TWX7CS001 Contractor Saw Module User Manual
Quick guide and user manual for the Triton TWX7CS001 10" Contractor Saw Module. Includes installation, safety instructions, cutting procedures, and maintenance.
Table of contents
Quick guide from the manual
The Triton TWX7CS001 Contractor Saw Module is designed for use with the Triton Workcentre TWX7. This manual provides essential safety, installation, and operation instructions. Always ensure the saw is disconnected from the power supply before performing any adjustments, maintenance, or accessory changes. Wear appropriate personal protective equipment (PPE), including eye, ear, and respiratory protection, as well as cut-proof gloves when handling the saw blade.
Safety
General Safety: Keep the work area clean and well-lit. Do not use in damp or wet environments. Keep children and bystanders at a safe distance. Always disconnect the power when not in use.
Table Saw Safety: Always use the riving knife (spreader) to prevent kickback. Never remove the blade guard or riving knife. Use push sticks when ripping narrow workpieces. Feed work against the direction of rotation. Never stand in line with the blade path.
Installation
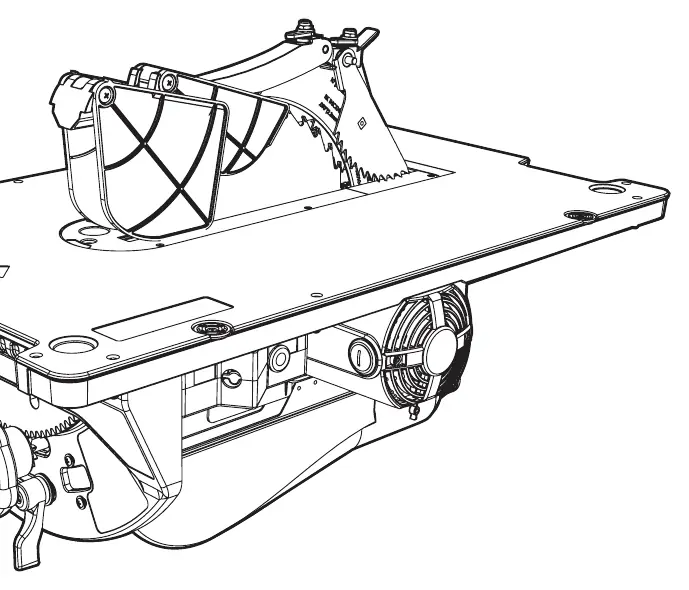
Module Installation: Ensure the saw blade is in the 45° position before inserting or removing the module. Use the hand slots to carry the module. Slide the module rollers into the mounting guides and lock the module into place. Adjust the module levelling screws to remove any play between the module and the Workcentre chassis.
Riving Knife & Kerf Plate: Ensure the riving knife is correctly locked into place. Level the kerf plate against the table surface using the levelling screws.
Operation
Switching ON/OFF: Connect the Workcentre to the mains. Use the Knee-Off Stop Button to switch off in an emergency. The power tool must be connected to the Workcentre switchbox.
Cutting Operations:
- Cross Cut: Use the protractor gauge to support the workpiece.
- Mitre Cut: Adjust the protractor gauge to the desired angle.
- Rip Cut: Use the rip fence. Keep hands clear of the blade and use a push stick if the distance between the fence and blade is less than 6 inches.
- Bevel Cut: Unlock the locking lever and adjust the bevel angle using the bevel angle adjuster.
- Slot Cut: Lower the riving knife to the slot cutting position. Do not use dado blades.
Maintenance
Blade Replacement: Disconnect power. Remove the blade guard and kerf plate. Raise the arbor to maximum height. Use the provided multi-tools to remove the blade securing nut and replace the blade. Ensure the blade direction arrow matches the guard.
Cleaning & Lubrication: Keep the machine clean of dust and debris. Lubricate moving parts regularly with PTFE spray only. Do not use oil or silicone-based sprays.
Practical help
Common problems
No function when ON/OFF Switch is operated
Check power supply, press the Reset Button (56) on the underside of the Power Inlet Box (55), or have the switch replaced at an authorised service centre.
Poor cutting quality
The blade is likely defective or blunt; replace the saw blade.
Cutting profiles are inconsistent
Ensure the Protractor Gauge or Rip Fence is securely fastened, calibrate the Saw Blade, or replace the sacrificial wood piece on the Protractor Gauge.
Bevel angle setting is loose
Tighten the Rear Bevel Angle Locking Nut (57).
Before use
- Ensure the saw table is switched off and disconnected from power.
- Wear suitable cut-proof gloves when handling the blade.
- Check that the blade is sharp and the correct type for the material.
- Ensure the Riving Knife is correctly locked into place.
- Level the module and Kerf Plate before use.
- Ensure the work area is well-ventilated and clear of obstructions.
Specs in practice
- No load speed
- 4500rpm
- Max rip cut capacity
- 30 1/2"
- Cutting depth at 90°
- 3 3/8"
Images and diagrams
- Figure A: Module levelling screw installation.
- Figure F: Kerf plate access hole for removing the plate.
- Figure G/H/I: Riving knife installation and slot cutting position.
- Figure N: Workcentre switchbox and mains connection.
- Figure O: Blade assembly installation.
Model compatibility
- Designed for use with the Triton Workcentre TWX7 and accessories.
- Only fit circular saws listed as compatible in the specifications.

Manual page author
David Miller
Documentation analyst
Organizes user manual content into clear summaries, with attention to model details, product context, and everyday usability.