Computers / KVM Switches
User Manual for Black Box GO! 2-Way Radio
Quick guide for the Black Box GO! 2-Way Radio. Learn how to set up, operate, manage channels, use programmable buttons, and understand LED status indicators.
Quick answers from the manual
Quick answer
- The Black Box GO! is a digital and analog 2-way radio. Setup involves charging the battery for 10-12 hours, installing the battery, antenna, and belt clip. Operation is controlled via the channel knob, volume knob, and PTT button. p. 2
Key actions
- Charging the battery p. 2
- Initiating a call p. 5, 7
First start
- Charge the battery for 10-12 hours before first use. p. 2
Problems and fixes
Message fails to send
If the radio gives a low-pitch prompt tone, the message failed to be sent.
p. 7Technical specifications
| Parameter | Value | Meaning | Pages |
|---|---|---|---|
| Frequency | 136-174 MHz | Operating frequency range | p. 8 |
| Channel Capacity | 32 | Number of available channels | p. 8 |
Where to find it in the PDF
- Quick Start p. 2
- Radio Controls p. 3
- Technical Specifications p. 8
Table of contents
Quick guide from the manual
The Black Box GO! is a digital and analog 2-way radio. Before first use, it is recommended to charge the battery for 10 to 12 hours. The device supports 32 channels, 2 zones, and is IP56 water-resistant. Operation involves using the channel selection knob, volume/power knob, and the PTT (Push-to-Talk) button.
Getting started
To assemble your radio, follow these steps:
- Charge the battery using the provided charger.
- Align the battery with the slot on the rear of the radio and push until fastened.
- Place the antenna into the installation hole and turn clockwise to secure.
- Align the belt clip with the screw holes on the rear and fasten with screws.
- Turn the volume/power knob clockwise until you hear a click to power on.
- Select a channel using the channel knob.
- Connect any audio accessories by removing the protective cover on the side.
Radio operation
Turning On/Off: Rotate the volume/power knob clockwise to turn on. A short beep indicates the radio is on.
Adjusting Volume: Rotate the volume knob clockwise to increase volume and anticlockwise to decrease.
Selecting a Channel: Rotate the channel selection knob until you reach the desired group channel. You will hear a voice enunciation of the channel number.
PTT Button: Press and hold the PTT button to transmit. Release to listen. If the "idle channel prompt" is enabled, you will hear a tone when the channel becomes idle.
Programmable buttons
Your radio features programmable buttons that can be assigned specific functions by your agent. Functions include:
- Emergency call: Initiates or cancels an emergency alarm.
- Monitoring: Monitors activities on an analog channel.
- One-press call: Initiates a predefined call.
- Scanning: Enables or disables scanning.
- VOX: Enables or disables hands-free voice transmission.
- Power level: Switches between high and low transmitting power.
- Talk around: Switches between repeater and direct mode.
Status indicators
The LED indicator provides visual feedback on the radio's status:
- Red: Transmitting signals, sending messages, or encryption calling.
- Green: Turning on, receiving a call, or receiving data.
- Flashing Red: Scanning.
Technical specifications
The radio operates in the 136-174 MHz frequency range. It features 32 channels, a 2000 mAh Li-Ion battery, and is rated IP56 for dust and water resistance. It supports TDMA DMO 2 time slots to save frequency resources.
Practical help
Common problems
Radio fails to transmit
Ensure the Encryption function is activated on the channel if required, as the radio cannot transmit encryption data without it.
Message fails to send
If the radio emits a low-pitch prompt tone after pressing the send button, the message failed to send.
Cannot reply to a general call
General calls are for announcements only; users cannot reply to them.
Radio does not turn on
Ensure the battery is properly installed and charged for 10-12 hours.
Before use
- Charge the battery for 10-12 hours
- Install the battery
- Attach the antenna
- Attach the belt clip
- Turn on the radio
- Select a channel
Specs in practice
- Channel Capacity
- 32 channels
Images and diagrams
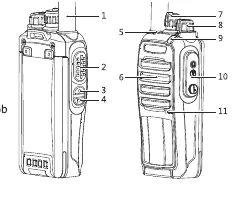
- The radio features a PTT button, channel selector knob, volume/power knob, and programmable side buttons.
- The antenna is installed by turning it clockwise into the top hole.
- The battery is installed by sliding it into the rear slot until fastened.
Model compatibility
- MotoTRBO Tier II & Hytera Compatible
- Uses Motorola M1 Radio Connector

Manual page author
Michael Turner
Technical manual editor
Reviews PDF manuals for structure, safety notes, and practical product details so readers can find the right information quickly.