Lighting / Controllers & Dimmers
User Manual for Sunricher 1009TYWi5C 4-in-1 RF+WiFi LED Controller
Quick guide for the Sunricher 1009TYWi5C 4-in-1 RF+WiFi LED Controller. Learn how to wire, pair with the TuyaSmart app, connect RF remotes, and configure master/slave settings.
Table of contents
Quick Guide from the Manual
The Sunricher 1009TYWi5C is a versatile 4-in-1 LED controller supporting DIM, CCT, RGBW, and RGB+CCT modes. It can be controlled via the TuyaSmart app (WiFi) or universal legacy RF remotes. Before installation, ensure the power is disconnected and the dial switch is set to the correct mode for your LED strip.
Product Overview
The controller operates on 12-24VDC and features 5 output channels with a maximum of 4A per channel. It is designed for constant voltage LED strips. The device includes a 'Prog.' button for pairing and a jumper for master/slave synchronization.
Safety Warnings
- Do not install the device while power is applied.
- Do not expose the device to moisture.
- Ensure the input voltage matches the 12-24VDC requirement.
Wiring and Installation
The controller supports four distinct modes. Ensure the dial switches on the device are set to the corresponding mode before connecting power:
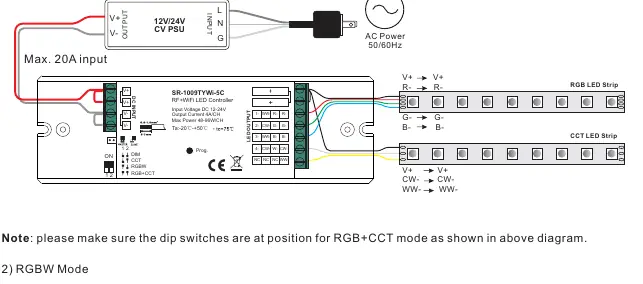
- RGB+CCT Mode: Connect R, G, B, CW, and WW channels to the respective LED strip terminals.
- RGBW Mode: Connect R, G, B, and W channels.
- CCT Mode: Connect WW and CW channels.
- DIM Mode: Connect single-color LED strips to the output channels.
Always refer to the wiring diagram provided in the manual to ensure correct polarity (V+ and output channels).
App Setup (TuyaSmart)
- Download the TuyaSmart app and register/log in. Enable Bluetooth on your smartphone.
- Short press the 'Prog.' button 5 times (or reset power 5 times) to enter WiFi pairing mode. The LED light will blink rapidly.
- In the app, tap 'Add Device', select 'Lighting', then 'Light Source (Wi-Fi)'.
- Follow the on-screen instructions to connect to your 2.4GHz WiFi network.
RF Remote Pairing
- Activate the RF remote by pressing the ON button.
- Select a zone on the remote (if applicable).
- Short press the 'Prog.' button on the controller (or reset power 3 times) to enter RF pairing mode.
- Immediately touch the color wheel or press any button (except ON/OFF) on the remote.
- The connected LED lights will blink once to confirm successful pairing.
To delete pairing, press and hold the 'Prog.' button for over 3 seconds until the lights blink.
Master and Slave Setting
This feature allows for perfect synchronization of color-changing effects across multiple receivers.
- Jumper Setting: Short circuit the jumper for Master function; open circuit for Slave function.
- Configuration: Set one receiver as Master and pair it to a remote zone. Set all other receivers as Slaves and pair them to other zones.
- Synchronization: When all zones are selected on the remote, the Master sends a sync signal to the Slaves. The maximum sync distance is 30m.
- Note: Power cycle the receiver after changing the jumper setting to enable the new mode.
Practical help
Common problems
Device not entering pairing mode
Ensure you are pressing the 'Prog.' button 5 times continuously or resetting the power 5 times. The LED light must blink rapidly.
Synchronization issues between receivers
Ensure the Master/Slave jumper is set correctly (short circuit for Master). Power cycle the receiver after changing the jumper. Ensure distance is within 30m.
App cannot find the device
Ensure your smartphone is connected to a 2.4GHz WiFi network and Bluetooth is enabled.
Before use
- Verify input voltage is 12-24VDC.
- Ensure power is disconnected before wiring.
- Set the dial switch to the correct mode (DIM, CCT, RGBW, or RGB+CCT).
- Download the TuyaSmart app.
- Check that the LED strip is compatible with constant voltage output.
Specs in practice
- Input Voltage
- 12-24VDC constant voltage.
- Output Current
- 4A per channel (5 channels total).
- RF Frequency
- 434/869.6/916.5MHz.
- Waterproof Grade
- IP20 (Indoor use only).
Images and diagrams
- Wiring Diagrams: Shows connections for RGB+CCT, RGBW, CCT, and DIM modes.
- Master/Slave Jumper: Short circuit for master, open circuit for slave.
Model compatibility
- Compatible with universal legacy RF remotes.
- Requires 2.4GHz WiFi network for app control.

Manual page author
Michael Turner
Technical manual editor
Reviews PDF manuals for structure, safety notes, and practical product details so readers can find the right information quickly.