Lighting / Controllers & Dimmers
User Manual for Somfy LED RECEIVER io W POWERED 100W / 200W
A comprehensive user guide for the Somfy LED RECEIVER io W POWERED 100W and 200W. This manual covers installation, wiring, commissioning, and troubleshooting for your lighting controller.
Table of contents
Manual images
Click an image to enlargeQuick guide from the manual
The Somfy LED RECEIVER io W POWERED 100W and 200W are receivers equipped with io-homecontrol radio technology. They allow independent control of white LED light sources at constant voltage (24V). These receivers are suitable for outdoor use (IP44) and are ideal for controlling lighting on awnings, pergolas, or verandas.
Installation and Wiring
Warning: Installation must be performed by a home automation professional in accordance with local regulations and Somfy instructions. Always cut off the mains power supply before starting installation.
- Ensure the power of the connected LED lights does not exceed 4.2A per output.
- Cables passing through metal walls must be protected and insulated.
- The receiver cable is not removable; if damaged, return the receiver to after-sales service.
- Do not cut the antenna wire and ensure it is not in contact with metal parts.
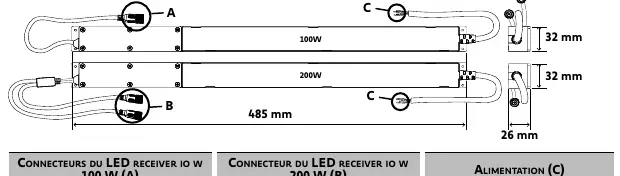
Connect the receiver to the LED lights and mains power supply (220-240V AC) according to the wiring diagram provided in the manual. The connectors are compatible with TELECO lighting solutions; otherwise, use the accessory ref. 9029053.
Commissioning
This guide describes commissioning using an io control point. For other control points, refer to their specific instructions.
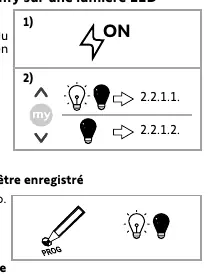
- Power on the receiver.
- Press the Up and Down buttons simultaneously on the io control point.
- Follow the procedure based on the LED light's reaction (e.g., briefly press the PROG button on the control point to register it).
Usage and Maintenance
The product is maintenance-free.
- Up/Down buttons: Briefly press to switch the LED light on or off.
- Dimmer: Use the dimmer on Situo Variation io control points to adjust intensity, or press and hold Up/Down buttons on other io control points.
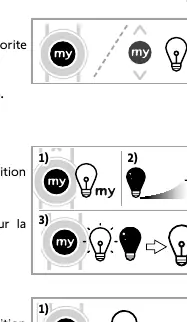
- STOP/my button: Press to switch the LED light directly to the preset favourite intensity (default 50%).
Settings
Favourite (my) position: To change, switch the light on, adjust intensity, then press the my button until the LED flashes. To delete, switch the light on, then press and hold the my button until the LED flashes.
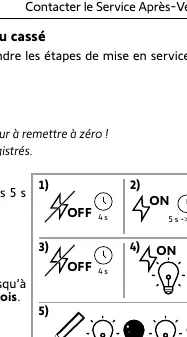
Automatic cut-off: The receiver can automatically switch off LED lights after 3, 6, or 12 hours. The procedure involves pressing the my and Down buttons simultaneously on the control point until the LED flashes to activate/deactivate or set the duration.
Troubleshooting
If the LED light does not react, check if the control point is programmed, check batteries, ensure compatibility, and verify power supply and wiring. If radio performance is poor, ensure the receiver is not installed in a metal box and the antenna is not damaged.
Technical Data
The receivers operate at 868-870 MHz io-homecontrol. They are rated IP44, Class II, and operate between -20°C and +45°C. The output voltage is 24V DC.
Practical help
Common problems
LED light does not react when a button is pressed on the control point
Ensure the control point is programmed in the receiver, check control point batteries, verify compatibility, check power supply, and inspect wiring.
Poor radio performance
Ensure the receiver is not installed in a metal box or near metal partitions/columns that could block the signal. Check if the antenna is damaged.
LED light does not turn on
Check if the ambient temperature is too high (>45°C). Wait for the temperature to cool down.
Before use
- Ensure mains power is cut off before installation.
- Verify compatibility of LED lights with the receiver.
- Ensure wiring follows the correct polarity.
- Remove the protective cap from the output cable if using a second LED light (200W model only).
- Secure the receiver using screws, adhesive tape, or collars.
Specs in practice
- Output Voltage
- 24V DC constant voltage.
- Radio Frequency
- 868-870 MHz io-homecontrol.
Images and diagrams
- The wiring diagram shows connections for the 100W (1 output) and 200W (2 outputs) models, including connections for LED lights (A/B) and mains power (C).
Model compatibility
- Compatible with TELECO lighting solutions.
- If not using TELECO, use accessory ref. 9029053 (transparent cable: 0V, white cable: 24V).

Manual page author
Emily Carter
User documentation editor
Prepares concise manual descriptions and highlights the most useful setup, operation, and maintenance information for readers.