Electronics / Remote Controls
User Manual for Chacon DiO 16-Channel Remote Control 54761
Quick guide for the Chacon DiO 16-Channel Remote Control (54761). Learn how to pair the remote with receivers, replace the battery, use group functions, and troubleshoot connection issues.
Table of contents
Manual images
Click an image to enlargeQuick Guide
The Chacon DiO 16-Channel Remote Control allows you to manage your home lighting and devices remotely. To get started, ensure the battery is installed, pair the remote with your DiO receiver, and use the channel buttons to control your devices individually or in groups.
Battery Replacement
The remote uses a CR2032 3V battery. To replace it:
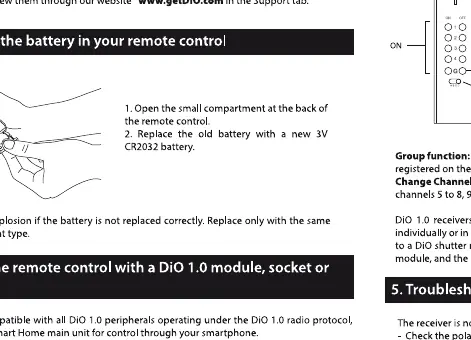
- Open the small compartment on the back of the remote control.
- Remove the old battery and insert a new CR2032 3V battery, ensuring correct polarity.
- Close the compartment.
Warning: Risk of explosion if the battery is not replaced correctly. Replace only with the same type or an equivalent.
Linking the Remote
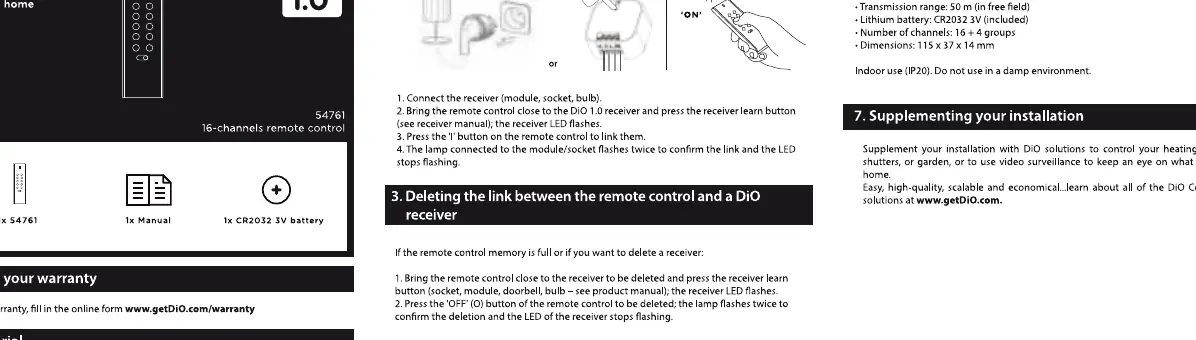
To link the remote control to a receiver (module, socket, or bulb):
- Bring the remote control close to the receiver.
- Press the learn button on the receiver (refer to the receiver manual for location). The receiver LED will flash.
- Press the ON button on the remote control to link. The receiver LED will flash twice to confirm the deletion or linking process.
Usage
The remote control offers individual and group control options:
- Individual control (channels 1 to 16): Press the T button on the remote once to turn the device ON, or press it again to turn it OFF.
- Dimmer: If using a dimmer module, socket, or bulb, press the T button to start/stop the dimming process.
- Group function: Press the T or OFF button on channel G to turn off all lamps or devices registered on the remote control (channels 1 to 4).
- Channel switching: Move the small switch on the bottom of the remote control to access channels 5 to 8, 9 to 12, or 13 to 16.
Troubleshooting
If the receiver is not responding:
- Check the battery of the remote control and replace it if necessary.
- Ensure the remote is linked to the receiver and that the receiver is connected correctly to power.
- Check the status of the receiver memory.
- The range between the receiver and the remote control is 50 meters in an open field, but this may be reduced by the thickness of walls or a similar environment.
Technical Specifications
- Protocol: DiO 1.0
- Frequency: 433.92 MHz
- Transmission range: 50m (in free field)
- Battery: CR2032 3V (included)
- Number of channels: 16 + 4 groups
- Dimensions: 115 x 37 x 14 mm
Practical help
Common problems
Receiver does not respond to remote
Check if the battery is dead, ensure the receiver is powered, and verify that the remote is correctly paired with the receiver.
Reduced operating range
The 50m range is for open fields. Walls and other obstacles will significantly reduce the effective range.
Before use
- Ensure a CR2032 3V battery is installed in the remote.
- Verify the receiver is plugged into a power source.
- Identify the learn button on your specific DiO receiver.
- Ensure you are within range of the receiver during the pairing process.
Specs in practice
- 50m (free field)
- Maximum distance between remote and receiver without obstacles.
Images and diagrams
- The linking process requires pressing the learn button on the receiver followed by the ON button on the remote.
- The remote has a switch at the bottom to toggle between channel groups (1-4, 5-8, 9-12, 13-16).
Model compatibility
- Compatible with DiO 1.0 protocol peripherals.
- Not compatible with DiO 2.0 protocol devices.

Manual page author
Michael Turner
Technical manual editor
Reviews PDF manuals for structure, safety notes, and practical product details so readers can find the right information quickly.