Electronics / Remote Controls
User Manual for Security Brands Ridge Remote 14-R433
Quick guide for the Security Brands Ridge Remote 14-R433. Learn how to pair the remote with the Ridge 2.0 Transceiver, select operating modes (momentary/latch), and operate your gate or door.
Table of contents
Manual images
Click an image to enlargeQuick Guide for Ridge Remote
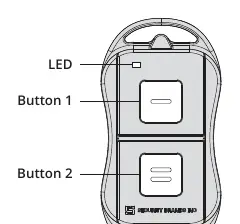
The Ridge Remote 14-R433 is a 433 MHz remote control designed to work exclusively with the Security Brands Ridge 2.0 Transceiver (Model 14-REC20). It features two programmable buttons and a status LED for feedback during pairing and mode selection.
What's What
The remote consists of two programmable buttons and a status LED. Each button can be paired to a separate transceiver or the same transceiver, and each can be configured to different modes of operation.
Basic Setup (Pairing)
To pair the remote with the Ridge 2.0 Transceiver, follow these steps:
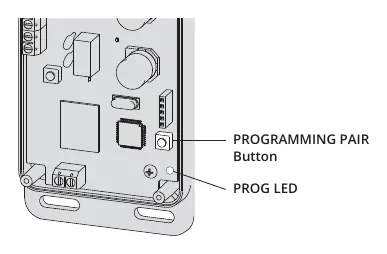
- Ensure the Ridge 2.0 Transceiver is powered up and the cover is removed.
- On the transceiver, hold down the PROGRAMMING PAIR button for three seconds and release. The PROG LED will light up.
- On the Ridge Remote, press and hold down both buttons simultaneously.
- When the remote LED flashes twice, continue holding the button you want to program and release the other button.
- When the LED flashes again, release the button. The button is now programmed.
- Repeat the procedure for the second button if desired.
Mode Selection
You can set the remote buttons to Momentary or Latch mode:
- On the Ridge Remote, press and hold down both buttons and watch the remote LED.
- When the LED flashes twice, continue holding both buttons.
- When the LED flashes twice again, continue holding the button you want to change modes on until the LED flashes multiple times to confirm the mode change.
Note: If the relay on the Ridge 2.0 Transceiver is already latched (on), it cannot be unlatched unless the remote button is set to latch mode.
How to Use
To operate your gate or door:
- Ensure you are within range of the Ridge 2.0 Transceiver.
- Press the remote button paired to the transceiver long enough for the LED to flash.
- The transceiver will respond and operate the gate or door.
If the transceiver does not respond, ensure the remote LED flashes when the button is pressed. If it does not, check the battery. If it still fails to respond, repeat the pairing procedure.
Safety Information
Warning: Automatic gates can cause serious injury or death. Always check that the gate path is clear before operating. Reversing or other safety devices should always be used.
Manufacturer information
Security Brands, Inc.
Practical help
Common problems
Transceiver does not respond when button is pressed.
Ensure the remote LED flashes when the button is pressed. If not, check the battery. If it flashes but the transceiver does not respond, repeat the pairing procedure.
Relay on the transceiver is latched (on) and will not unlatch.
The relay cannot be unlatched unless the remote button is set to latch mode. Change the mode of the remote button.
Before use
- Ensure you have the Security Brands Ridge 2.0 Transceiver (Model 14-REC20).
- Ensure the transceiver is powered up.
- Ensure the transceiver cover is removed to access the programming button.
- Verify you are within range of the transceiver.
Specs in practice
- Momentary Mode
- The relay activates only while the button is held down.
Images and diagrams
- Programming Pair Button: Located on the transceiver board, used to initiate the pairing process.
- Remote LED: Provides visual feedback during pairing and mode selection.
Model compatibility
- This remote must be paired to and used with a Security Brands Ridge 2.0 Transceiver (Model 14-REC20) to work correctly.

Manual page author
Emily Carter
User documentation editor
Prepares concise manual descriptions and highlights the most useful setup, operation, and maintenance information for readers.