Lighting / Fixtures
User Manual for Citronic 180.003UK Pro Studio Mic Boom Arm
Quick guide for the Citronic 180.003UK Pro Studio Mic Boom Arm. Includes assembly instructions, mounting steps, and safety guidelines for desk installation.
Quick answers from the manual
Quick answer
- The Citronic 180.003UK is a studio microphone boom arm. It supports microphones up to 1kg and mounts to surfaces between 10mm and 55mm thick. p. 1, 2
Key actions
- Assemble the clamp and mount, then attach the arm using the provided hex key. p. 2
- Attach the microphone using the 3/8" or 5/8" adapter. p. 2
Technical specifications
| Parameter | Value | Meaning | Pages |
|---|---|---|---|
| Max Load | 1kg | Maximum weight capacity | p. 1 |
| Clamp Range | 10-55mm | Compatible desk thickness | p. 2 |
Where to find it in the PDF
- Safety Instructions p. 1
- Assembly Instructions p. 2
Table of contents
Manual images
Click an image to enlargeQuick guide from the manual
The Citronic 180.003UK is a professional studio microphone boom arm designed for desk mounting. It supports microphones up to a maximum weight of 1kg. Ensure the mounting surface is between 10mm and 55mm thick.
Parts list
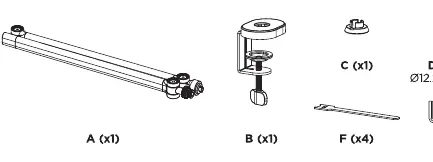
- A: Boom arm
- B: Desk clamp
- C: Mount
- D: Washer (12.2x20x1)
- E: M6x12 screw
- F: Cable clips (x4)
- G: 4mm hex key
Assembly and installation
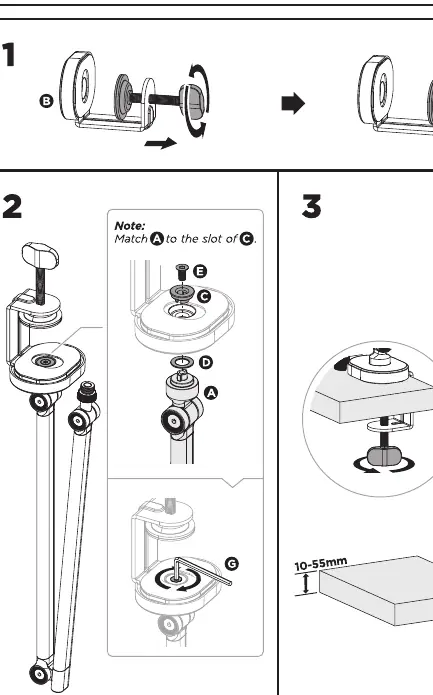
- Assemble the clamp: Attach the clamp (B) to the mount (C).
- Attach the arm: Place the washer (D) onto the mount (C). Insert the boom arm (A) into the slot of the mount (C). Secure it using the M6x12 screw (E) and tighten with the hex key (G).
- Mount to desk: Slide the assembled clamp onto the edge of your desk (10-55mm thickness) and tighten the clamp screw securely.
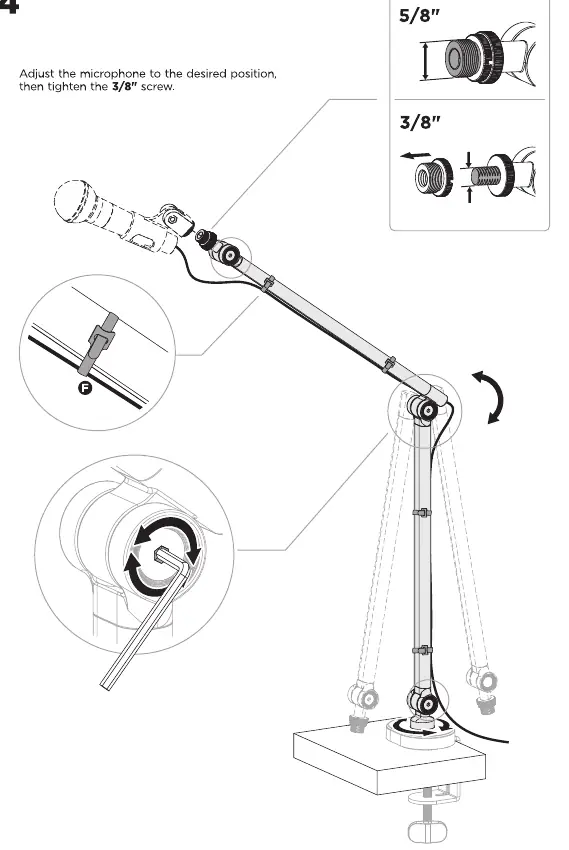
Microphone setup
Attach your microphone to the end of the boom arm. The unit includes adapters for both 3/8" and 5/8" microphone threads. Adjust the microphone to the desired position and tighten the 3/8" screw to lock it in place. Use the provided cable clips (F) to secure the microphone cable along the arm.
Safety warnings
- Do not exceed the maximum weight capacity of 1kg.
- Ensure the clamp is tightened firmly to the desk.
- Keep small parts away from children to avoid choking hazards.
- Use only for the intended purpose of holding a microphone.
Practical help
Common problems
Arm does not stay in position
Ensure the microphone weight is within the 1kg limit and tighten the adjustment screws.
Clamp does not fit the desk
Verify that the desk thickness is between 10mm and 55mm.
Before use
- Verify desk thickness is between 10mm and 55mm.
- Ensure microphone weight does not exceed 1kg.
- Check all parts (A-G) are present.
- Identify if your microphone requires a 3/8" or 5/8" thread adapter.
Specs in practice
- Thread Adapters
- 3/8" and 5/8" - Standard sizes to fit most studio microphones.
Images and diagrams
- Step 1: Shows the assembly of the desk clamp.
- Step 2: Illustrates attaching the arm to the mount using the screw, washer, and hex key.
- Step 3: Demonstrates mounting the assembly to a desk edge.
- Step 4: Shows microphone attachment and thread adapter usage.
Model compatibility
- Compatible with microphones up to 1kg.
- Mounts to surfaces 10-55mm thick.
- Supports 3/8" and 5/8" microphone threads.

Manual page author
Emily Carter
User documentation editor
Prepares concise manual descriptions and highlights the most useful setup, operation, and maintenance information for readers.