Automotive / Dash Cams
User Manual for Cobra 1080P Wireless NVR Camera (Item 58197)
Quick guide for the Cobra 1080P Wireless NVR Camera (Item 58197). Includes installation steps, mounting instructions, camera adjustment, syncing procedures, and troubleshooting.
Table of contents
Manual images
Click an image to enlargeQuick guide from the manual
This document provides essential instructions for the Cobra 1080P Wireless NVR Camera (Item 58197). It covers safe installation, mounting, camera adjustment, and syncing with your NVR system. Always ensure the power adapter is used in a clean, dry indoor location.
Installation and Mounting
Before mounting, test the camera by connecting it to the power adapter and an AC outlet. Choose a location that is out of reach of children but provides the desired viewing angle. Ensure the installation surface is free of hidden utility lines.
Mounting Steps
- Solid Surface: Drill pilot holes using a bit slightly smaller than the screws. Position the camera and drive screws until secure.
- Hollow Surface: Drill holes matching the anchor diameter. Tap anchors into place, then drive screws through the base into the anchors.
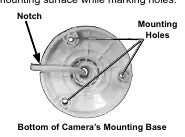
- Cable Routing: Route the cable through the notch or slot on the mounting base to keep the base flush against the surface.
- Orientation: Avoid mounting the camera upside down; ensure the hood is above the lens.
Camera Adjustment
To adjust the camera view:
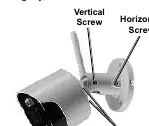
- Rotation: Loosen the position screws on the sides to rotate the camera for proper image orientation.
- Tilt: Loosen the vertical screw to tilt the camera up or down.
- Pan: Loosen the horizontal screw to pan the camera left or right.
- Note: Only loosen adjustment screws slightly; do not remove them. Tighten securely after adjustment.
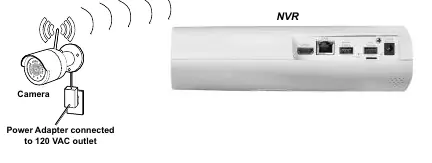
Operation and Syncing
To synchronize the camera with your NVR:
- Refer to your NVR instructions for specific operating procedures.
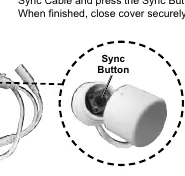
- Pull back the cover on the sync cable.
- Press the sync button.
- Close the cover securely after synchronization.
Maintenance and Troubleshooting
Periodically inspect the camera for loose hardware, damaged wiring, or cracked parts. Wipe external surfaces with a clean cloth. If the camera does not work, check the power outlet and cable connections. If the image quality is poor, clean the camera lens.
Manufacturer information
Cobra Electronics
Practical help
Common problems
Camera does not work
Check for power at the outlet and ensure all cables are securely connected.
Poor image quality
The camera lens may be dirty; clean the lens with a clean cloth.
View is undesirable
The camera is out of adjustment. Loosen the vertical/horizontal screws, tilt/pan the camera as needed, then tighten the screws.
Image is upside down or sideways
The camera is not mounted correctly. Loosen the position screws, rotate the camera to the correct orientation, and tighten the screws.
Before use
- Check local surveillance laws before installation.
- Wear ANSI-approved safety goggles during installation.
- Test the camera functions by connecting it to power before mounting.
- Ensure the power adapter is plugged in indoors in a clean, dry location.
- Verify the installation surface has no hidden utility lines before drilling.
- Route cables to avoid tripping hazards.
Specs in practice
- Camera Resolution
- 2MP / 1920 x 1080 for high-definition video.
- Ingress Protection Rating
- IP66, meaning the camera is protected from low-pressure water jets.
- Operating Temperature
- Functions between -22°F to 122°F.
- Night Vision Distance
- Up to 130 ft under ideal conditions.
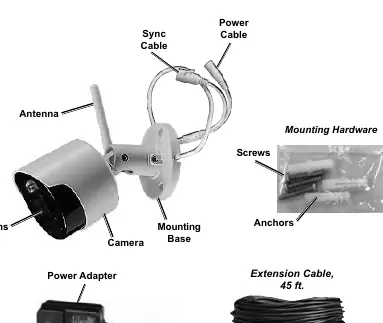
Images and diagrams
- The mounting base features a notch/slot to allow the cable to pass through while keeping the base flush against the wall.
- Adjustment screws (vertical, horizontal, and position) allow for precise camera aiming.
- The sync button is located on the sync cable, protected by a cover.
Model compatibility
- Compatible NVR: Item 57959.
- Do not use an extension cord with the power adapter.
- The included power adapter does not require grounding.

Manual page author
Emily Carter
User documentation editor
Prepares concise manual descriptions and highlights the most useful setup, operation, and maintenance information for readers.