Toys / RC Models & Drones
User Manual for E-flite Commander mPd 1.4m
Comprehensive user manual for the E-flite Commander mPd 1.4m RC aircraft. This guide provides detailed instructions for assembly, transmitter setup, binding procedures, SAFE Select configuration, flight testing, and maintenance.
Table of contents
Manual images
Click an image to enlargeQuick Start Guide
The E-flite Commander mPd 1.4m is a sophisticated RC aircraft. Before your first flight, ensure the transmitter is properly programmed, the receiver is bound, and the control surfaces are tested. Always perform a range check and verify the Center of Gravity (CG) is at 85mm +/- 3mm from the leading edge of the wing at the fuselage.
Model Assembly
The aircraft requires final assembly of the landing gear, horizontal tail, wings, and propeller.
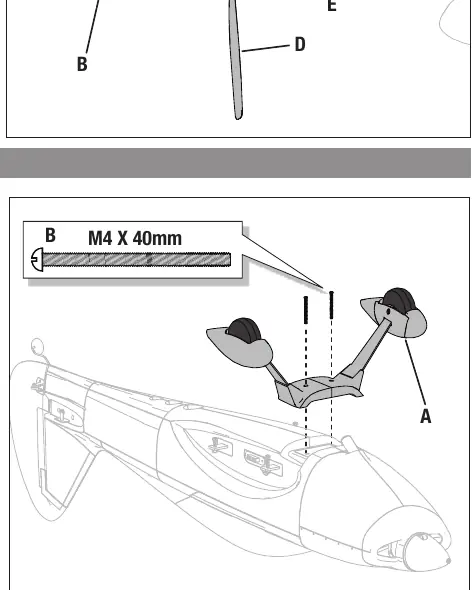
- Landing Gear: Install the assembly into the bottom fuselage pocket and secure with the two included M4 x 40mm screws.
- Horizontal Tail: Slide the joiner tube into the fuselage, attach the tail halves, and secure with the two 2.8 x 10mm self-tapping screws.
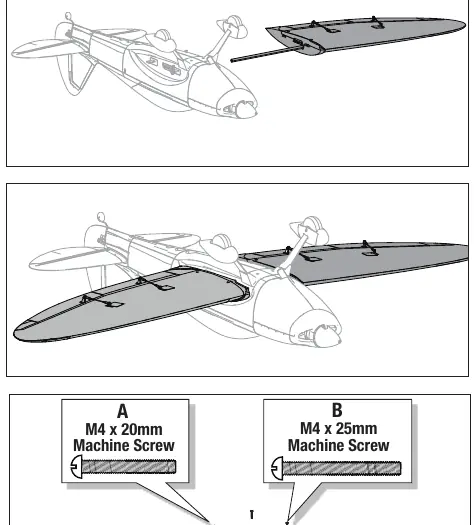
- Wing Installation: Insert the 10mm x 585mm joiner tube into one wing, slide into the fuselage, then attach the second wing. Secure with M4 x 20mm screws (rear) and M4 x 25mm screws (front).
- Propeller: Install the hub, backplate, and propeller onto the shaft. Tighten the spinner nut clockwise and secure the spinner with the M3 x 30mm screw.
Transmitter and Receiver Setup
The BNF Basic version includes a pre-programmed receiver. For PNP versions, ensure you use a 6-channel full-range receiver. Program your transmitter with a blank ACRO model, set dual rates to 100% (high) and 70% (low), and set throttle cut to -100%.
Binding and SAFE Select
Binding is required to link your transmitter. SAFE Select can be enabled or disabled during the binding process. If enabled, you can assign a switch to toggle between SAFE Select and AS3X modes. Always ensure the transmitter sticks and throttle trims are at neutral before binding.
Operation and Testing
Before flying, perform the following tests:
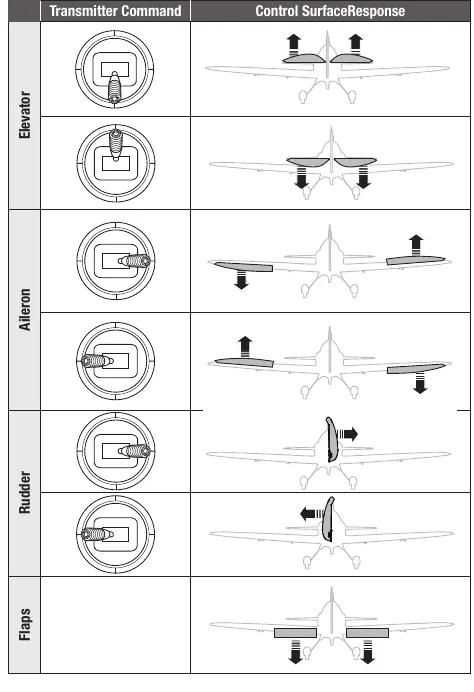
- Control Direction Test: Verify that moving the transmitter sticks results in the correct movement of the elevator, ailerons, rudder, and flaps.
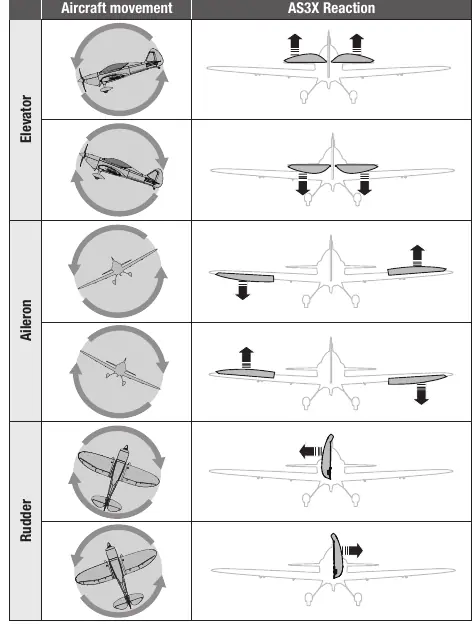
- AS3X Response Test: Raise the throttle above 25% to activate AS3X, then lower it. Move the aircraft and observe the control surfaces; they should move to counteract the movement.
Maintenance and Troubleshooting
Regular maintenance ensures flight safety.
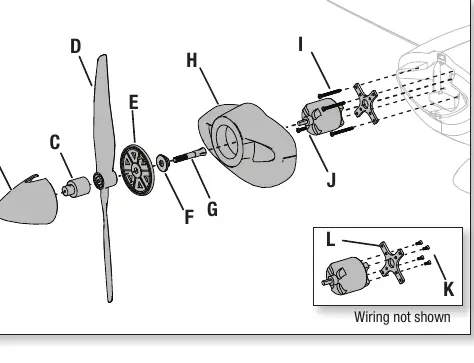
- Motor Service: Disconnect the battery before service. Remove the spinner, propeller, and cowl to access the motor. Secure the motor with the four M3 x 35mm screws.
- Troubleshooting: If the aircraft does not respond to throttle, check the throttle trim and servo travel settings. If experiencing oscillation, check for loose components or an imbalanced propeller.
Practical help
Common problems
Aircraft will not respond to throttle
Ensure throttle is at idle and trim is at the lowest setting. Verify throttle servo travel is set to 100% or greater.
Oscillation during flight
Check for a loose receiver, imbalanced propeller, or worn parts. Ensure all fasteners are tight.
Reduced flight time or underpowered
Ensure the battery is fully charged and warm. Check that the propeller is installed with the numbers facing forward.
Aircraft will not bind
Move the transmitter a few feet away from the aircraft. Ensure the bind plug is installed correctly or the bind button is held during the process.
Before use
- Ensure the transmitter is bound to the receiver.
- Verify control surfaces move in the correct direction.
- Check Center of Gravity (CG) at 85mm +/- 3mm.
- Ensure the battery is fully charged and secured.
- Perform the AS3X response test.
- Set throttle cut on the transmitter.
Images and diagrams
- Landing Gear Installation: Shows the pocket location and screw placement.
- Wing Installation: Details the joiner tube insertion and screw types (M4x20mm/M4x25mm).
- Control Direction Test: Visual guide for transmitter stick inputs versus expected surface response.
- AS3X Response Test: Shows how the aircraft should react when moved while the system is active.
Model compatibility
- BNF Basic includes a pre-programmed receiver; PNP requires a separate 6-channel receiver.
- Compatible with 3S or 4S LiPo batteries (requires different propellers: 13x8E for 3S, 12x6E for 4S).

Manual page author
Emily Carter
User documentation editor
Prepares concise manual descriptions and highlights the most useful setup, operation, and maintenance information for readers.