HVAC / Thermostats & Controls
Installation Manual for Copeland 1F88U42 Smart Thermostat
Professional installation guide for the Copeland 1F88U42 Smart Thermostat. Includes wiring diagrams, system configuration, testing procedures, and troubleshooting steps.
Quick answers from the manual
Quick answer
- This manual provides professional installation and configuration instructions for the Copeland 1F88U42 Smart Thermostat, including wiring diagrams, system testing, and troubleshooting. p. 1, 6, 7, 8
Key actions
- Install thermostat p. 6, 7, 8
- Configure system p. 9, 10
- Test system p. 12, 13
First start
- Download Sensi app, create account, hold logo for 5 seconds to enable Contractor Mode, and register thermostat. p. 11
Problems and fixes
No Heat/No Cool
Check fuse/breaker, furnace power switch, door panel, and wiring connections.
p. 17Maintenance and reset
- Turn the power to your system off, wait 5 seconds and turn it back on. p. 18
Technical specifications
| Parameter | Value | Meaning | Pages |
|---|---|---|---|
| Voltage | 20-30VAC | Required low voltage for operation | p. 4 |
Where to find it in the PDF
- Wiring Diagrams p. 7, 8
- Configuration p. 9, 10
- Troubleshooting p. 17, 18
Table of contents
Manual images
Click an image to enlargeQuick guide from the manual
This document is intended for professional installers to set up the Copeland 1F88U42 Smart Thermostat. It covers system compatibility, wiring, configuration, and testing procedures. Always disconnect power at the main circuit breaker before beginning installation.
Compatibility
The thermostat is compatible with:
- Mobile Devices: iOS, Android, Amazon Fire.
- Smart Home Platforms: Amazon Alexa, Google Assistant, Samsung SmartThings.
- HVAC Systems: Conventional heating/cooling (gas, electric, boiler), heat pumps.
- Routers: Single-band (2.4 GHz or 5.0 GHz) and dual-band routers.
Note: Not compatible with line voltage (requires 20-30VAC) or millivolt systems.
Installation and Wiring
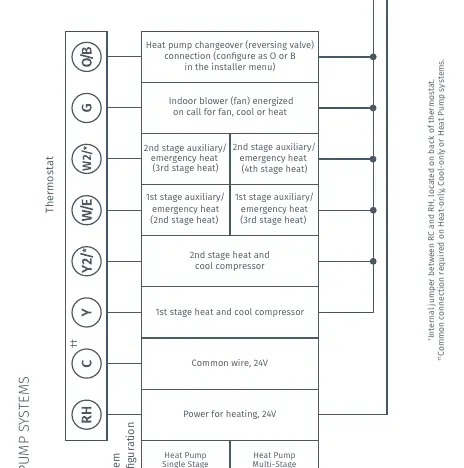
Install the thermostat by referring to the terminal definitions and specific wiring diagrams provided in the manual. Ensure the system is configured correctly based on whether it is a conventional or heat pump system.
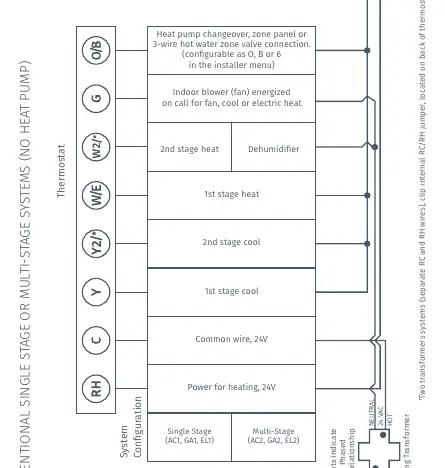
- RC/RH: Power for cooling/heating (24V).
- C: Common wire (24V).
- Y: 1st stage cool/heat.
- G: Indoor blower (fan).
- O/B: Heat pump changeover/reversing valve.
Configuration
Configure the thermostat to match your specific HVAC equipment:
- Navigate to Menu > Advanced Set Up > HVAC Equipment > Configure.
- Select Outdoor Equipment (AC1, AC2, HP1, HP2).
- Select Indoor Equipment (GA1, GA2, EL1, EL2, Fan).
- Set Reversing Valve Position (O/B/6) if applicable.
System Testing
After installation and configuration, test the system:
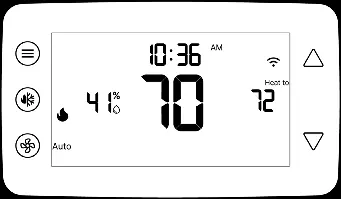
- Cooling: Select 'Cool' mode, adjust setpoint 1° below room temperature.
- Heating: Select 'Heat' mode, adjust setpoint 1° above room temperature.
- Auxiliary Heat: For heat pumps, adjust setpoint 3° above room temperature.
Troubleshooting
If you encounter issues such as 'No Heat/No Cool', check for blown fuses, tripped breakers, or loose wiring connections. If 'Call for Service' appears, verify system performance or reset the thermostat by turning power off for 5 seconds.
Manufacturer information
Copeland
Practical help
Common problems
No Heat/No Cool/No Fan
Check for blown fuse/tripped breaker, ensure furnace power switch is ON, check door panel, and verify wiring connections.
Display is Blank
Attach a common wire (c-wire) or ensure the display is turned on.
Call for Service appears on screen
Check if the system can heat/cool within 2 hours, or reset the thermostat. If '--' is displayed for room temperature, replace the thermostat.
Before use
- Verify HVAC system compatibility (Conventional or Heat Pump)
- Ensure system is low voltage (20-30VAC)
- Have a compatible iOS or Android device
- Have Wi-Fi network name (SSID) and password ready
Images and diagrams
- Wiring diagrams for conventional systems (page 7) and heat pump systems (page 8) detail terminal connections.
Model compatibility
- Not compatible with line voltage or millivolt systems.
- Requires standard HVAC wiring.

Manual page author
David Miller
Documentation analyst
Organizes user manual content into clear summaries, with attention to model details, product context, and everyday usability.