Toys / RC Components
Instruction Manual for Corally CT2R Radio Control System
Quick guide for the Corally CT2R 2.4GHz radio control system. Learn how to install batteries, bind the receiver, set up fail-safe, and adjust transmitter settings like trim and dual rate.
Quick answers from the manual
Quick answer
- The Corally CT2R is a 2.4GHz radio control system for RC cars and boats. This manual covers setup, binding, fail-safe configuration, and transmitter operation. p. 1, 2
Key actions
- Binding the receiver p. 8
- Setting Fail Safe p. 8
First start
- Install 4 AA batteries in the transmitter, then power on the receiver. p. 4, 8
Problems and fixes
Receiver not binding
Ensure pairing cable is in BIND channel and battery is connected to VCC.
p. 8Technical specifications
| Parameter | Value | Meaning | Pages |
|---|---|---|---|
| Transmitter Range | 400m | Maximum distance | p. 2 |
| Receiver Weight | 5g | p. 2 |
Where to find it in the PDF
- Transmitter Overview p. 3
- Binding Procedure p. 8
Table of contents
Manual images
Click an image to enlargeQuick guide from the manual
This manual provides instructions for the Corally CT2R 2.4GHz radio control system. Key procedures include installing batteries, binding the receiver to the transmitter, and configuring the fail-safe mode. Always ensure the transmitter antenna is not covered during operation to maintain range.
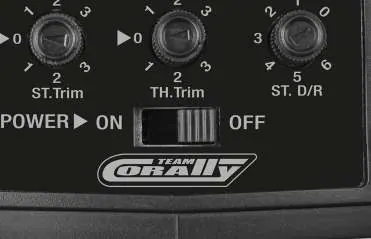
Transmitter Overview
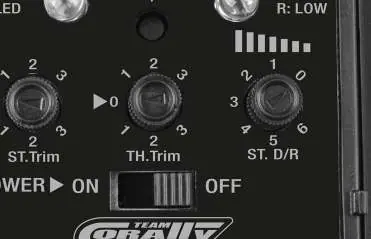
The transmitter features a steering wheel for direction control and a throttle trigger for speed and braking. The control panel includes:
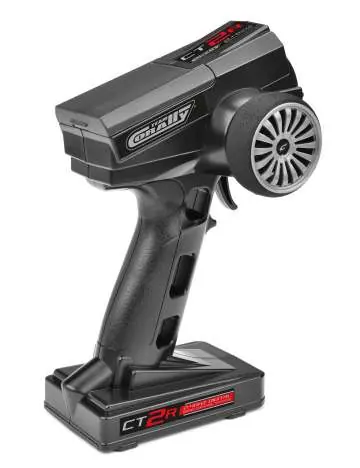
- Steering Trim: Adjusts steering to ensure the model runs straight.
- Throttle Trim: Adjusts the neutral position of the throttle.
- Steering Dual Rate (D/R): Adjusts steering sensitivity.
- Reverse Switches: Reverses the rotation direction of steering or throttle servos.
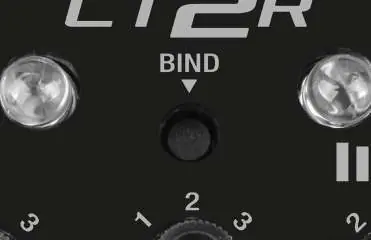
- Bind Button: Used to link the transmitter to the receiver.
Battery Installation / Replacement
The transmitter requires 4 AA batteries. To install:
- Remove the battery tray cover.
- Insert 4 AA batteries, observing the correct polarity markings.
- Replace the cover.
- Power on the transmitter and check the LED status. A solid green LED indicates the battery level is OK; a solid red LED indicates low voltage and the need for replacement.
Operating Your Model
Control the model using the transmitter:
- Forward: Gently pull the throttle trigger. Speed is proportional to the trigger pull.
- Neutral: Release the trigger to slow down.
- Brake/Reverse: Push the trigger forward to brake. To activate reverse, stop the model, release to neutral, and push the trigger forward again.
Receiver Connection
Install the receiver in your model using double-sided Velcro to protect it from vibrations. Mount the antenna up and away from the vehicle in an antenna tube for the best signal. Connect servos and ESC according to the diagram provided in the manual. Never cut the antenna.
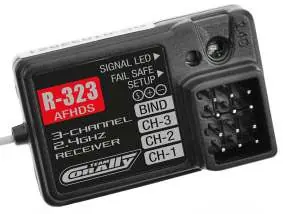
Binding / Linking the Receiver and Transmitter
The system is factory-paired, but if you need to re-bind:
- Install batteries in the transmitter (OFF).
- Connect the pairing cable to the BIND channel of the receiver.
- Connect the battery to the receiver (VCC port). The red LED will flash.
- Press and hold the BIND button on the transmitter and turn it ON (approx. 5 seconds).
- When the receiver LED stops flashing, the binding is successful.
- Release the BIND button and remove the pairing cable.
Fail Safe Setup
Fail-safe prevents loss of control if the signal is lost:
- Turn on the transmitter.
- Power up the receiver.
- Hold the throttle trigger in the desired position (Neutral for electric cars, Brake for nitro cars).
- Press the FAIL SAFE SETUP button on the receiver with a pin. The LED will flash for 3 seconds to store the setting.
Precautions
- Keep high-frequency noise sources (motors, batteries, wiring) at least 1/2 inch away from the receiver and antenna.
- Ensure all connectors are firmly seated.
- Do not disassemble the system.
- Protect the receiver from water and moisture.
Practical help
Common problems
Receiver not responding
Check binding procedure and ensure the battery is connected to the VCC port.
Model moves erratically
Check for interference, ensure the antenna is not covered, and verify servo linkage is not binding.
Low battery warning
Replace the 4 AA batteries in the transmitter.
Before use
- Ensure transmitter batteries are fresh (4x AA).
- Check that all connectors are firmly seated.
- Verify servo linkage moves freely without binding.
- Ensure receiver antenna is positioned correctly.
- Check that the transmitter antenna is not covered by your hand during operation.
Specs in practice
- Receiver Power
- Operating voltage range is 4.5–7.2 VDC.
Images and diagrams
- Transmitter controls: Steering wheel, throttle trigger, trim knobs, and reverse switches.
- Receiver ports: CH-1 (Steering), CH-2 (Throttle), CH-3, BIND, and VCC.
Model compatibility
- Compatible with RC cars and boats.
- Receiver requires 4.5–7.2 VDC power.

Manual page author
David Miller
Documentation analyst
Organizes user manual content into clear summaries, with attention to model details, product context, and everyday usability.