Lighting / Controllers & Dimmers
User Manual for EcoDim Eco-Dim.07 Zigbee Basic Smart Dimmer Switch
Quick guide for the EcoDim Eco-Dim.07 Zigbee Basic smart dimmer switch. Includes installation steps, wiring diagrams, MIN light level adjustment, and Zigbee pairing instructions.
Quick answers from the manual
Quick answer
- The EcoDim Eco-Dim.07 Zigbee Basic is a smart dimmer switch for 0-200W LED lamps. It supports Zigbee connectivity and can be controlled via voice assistants and home automation apps. p. 1, 14
Key actions
- Perform a factory reset by holding the reset button for 5 seconds. p. 7, 17
- Adjust the minimum light level using the MIN adjustment screw. p. 7, 17
First start
- Switch off power, connect wires, install in box, switch on power, and adjust MIN settings. p. 6, 16
Problems and fixes
Pairing mode not activating
Press the reset button twice to manually trigger pairing mode.
p. 7, 17Maintenance and reset
- Hold reset button for 5 seconds until indicator is solid red for 10 seconds. p. 7, 17
Technical specifications
| Parameter | Value | Meaning | Pages |
|---|---|---|---|
| Input voltage | 220-240 Vac, 50Hz | Standard mains power requirement. | p. 5, 15 |
| Load | 0-200W LED | Maximum power capacity for LED lamps. | p. 5, 15 |
Where to find it in the PDF
- Specifications p. 5, 15
- Installation p. 6, 16
- MIN Adjustment p. 7, 17
Table of contents
Manual images
Click an image to enlargeQuick guide from the manual
The EcoDim Eco-Dim.07 Zigbee Basic is a smart dimmer switch designed for 0-200W LED lamps. It supports Zigbee connectivity and is compatible with various home automation systems like Amazon Alexa, Google Assistant, and Philips Hue. This guide covers installation, configuration, and troubleshooting.

Specifications
- Input voltage: 220-240 Vac, 50Hz
- Load: 0-200W LED, 10-300W Halogen/Incandescent
- Dimmer type: R,C Phase cut
- Operating temperature: 35°C
- Operation: Push/turn button
Installation

- Safety first: Always ensure the electricity is switched off at the mains before starting installation.
- Preparation: Remove the existing dimmer knob and cover plate.
- Wiring: Connect the wires according to the connection diagram provided in the manual.
- Mounting: Install the dimmer into the mounting box using the screws.
- Power up: Switch the electricity back on.
- Finish: Replace the cover plate and dimmer knob.
MIN Adjustment
To ensure optimal dimming performance, you may need to adjust the minimum light level:
- Switch on the lights using the push/turn button.
- Insert a screwdriver into the MIN adjustment slot.
- Turn to the left until the light becomes unstable.
- Turn slightly back to the right until the light remains steady.
Zigbee Pairing
To connect the dimmer to your Zigbee network:
- Ensure the dimmer is powered on. It should automatically enter pairing mode.
- If not, press the reset button twice. The indicator will blink blue.
- Ensure your Zigbee controller is in pairing mode.
- The dimmer will appear in your app.
Advanced Settings
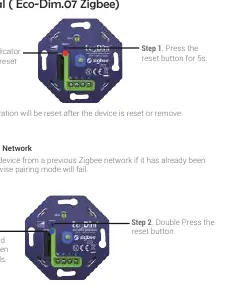
- Factory Reset: Press and hold the reset button for at least 5 seconds. The indicator will stay solid red for 10 seconds.
- TouchLink: Used to connect the dimmer directly to a remote without a hub. Requires pressing the reset button 4 times (indicator blinks green).
- Find and Bind: Used to link the dimmer and remote within the same Zigbee network. Requires pressing the reset button 5 times (indicator blinks yellow).
Manufacturer information
EcoDim B.V.
Practical help
Common problems
Pairing fails
Remove the device from any previous Zigbee network before attempting to pair again.
Light is unstable or flickering
Adjust the MIN setting using a screwdriver to find the stable minimum brightness level.
Before use
- Ensure the power supply is switched off at the mains.
- Verify that the load is within 0-200W for LED lamps.
- Ensure the installation is performed by a qualified specialist.
- Check that the mounting box is suitable.
Specs in practice
- Input voltage
- 220-240 Vac, 50Hz power requirement.
Images and diagrams
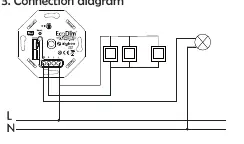
- The wiring diagram illustrates the connection of the dimmer to the Live (L) and Neutral (N) lines, showing the path to the light fixture.
Model compatibility
- Compatible with Amazon Alexa, Google Assistant, Philips Hue, Homey, Samsung SmartThings, Trust, and WINK.

Manual page author
Michael Turner
Technical manual editor
Reviews PDF manuals for structure, safety notes, and practical product details so readers can find the right information quickly.