Smart Home / Smart Switches
User Manual for Eco-Dim.07 Zigbee Basic Smart Dimmer
Quick guide for the Eco-Dim.07 Zigbee Basic smart dimmer. Learn how to install, wire, pair with Zigbee networks, adjust minimum brightness, and perform a factory reset.
Quick answers from the manual
Quick answer
- The Eco-Dim.07 Zigbee Basic is a smart dimmer switch compatible with Zigbee networks. It supports 2-wire installation (no neutral required) and is suitable for 0-200W LED loads. p. 1, 3
Key actions
- Factory Reset p. 6, 10, 11
First start
- Install the dimmer, turn on power, adjust the MIN brightness level, and pair with your Zigbee controller. p. 5, 6, 8
Problems and fixes
Pairing fails
Remove the device from the previous Zigbee network first.
p. 7, 11Maintenance and reset
- Press and hold the reset button for at least 5 seconds. p. 6, 10, 11
Technical specifications
| Parameter | Value | Meaning | Pages |
|---|---|---|---|
| Input voltage | 220-240 Vac, 50Hz | Operating voltage | p. 4, 9 |
| Load | 0-200W LED | Maximum LED load | p. 4, 9 |
Where to find it in the PDF
- Installation p. 5, 8
- Specifications p. 4, 9
Table of contents
Manual images
Click an image to enlargeImportant Information
The Eco-Dim.07 Zigbee Basic is a smart dimmer switch designed for 2-wire installation (no neutral wire required). Installation must be carried out by a qualified specialist in compliance with local regulations. Always ensure the electricity is switched off before starting any installation work.
Product Description
The device features a push/turn button for manual operation and is compatible with most home automation apps, including Google Assistant, Amazon Alexa, Philips Hue, Homey, Samsung SmartThings, Trust, and WINK. It supports soft start and silent dimming.

Technical Specifications
- Input voltage: 220-240 Vac, 50Hz
- Load: 0-200W LED, 10-300W Halogen/Incandescent
- Type: R,C Phase cut
- Dimensions: 70 x 70 x 26.2 mm
- Weight: 50.3g
- Operating temperature: 35 degrees Celsius
Installation
- Remove the dimmer knob and the cover frame.
- Ensure the power is switched off.
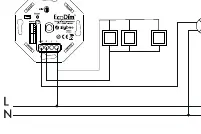
- Connect the power wires according to the wiring diagram.
- Install the dimmer into the wall box using screws.
- Switch the power back on.
- Turn on the connected lights by pressing the dimmer knob.
- Set the MIN brightness level as described below.
- Pair the dimmer with your smart home system if required.
- Replace the cover frame and dimmer knob.
MIN Brightness Adjustment
To ensure optimal performance, adjust the minimum light level:
- Switch on the lights using the push/turn button.
- Insert a screwdriver into the MIN adjustment slot.
- Turn to the left. When the light becomes unsteady, turn slightly back to the right until the light remains stable.
Pairing with Zigbee Network
- Ensure the device is removed from any previous Zigbee network.
- Switch on the dimmer (lights must be on).
- Double press the reset button on the dimmer. The LED indicator will blink blue.
- Ensure your controller is in pairing mode.
- The dimmer will be visible in your app once pairing is successful.
Factory Reset
To reset the device to factory settings:
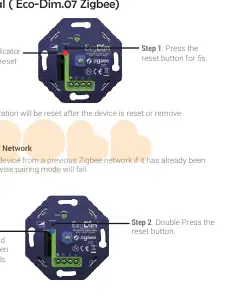
- Press and hold the reset button for at least 5 seconds.
- The indicator will stay solid red for 10 seconds when the reset is finished.
- Note: All configuration parameters will be reset.
Advanced Settings
- TouchLink: Press the reset button 4 times. The indicator will blink green. Bring the remote within 10cm of the dimmer.
- Find and Bind: Press the reset button 5 times. The indicator will blink yellow. Ensure both devices are on the same Zigbee network.
Practical help
Common problems
Light becomes unsteady during MIN adjustment.
Turn the MIN adjustment screw slightly to the right until the light remains stable.
Pairing fails.
Ensure the device is removed from any previous Zigbee network before attempting to pair again.
Before use
- Ensure power is switched off at the mains.
- Verify the load is within 0-200W for LED or 10-300W for halogen/incandescent.
- Ensure you have a compatible Zigbee controller.
- Check that the wall box has screw holes.
Specs in practice
- Input voltage
- 220-240 Vac, 50Hz
Images and diagrams
- The wiring diagram shows the connection of the dimmer to the live wire and the light source.
- The MIN adjustment screw is located on the front of the dimmer.
Model compatibility
- Compatible with Google Assistant, Amazon Alexa, Philips Hue, Homey, Samsung SmartThings, Trust, and WINK.
- Suitable for 90% of LED lamps.

Manual page author
Emily Carter
User documentation editor
Prepares concise manual descriptions and highlights the most useful setup, operation, and maintenance information for readers.