Industrial / Hydraulic Presses
Instruction Manual for Dake 10- & 20-Ton Floor/Bench Utility Press
Comprehensive user guide for Dake 10-Ton and 20-Ton hydraulic utility presses. Includes assembly instructions, safe operation procedures, maintenance tips, troubleshooting, and detailed parts lists.
Quick answers from the manual
Quick answer
- This manual provides assembly, operation, and maintenance instructions for Dake 10-Ton and 20-Ton hydraulic utility presses. It includes safety warnings, troubleshooting, and detailed parts lists. p. 1, 10, 12, 14
Key actions
- Assemble the press p. 10, 12
- Operate the press p. 14
- Add hydraulic fluid p. 15
First start
- Securely fasten the press to the floor or workbench. p. 8
- Read all safety instructions and wear eye protection. p. 8
Problems and fixes
Oil leaking around ram
Secure ram under 4-6 ton pressure for 1 hour.
p. 15
Ram is jerky or sluggish
Pump handle with valve open to release air.
p. 15Maintenance and reset
- Bleed the hydraulic system p. 15
Technical specifications
| Parameter | Value | Meaning | Pages |
|---|---|---|---|
| Max. Press Capacity | 10 Ton / 20 Ton | Maximum force capacity. | p. 7 |
| Ram Stroke | 6" / 8" | Maximum ram travel. | p. 7 |
Where to find it in the PDF
- Assembly Instructions (Bench) p. 10, 11
- Assembly Instructions (Floor) p. 12, 13
- Parts Lists p. 17, 19, 21
Table of contents
Manual images
Click an image to enlargeQuick Guide
This manual covers the assembly, operation, and maintenance of Dake 10-Ton and 20-Ton hydraulic utility presses. Before operating, ensure the press is securely fastened to the floor or workbench. Always wear eye protection and keep hands away from the point of operation. For support, contact Dake Corporation at 800.937.3253 or [email protected].
Safety Warnings
Users must read and understand all safety instructions before use. Key safety practices include:
- Keep hands out of the point of operation.
- Never hold the part while pressing.
- Always wear eye protection.
- Clamp the work piece or brace it when pressing.
- Never place fingers in pin holes.
- Always use the nose piece when pressing; never press using the end of the ram to avoid damage.
- Never use a press that is not fastened securely.
- Do not use the press if parts are damaged or missing.
The employer is responsible for performing a hazard/PPE assessment and ensuring point-of-operation safeguarding as per ANSI B11.2 standards.
Assembly Instructions
Assembly varies by model (10-Ton Bench, 10-Ton Floor, 20-Ton Floor). General steps include:
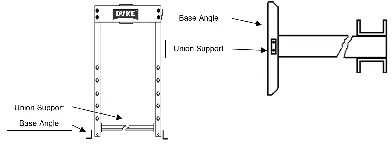
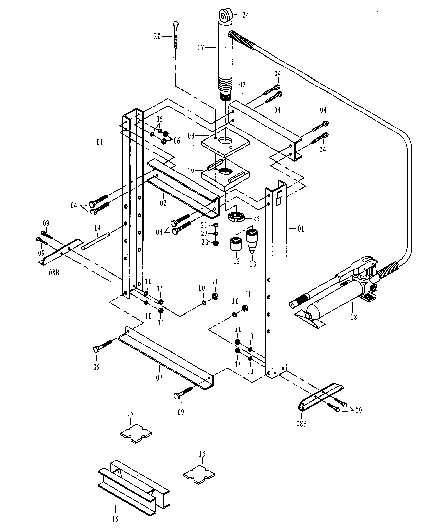

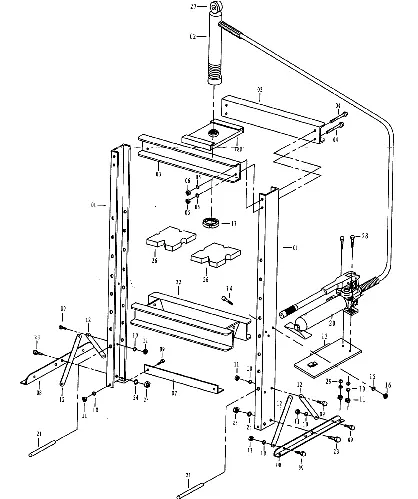
- Union Support: Install the union support to the upright channels and base angles using the provided bolts and nuts.
- Head Ram Traverse Plates: Mount the plates with the two bars facing inside the frame and the threaded plate on the bottom. Tighten bolts only enough to allow the plate to travel.
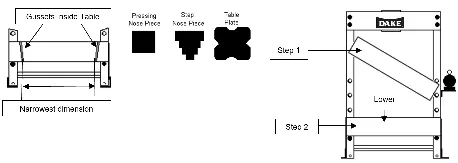
- Worktable: Insert table pins in the lowest holes. Tilt the worktable at a sharp angle to insert it into the uprights. Ensure the narrowest dimension of the table gussets faces down.
- Pump Installation: Secure the pumping unit to the mounting bracket.
- Cylinder: Screw the cylinder into the head traverse plate, ensuring the hydraulic hose fitting faces the pump side.
Operation
Procedure:
- Use the supplied nose pieces (flat for flattening, step style for bearings/bushings).
- Always use table plates as a backing plate.
- Close the pumping unit release valve (clockwise) to build pressure.
- Pump the handle to lower the ram.
- Turn the valve counterclockwise to release pressure and raise the ram.
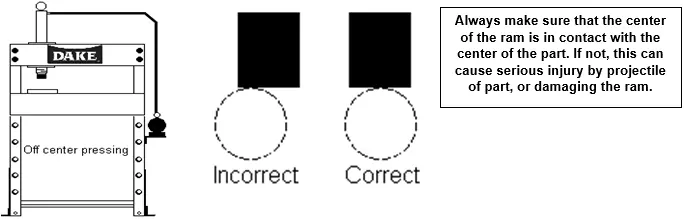
- Off-center pressing: Loosen the head ram traverse plate bolts, slide the head to the required area, and proceed. Return to center and snug bolts after use.
Note: Never pump the ram down fully and dead head it in the cylinder. Only build pressure when a part is being pressed.
Maintenance and Troubleshooting
Adding Fluid: Retract the ram, place the pump on a level surface, remove the filler plug, lift the plug end of the pump 3/8 to 3/4 inch, fill, replace the plug, and bleed the system.
Troubleshooting:
- Oil leaking around ram: Secure the ram under 4-6 tons of pressure for 1 hour to stretch the seal.
- Ram jerky/sluggish: Pump the handle with the valve open to release air.
- Pump will not build pressure: Check that the release valve is closed and check oil levels.
- Gauge leaking: Apply Teflon tape following the flow of the threads.
Manufacturer information
DAKE Corporation
Practical help
Common problems
Oil leaking around the ram
Secure the ram under 4-6 tons of pressure for 1 hour to stretch the main seal.
Ram is jerky or sluggish
With the valve open, repeatedly pump the handle to release air from the lines.
Pump will not build pressure
Ensure the release valve is fully closed and check the oil fluid level.
Pressure gauge is leaking
Apply Teflon tape following the direction of the threads on the gauge.
Before use
- Read and understand all safety instructions.
- Ensure the press is securely fastened to the floor or workbench.
- Wear eye protection.
- Check for damaged or missing parts (hoses, structural components).
- Ensure the work piece is clamped or braced.
Specs in practice
- Max. Press Capacity
- The maximum force the press can exert (10 or 20 tons).
- Ram Travel Per Stroke
- The distance the ram moves with each pump handle stroke.
Images and diagrams
- Assembly diagrams illustrate the correct orientation of upright channels, base angles, and traverse plates.
- Parts lists provide reference numbers for identifying and ordering replacement components.
Model compatibility
- Only use supplied table pins.
- Do not weld or pin the table.
- Do not use a longer handle or pipe to increase leverage.

Manual page author
Michael Turner
Technical manual editor
Reviews PDF manuals for structure, safety notes, and practical product details so readers can find the right information quickly.