Computers / Laptops
Quick Start Guide for Dell Inspiron 16 7635 2-in-1 Laptop
Quick start guide for the Dell Inspiron 16 7635 2-in-1 laptop. Includes setup instructions, port identification, safety information, and technical specifications.
Quick answers from the manual
Quick answer
- To set up your Dell Inspiron 16 7635 2-in-1, connect the power adapter to the computer and power it on. Ensure all filler brackets are installed in empty slots to maintain FCC certification. p. 9, 10
Key actions
- Connect power adapter p. 9
- Power on the computer p. 10
First start
- Connect the power adapter and press the power button. p. 9, 10
Maintenance and reset
- Do not remove the computer cover unless installing internal accessories. Keep filler brackets installed in empty slots. p. 6, 7
Technical specifications
| Parameter | Value | Meaning | Pages |
|---|---|---|---|
| Input Voltage | 100-240V AC | Standard AC input | p. 8 |
| Output Voltage | 20V DC | DC output to laptop | p. 8 |
Where to find it in the PDF
- Quick Start p. 1
- Ports and Icons p. 12, 13, 14, 15
- Technical Specifications p. 8
Table of contents
Manual images
Click an image to enlargeQuick Start Guide
This guide provides essential information for setting up and maintaining your Dell Inspiron 16 7635 2-in-1 laptop. For detailed instructions on removing or replacing parts, please refer to the Owner's or Service Manual available at Dell.com/support.
Setup and Power
Follow these steps to prepare your computer for use:
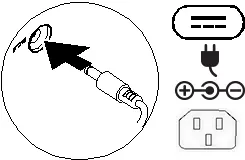
- Connect Power: Connect the power adapter or power cable to your computer and to the display, if required.
- Power On: Press the power button to turn on the computer (and the display, if connected).
Safety and Maintenance
To ensure the longevity and proper operation of your device, observe the following guidelines:
- Safety Information: Read the safety information shipped with your computer. Additional best practices can be found at Dell.com/regulatory_compliance.
- Computer Cover: Do not remove the computer cover unless you need to install internal accessories.
- Filler Brackets: Retain and install filler brackets or cards over empty card-slot openings. This is necessary to maintain FCC certification, keep dust and dirt out, and maintain proper airflow for cooling.
Ports and Icons
Your laptop features various ports and connectors. Depending on your specific configuration, some ports may not be available. Key icons include:

- USB Ports: Includes USB 2.0, USB 3.0/3.1 Gen 1, and USB 3.1 Type-C.
- PowerShare: USB ports with the lightning bolt icon support PowerShare.
- Thunderbolt: Thunderbolt 3 ports with Power Delivery (USB-C) are marked with a lightning bolt icon.
- Video/Audio: HDMI, DisplayPort, and Headphone/Audio-out jacks are available.
- Indicators: Icons for Power/Battery status, Hard-drive activity, Wi-Fi, and Bluetooth are provided to help you monitor system status.
Technical Specifications
The following specifications apply to the power adapter:
- Input Voltage: 100-240V AC
- Input Frequency: 50-60Hz
- Input Current: 1.7A (maximum)
- Output Voltage: 20V DC
- Output Current: 3.25A
- Maximum Operating Temperature: 35°C
Official resources from the manual
Manufacturer information
Dell Inc.
Practical help
Common problems
Ports or connectors are missing
Some ports or connectors may not be available depending on your specific computer configuration.
Need to open the computer case
Do not remove the computer cover unless you need to install internal accessories. Refer to the Owner's or Service Manual for instructions.
Before use
- Connect the power adapter to the computer.
- Power on the computer.
- Ensure all filler brackets are installed in empty slots to maintain FCC certification.
Specs in practice
- Input Voltage
- 100-240V AC, 50-60Hz
- Max Operating Temp
- 35°C
Images and diagrams
- The laptop features various ports including USB 3.2 Gen 1, USB-C 3.2 Gen 2 (Power Delivery + DisplayPort), HDMI, and audio jacks.
- The power button is located on the keyboard area.
Model compatibility
- Some ports or connectors may not be available depending on your computer configuration.

Manual page author
Michael Turner
Technical manual editor
Reviews PDF manuals for structure, safety notes, and practical product details so readers can find the right information quickly.