Computers / Laptops
Maintenance and Service Guide for HP OmniBook X Flip 14-inch 2-in-1 Laptop
Comprehensive maintenance and service guide for the HP OmniBook X Flip 14-inch 2-in-1 Laptop. Includes detailed disassembly, component replacement, specifications, and troubleshooting procedures.
Quick answers from the manual
Quick answer
- This guide provides comprehensive instructions for maintaining and servicing the HP OmniBook X Flip 14-inch 2-in-1 Laptop, including component removal, replacement, and system diagnostics. p. 1
Key actions
- Accessing BIOS/Setup Utility p. 76
- Removing the bottom cover p. 30
- Replacing the battery p. 33, 35
Problems and fixes
Battery swelling
Stop using the notebook until the battery can be replaced.
p. 94Maintenance and reset
- Resetting the PC p. 80
Technical specifications
| Parameter | Value | Meaning | Pages |
|---|---|---|---|
| Display | 14.0 in, 2.8K (2880 x 1800) OLED or WUXGA (1920 x 1200) LED | Screen resolution and type | p. 8 |
| Memory | 16 GB, 24 GB, or 32 GB LPDDR5x-7500 | On-board system memory | p. 9 |
Where to find it in the PDF
- Product Description p. 1, 8
- Removal and Replacement p. 30, 40
- Specifications p. 88
Table of contents
Manual images
Click an image to enlargeQuick guide from the manual
This document provides essential maintenance and service information for the HP OmniBook X Flip 14-inch 2-in-1 Laptop. It covers component identification, disassembly, and replacement procedures for both Customer Self-Repair (CSR) parts and authorized service provider parts. Users should follow all safety guidelines, including electrostatic discharge (ESD) precautions, before attempting any repairs.
Product description
The HP OmniBook X Flip 14-inch 2-in-1 Laptop features a 14.0-inch display (available in 2.8K OLED or WUXGA LED), AMD Ryzen AI processors, and on-board LPDDR5x-7500 memory. It includes various ports such as USB 4 Gen 4 Type-C, USB 3.2 Gen 2 Type-C, and HDMI 2.1.
Removal and replacement procedures
Before starting any disassembly, ensure the computer is turned off, the power cord is disconnected, and all external devices are removed. Always use a nonconductive, nonmarking pry tool and a magnetic Phillips P1 screwdriver.
Bottom cover
To remove the bottom cover, position the computer upside down, loosen the captive screw, and remove the remaining screws. Use a tool to release the cover from the seams.
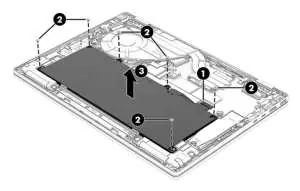
Battery
The battery removal procedure depends on whether you are replacing the existing battery or installing a new one. A revive kit is required for new battery installation. Always disconnect the battery cable from the system board before proceeding.
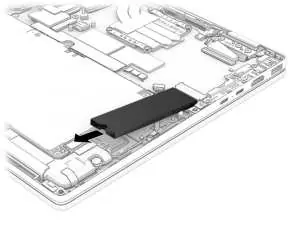
Solid-state drive (SSD)
To remove the SSD, remove the screws securing the SSD cover, lift the cover, and pull the SSD out of the socket. Ensure a thermal pad is installed on the bottom of the SSD cover during reassembly.
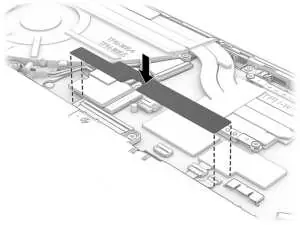
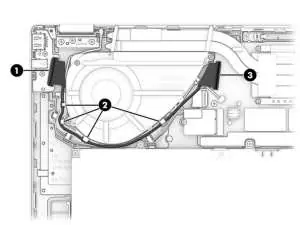
Fan
Remove the cables from the clips around the fan, disconnect the fan cable from the system board, and remove the screws to lift the fan out.
Using Setup Utility (BIOS)
To access the Setup Utility, turn on or restart the computer and quickly press f10. Use extreme care when making changes in the BIOS, as errors can prevent the computer from operating properly.
Diagnostics
The computer includes HP PC Hardware Diagnostics tools (Windows and UEFI) to help determine if hardware is functioning properly. These tools can be accessed via the HP Support Assistant or by pressing specific keys during startup.
Battery care
If you notice battery swelling, stop using the notebook immediately and contact HP for replacement options. Swollen batteries are not a safety issue but result from gas generation during normal cell degradation.
Manufacturer information
HP Inc.
Practical help
Common problems
Computer overheating
Ensure the computer is on a hard, flat surface and air vents are not obstructed.
Battery swelling
Stop using the notebook immediately and contact HP for replacement options.
System recovery failure
Follow instructions in the System Recovery Service Advisory after replacing the system board.
Before use
- Ensure workspace is clear of flammable materials.
- Use a nonconductive, nonmarking pry tool.
- Use a magnetic Phillips P1 screwdriver.
- Discharge static electricity before handling internal components.
- Shut down the computer completely before disassembly.
Images and diagrams
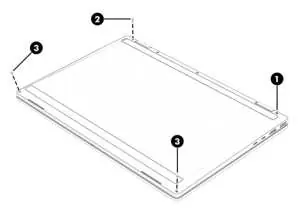
- Exploded views of major components.
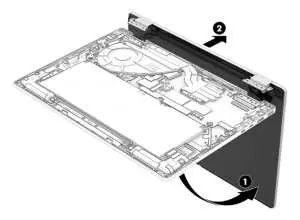
- Step-by-step disassembly for bottom cover, battery, SSD, and display assembly.
- Cable routing diagrams for fan and display assembly.
Model compatibility
- Only use authorized wireless modules.
- Battery replacement requires a revive kit.
- Some features (like S Mode) have specific software limitations.

Manual page author
David Miller
Documentation analyst
Organizes user manual content into clear summaries, with attention to model details, product context, and everyday usability.