Industrial / Door Hardware
Installation Manual for Detex 105600-X Value Series Trim
Quick installation guide for the Detex 105600-X Value Series Trim. Includes step-by-step door preparation, drilling requirements, and trim mounting instructions.
Table of contents
Manual images
Click an image to enlargeQuick guide from the manual
This document provides installation instructions for the Detex 105600-X Value Series Trim. The process involves preparing the door by drilling specific holes and securing the trim assembly using the provided hardware. Please note that the Rim device is shown for reference only; refer to the specific device instructions for further details.
Tools Required
- Power Drill
- Pencil
- Safety Glasses
- Center Punch
- Hammer
- Tape Measure
- Screw Driver
Door Preparation
Proper door preparation is essential for a secure installation. Follow these steps for both the interior and exterior door faces:
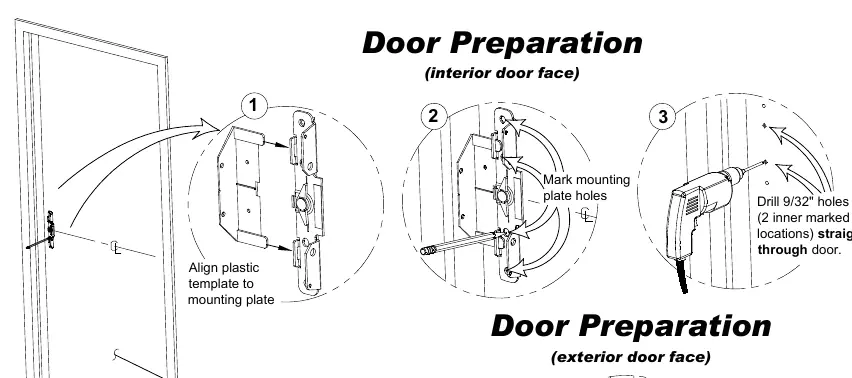
Interior Door Face
- Align the plastic template to the mounting plate.
- Mark the mounting plate holes on the door.
- Drill 9/32 inch holes through the door at the two inner marked locations. Ensure the drill is held straight.
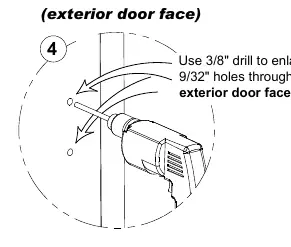
Exterior Door Face
- Use a 3/8 inch drill bit to enlarge the previously drilled 9/32 inch holes. Note: Only enlarge the holes on the exterior door face.
Installing the Trim
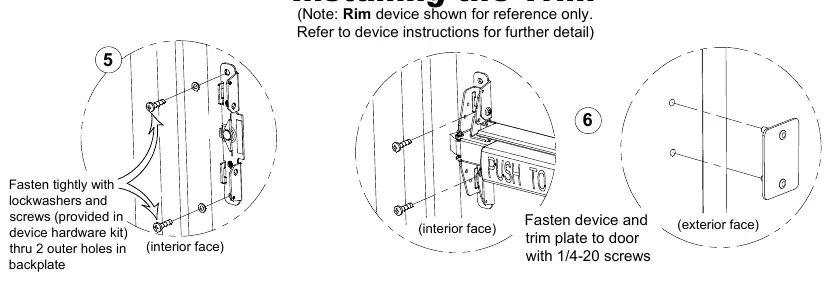
- Fasten the backplate tightly using the lockwashers and screws provided in the device hardware kit. Secure these through the two outer holes in the backplate.
- Fasten the device and trim plate to the door using the 1/4-20 screws.
Contact Information
Detex Corporation, 302 Detex Drive, New Braunfels, Texas 78130-3045. Phone: (830)629-2900 or 1-800-729-3839. Fax: (830)620-6711. E-mail: [email protected]. Internet: www.detex.com.
Official resources from the manual
Manufacturer information
Detex Corporation
Practical help
Common problems
Incorrect hole size
Ensure 9/32 inch holes are drilled first, then enlarge only the exterior holes to 3/8 inch.
Loose trim assembly
Ensure the backplate is fastened tightly with the provided lockwashers and screws before attaching the trim plate.
Before use
- Gather all required tools: Power drill, pencil, safety glasses, center punch, hammer, tape measure, and screw driver.
- Verify you have the correct trim assembly (01P/01PN).
- Ensure the door is clear of obstructions.
- Check that you have the device hardware kit containing the necessary screws and lockwashers.
Specs in practice
- 9/32 inch hole
- Standard hole size required for mounting plate screws on the interior face.
- 3/8 inch hole
- Enlarged hole size required specifically for the exterior door face.
- 1/4-20 x 1 inch PPH Screw
- The specific screw type used to fasten the trim plate.
Images and diagrams
- The installation process is divided into door preparation (marking and drilling) and trim installation (fastening the backplate and trim plate).
- The template alignment is critical for ensuring the holes are drilled in the correct locations.
Model compatibility
- Designed for 01P / 01PN Value Series Trim.
- Rim device shown in diagrams is for reference only; refer to the specific device's manual for its installation.

Manual page author
Michael Turner
Technical manual editor
Reviews PDF manuals for structure, safety notes, and practical product details so readers can find the right information quickly.