Music / Guitar Effects
DigiTech The Weapon Guitar Effects Pedal Owner's Manual
Quick guide for the DigiTech The Weapon guitar effects pedal. Learn how to connect, adjust tone settings, replace the battery, and understand the seven signature Dan Donegan effects.
Table of contents
Manual images
Click an image to enlargeQuick guide from the manual
The DigiTech The Weapon is an artist series effects pedal designed in collaboration with Dan Donegan of Disturbed. It features seven signature tones, including distortion, phaser, wah, and sitar simulation. This manual provides instructions for setup, connection, and operation.
Included items
- DigiTech Artist Series Dan Donegan Pedal - The Weapon
- Artist Series Pedal Gig Bag
- PS200R Power Supply
- Artist Series Dan Donegan Guitar Pick
- Owner's Manual
Controls and connections
The pedal features several controls and inputs/outputs:
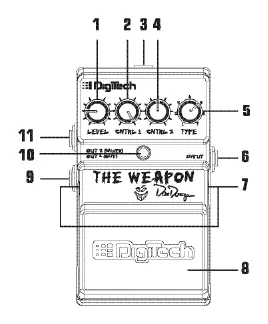
- Level Knob: Adjusts the output level of the effect.
- Cntrl 1 & Cntrl 2 Knobs: These knobs control different functions depending on the selected Type.
- Type Knob: Selects one of the seven signature tones.
- Input Jack: Connect your instrument here. Connecting a cable supplies battery power.
- Out 1 (Amp) Jack: Connect to your guitar amplifier.
- Out 2 (Mixer) Jack: Designed for direct connection to a mixer or recording device.
- Indicator LED: Shows when the effect is active. If dim or off, replace the battery.
Knob function descriptions
The Type knob selects the following signature tones:
- Stupify Rhythm Guitar: High gain distortion.
- Mistress Rhythm Guitar: Moderate distortion.
- Voices Intro: Phaser ramping to full distortion.
- Bound Intro: Wah with distortion.
- Rise and Intoxication: Octave pitch shift effect.
- Stupify Bridge: Sitar simulator.
- Mistress Radio-Style Guitar Break: Distortion tone.
For most types, setting Cntrl 1 and Cntrl 2 to the twelve o'clock position is the recommended starting point.
Setup directions
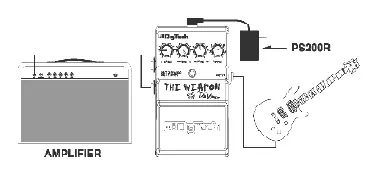
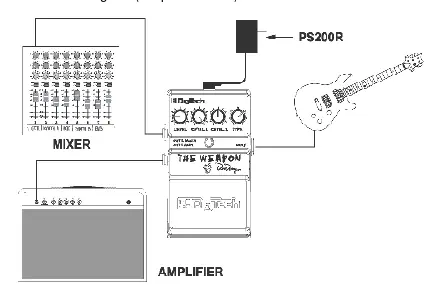

- Turn down the volume on your amplifier or mixer.
- Connect the pedal output (Amp or Mixer) to your amplifier or mixer input.
- Connect your guitar to the pedal Input jack.
- Connect the PS200R power supply to the pedal.
- Set the Level control to the minimum position.
- Turn on your amplifier or mixer to the desired volume.
- Press the pedal switch to activate the effect and gradually increase the Level control.
Battery replacement
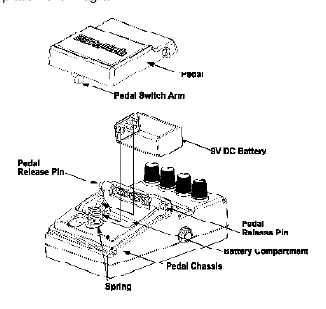
- Use the tip of a 1/4 inch guitar cable to push in the release pins on either side of the pedal.
- Remove the pedal from the chassis.
- Disconnect the old battery and connect a new 9V alkaline battery.
- Ensure the battery cable does not interfere with the spring or switch arm.
- Place the pedal back over the pins and push the pins in to lock it into place.
Specifications
- Input Impedance: 1 MOhms
- Output Impedance: 100 Ohms
- Power Supply: 9V Alkaline Dry Battery or PS200R power supply
- Battery Life: Approximately 4 hours with continuous usage
- Dimensions: 4 15/16 inches (L) x 3 1/8 inches (W) x 2 1/8 inches (H)
- Weight: 2 lbs
Practical help
Common problems
Indicator LED is dim or does not light
The battery needs to be replaced.
No sound output
Check all cable connections and ensure the power supply is properly connected.
Before use
- Ensure you are using the included PS200R power supply.
- Turn down the volume on your amplifier or mixer before connecting.
- Connect your guitar to the Input jack.
- Connect the pedal output to your amplifier or mixer.
- Set the Level control to minimum before turning on the amplifier.
Specs in practice
- Input Impedance
- 1 MOhms, standard for guitar instruments.
- Output Impedance
- 100 Ohms, suitable for standard amplifier or mixer inputs.
- Battery Life
- Approximately 4 hours of continuous use.
Images and diagrams
- Page 6: Diagram showing the layout of knobs, jacks, and pedal switch.
- Page 15: Connection diagram for using the pedal with an amplifier.
- Page 16: Connection diagram for using the pedal with both an amplifier and a mixer.
- Page 19: Diagram illustrating the battery replacement procedure.
Model compatibility
- Requires a Class II power adapter (PS200R) conforming to EN60065 or equivalent.
- Out 2 (Mixer) is specifically designed for full-range audio systems.

Manual page author
Emily Carter
User documentation editor
Prepares concise manual descriptions and highlights the most useful setup, operation, and maintenance information for readers.