Music / Instruments
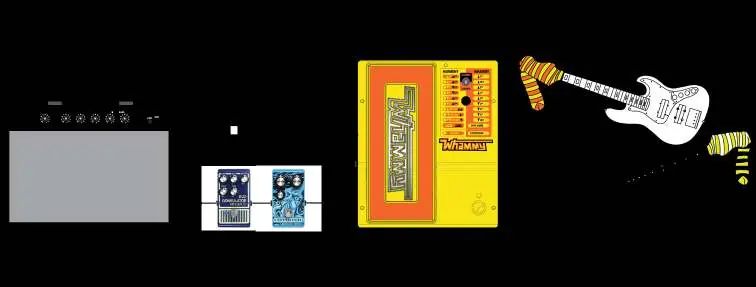
User Manual for DigiTech MonoNeon Signature Whammy Pedal
Quick start guide for the DigiTech MonoNeon Signature Whammy Pedal. Learn about connections, effect settings, MIDI configuration, and expression pedal calibration.
Table of contents
Manual images
Jump to the sectionQuick guide from the manual
To get started with your DigiTech MonoNeon Signature Whammy pedal, follow these steps:
- Connect your instrument to the Input Jack.
- Connect the Output Jack to your amplifier or other pedals.
- Connect the included power supply to the Power Input and an AC outlet.
- Turn on your amplifier and adjust the volume.
- Use the Effect On/Off Footswitch to enable the effect.
- Push the Expression Pedal fully forward (toe down) and rotate the Selector Knob to choose your desired effect.
Device controls
The pedal features several controls for sound manipulation:

- Expression Pedal: Controls the amount of pitch bending. Rocking it forward (toe down) increases the effect, while rocking it backward (toe up) decreases it.
- Classic/Chords Switch: Toggles between the classic Whammy algorithm (ideal for single notes) and the modern Chords algorithm (best for full chords).
- Selector Knob: Used to select between Whammy, Octaver, Harmony, or Detune effects.
- Effect On/Off Footswitch: Enables or bypasses the effect.
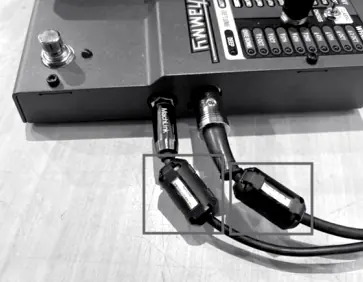
Connections
The pedal includes an Instrument Input, MIDI Input for remote control, Power Input, and an Output Jack. If using an external MIDI device, connect the MIDI out of your device to the MIDI Input on the Whammy.
Effect types
The pedal offers several effect categories:
- Whammy: Bends the pitch of your signal up or down based on the selected interval (e.g., 2 octaves up, dive bomb).
- Detune: Mixes your original signal with a detuned copy to create a thick, layered effect.
- Hypersonic: Bends the signal up to 3 full octaves.
- Harmony: Adds a pitch-shifted harmony to your signal, allowing you to bend between two intervals while keeping the input signal unchanged.
- Octaver: Adds an octave-shifted signal to your input, allowing you to morph between two different octave tones.
MIDI configuration
The Whammy can receive MIDI messages to select effects, bypass the unit, or control the expression pedal position via MIDI CC11. To change the MIDI channel:
- Disconnect the power.
- Press and hold the Effect On/Off Footswitch while reconnecting the power.
- Rotate the Selector Knob to choose the desired MIDI channel.
- Press the Effect On/Off Footswitch again to exit.
Expression pedal calibration
If the pedal does not respond properly or fails to return to the correct pitch, perform a re-calibration:

- Disconnect the power.
- Press and hold the Effect On/Off Footswitch while reconnecting the power.
- Release the footswitch once an LED begins to flash.
- Rock the Expression Pedal fully forward (toe down) and fully back (toe up) at least two times.
- Press the Effect On/Off Footswitch again to exit and return to normal operation.
Specifications and safety
For optimal performance, use only the included PS0913DC-04 power supply. To minimize electronic interference, clamp the two included ferrite cores around the INPUT and MIDI cables near the plug connectors. The unit features a 24-bit A/D and D/A conversion with a frequency response of 20 Hz to 20 kHz.
Practical help
Common problems
Expression pedal does not respond properly or pitch does not return to correct note
Perform the re-calibration procedure by holding the footswitch while powering on and rocking the pedal fully forward and back.
Electronic interference
Ensure the two included ferrite cores are clamped around the INPUT and MIDI cables near the plug connectors.
Unit not powering on or operating incorrectly
Ensure you are using the included PS0913DC-04 power supply. Do not use other power supplies.
Before use
- Connect instrument to Input Jack
- Connect Output Jack to amplifier or other pedals
- Connect included power supply to Power Input
- Ensure ferrite cores are attached to cables if interference is present
Specs in practice
- Input Impedance
- 1 MΩ (suitable for standard guitar/bass pickups)
- Power Requirements
- 9V DC, 2.4W (265 mA @ 9VDC)
- Frequency Response
- 20 Hz to 20 kHz
- Signal to Noise Ratio
- >105 dB (A-weighted)
Images and diagrams
- Controls: Expression pedal, Classic/Chords switch, Selector knob, and various effect LEDs.
- Inputs/Outputs: Instrument Input, MIDI Input, Power Input, and Output Jack.
- Calibration: Visual indicator using Harmony LEDs to show calibration progress.
Model compatibility
- Use only the included PS0913DC-04 power supply.
- MIDI Input supports external MIDI control devices.
- Compatible with guitar, bass, or other instruments via 1/4" TS phone jack.

Manual page author
Emily Carter
User documentation editor
Prepares concise manual descriptions and highlights the most useful setup, operation, and maintenance information for readers.