Music / Guitar Effects
DigiTech HardWire SP-7 Stereo Phaser Owner's Manual
Quick guide for the DigiTech HardWire SP-7 Stereo Phaser. Learn about setup, phaser types, tap tempo, battery replacement, and pedal controls.
Table of contents
Manual images
Click an image to enlargeQuick guide from the manual
The DigiTech HardWire SP-7 Stereo Phaser is a high-performance guitar effects pedal. This manual provides instructions for setup, operation, and maintenance. Key features include true bypass, high voltage operation, and a tap tempo function.
Setup
The pedal can be connected in two primary ways:
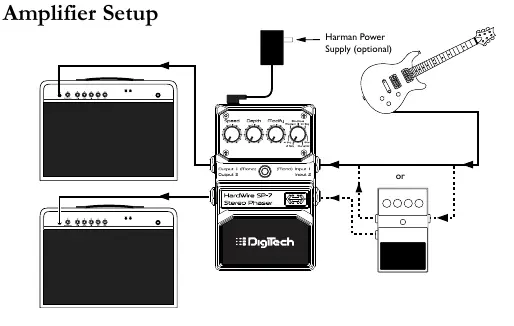
- Amplifier Setup: Connect your guitar to the pedal input and the pedal output to your amplifier input.
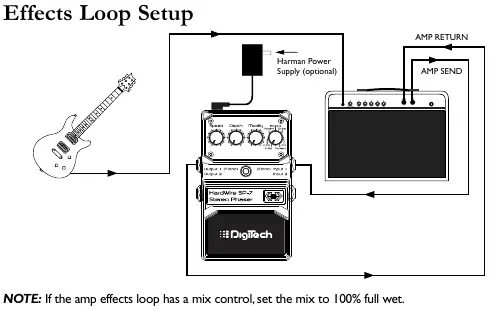
- Effects Loop Setup: Connect your guitar to the pedal input, and the pedal output to the amp effects return. If your amp has a mix control, set it to 100% full wet.
Pedal Interface and Controls
The pedal features several controls to shape your sound:
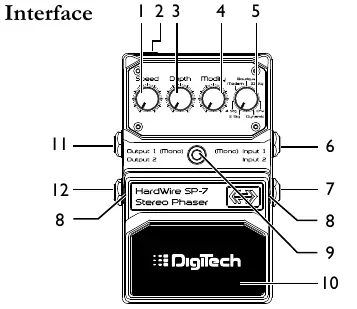
- Speed Knob: Controls the LFO speed of the phaser effect.
- Depth Knob: Controls the intensity of the phaser effect.
- Modify Knob: Controls various settings depending on the selected phaser type.
- Type Knob: Selects one of the 7 available phaser types.
- Input/Output Jacks: Use Input 1 (Mono) for single input. Use Input 2 for stereo operation.
- Foot Switch: Turns the effect on/off and accesses the Tap Tempo function.
Phaser Types
The SP-7 offers 7 distinct phaser types:
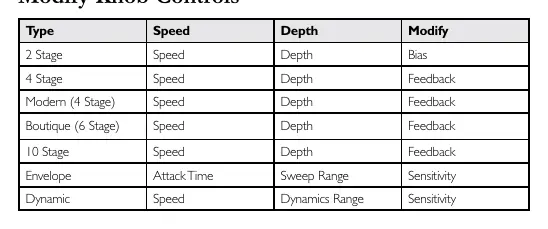
- 2 Stage: Subtle phase effect with adjustable bias.
- 4 Stage: Classic 4-stage vintage phaser.
- Modern: Deep phaser with enhanced feedback and modulation.
- Boutique: Unique 6-stage phaser with deep feedback control.
- 10 Stage: Modern multi-stage phaser with flexible feedback/depth controls.
- Envelope: Triggered phaser where the LFO start point is retriggered by playing dynamics.
- Dynamic: Phaser where the depth is controlled by playing dynamics.
Tap Tempo
To use the Tap Tempo function during a live performance:
- Press and hold the Foot Switch for 3 seconds until the Indicator LED flashes blue.
- Tap the Foot Switch at least two times to set the desired modulation speed.
- The function will time out after 4 seconds. To exit, press and hold the Foot Switch for 3 seconds until the LED stops flashing.
Performance Accessories
The pedal includes several accessories for pedalboard integration:
- Hook-and-loop Pedalboard Pad: For attaching the pedal to a pedalboard.
- Foot Switch Glow Sticker: Increases visibility on dark stages.
- StompLock: Keeps your knob settings in place.
Battery Operation
To replace the 9V battery:
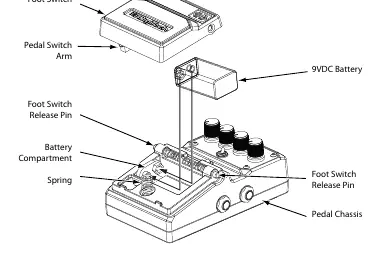
- Use the tip of a 1/4 inch guitar cable to push in the release pins on either side of the Foot Switch.
- Remove the Foot Switch to expose the battery compartment.
- Disconnect the old battery and connect a new 9V alkaline battery.
- Reattach the Foot Switch by aligning it with the pins and pressing it into place.
Practical help
Common problems
Indicator LED is blinking
Battery power is low (approximately 15 minutes of life remaining). Replace the battery.
Pedal will not switch from Bypass to Effect
The battery may be depleted. Replace with a new 9V alkaline battery or use a power adapter.
No sound output
Ensure cables are connected correctly. If using a single input, ensure it is connected to Input 1 (Mono).
Before use
- Ensure you have a 9V alkaline battery or a compatible Harman power supply.
- Use only unbalanced mono instrument cables.
- If using an effects loop, set the amp's mix control to 100% full wet.
- Attach the included StompLock if you want to preserve your knob settings.
- If using a pedalboard, apply the included Hook-and-loop Pedalboard Pad.
Specs in practice
- Input Impedance
- >1 MΩ (stereo) or >500 kΩ (mono) when the effect is on.
- Current Draw
- 75 mA (typical at 9 VDC).
- Power Supply
- 9V Alkaline Battery or Harman power supply.
Images and diagrams
- Amplifier Setup: Shows connection from guitar to pedal input, and pedal output to amp input.
- Effects Loop Setup: Shows connection from guitar to pedal input, and pedal output to amp effects return.
- Battery Replacement: Shows how to release the foot switch using a 1/4 inch cable tip to access the battery compartment.
Model compatibility
- Requires Class II power adapter conforming to EN60065, EN60742 or equivalent.
- Use only shielded interconnecting cables.

Manual page author
Michael Turner
Technical manual editor
Reviews PDF manuals for structure, safety notes, and practical product details so readers can find the right information quickly.