Electronics / Networking
Quick Installation Guide for Digitus Smart PDU 0U 16A
Quick installation guide for Digitus Smart PDU (DN-95626, DN-95627). Learn how to connect, configure network settings, and access the web interface for power monitoring.
Quick answers from the manual
Quick answer
- The Digitus Smart PDU is a power distribution unit with input monitoring. It is configured via a web interface (default IP 192.168.0.2) or the GBL_Conf software. p. 1, 3, 4
Key actions
- Connect the device to power and the network. p. 3
- Access the web interface via browser. p. 3, 4
First start
- Connect power, network, and consumers, then access the web interface. p. 3
Problems and fixes
Status LED red
Device is not connected to the Ethernet.
p. 2
Status LED orange
Waiting for DHCP server data.
p. 3Maintenance and reset
- Use GBL_Conf to restore default settings. p. 4
Technical specifications
| Parameter | Value | Meaning | Pages |
|---|---|---|---|
| Input Voltage | 230V AC | Operating voltage range | p. 2 |
| Max Current | 16A | Maximum load capacity | p. 3 |
Where to find it in the PDF
- Safety and Installation p. 2
- Network and Web Interface p. 3, 4
Table of contents
Manual images
Click an image to enlargeQuick guide from the manual
This document provides essential instructions for the initial setup and operation of the Digitus Smart PDU. It is intended for qualified personnel. The device is designed for indoor use only and must be connected to a properly grounded 230V AC power supply.
Safety Advice
- Installation must be performed by qualified personnel only.
- The device contains hazardous voltages; do not open or disassemble.
- Ensure the device is connected to a properly grounded power socket.
- Do not install in areas with excessive moisture or heat.
- The device is not a toy and must be kept out of reach of children.
- Only connect electrical devices that are rated for continuous operation.
Installation
The device features an illuminated two-line LCD display, a Select button, and a Status LED. The Status LED provides immediate feedback on the device's connection state:
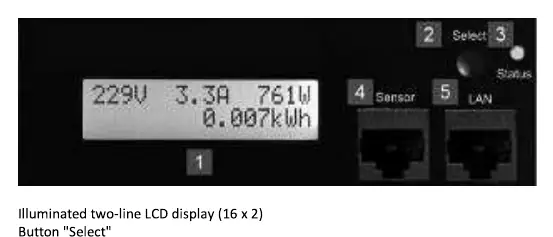
- Red: The device is not connected to the Ethernet.
- Orange: The device is connected to the Ethernet and waiting for data from the DHCP server.
- Green: The device is connected to the Ethernet and TCP/IP settings are allocated.
- Periodic blinking: The device is in Bootloader mode.
Start-up and Network Connection
To set up the device:
- Connect the power cord (CEE 7/4, max. 16 A) to the mains supply.
- Connect the network cable to the Ethernet connector (RJ45).
- Insert any optional external sensors into the sensor connector.
- Connect consumers to the protective sockets (C13, C19, max. 16 A).
The device will automatically search for a DHCP server to request an IP address. Once connected, the status LED will turn green.
Web Interface Configuration
The web interface is the central control panel for the device. You can access it from any PC on the same TCP/IP network:
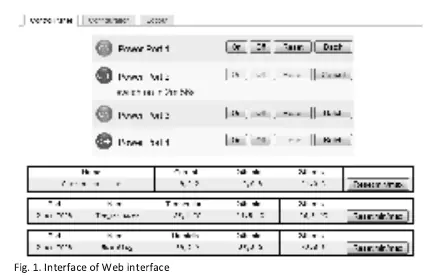
- Open a web browser on a PC in the same network.
- Enter the device IP address in the address bar (default: 192.168.0.2).
- Log in to access device settings and control power outlets or retrieve sensor values.
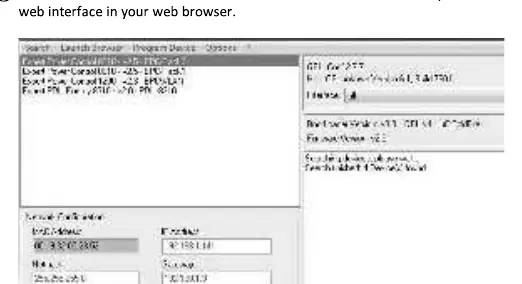
Configuration Program (GBL_Conf)
If the device cannot be found at the default address, use the GBL_Conf configuration program available at Digitus.info. This tool allows you to configure network and security settings and restore default settings. After installing GBL_Conf, open the program, and all devices found in the network will appear in the left window. Double-click the device name to be automatically forwarded to the web interface.
Official resources from the manual
Practical help
Common problems
Device not found at default IP address
Use the GBL_Conf configuration program to locate the device on the network.
Status LED is red
The device is not connected to the Ethernet. Check the network cable connection.
Status LED is orange
The device is connected to the Ethernet but is waiting for data from the DHCP server.
Before use
- Ensure installation is performed by qualified personnel.
- Verify power supply is 230V AC (50/60 Hz).
- Ensure the device is properly grounded.
- Connect the network cable to the RJ45 port.
- Connect consumers to the C13/C19 sockets.
- Download the GBL_Conf software if network discovery is required.
Model compatibility
- Requires 230V AC (50/60 Hz) power supply.
- Indoor use only.
- Compatible with standard DHCP network environments.

Manual page author
David Miller
Documentation analyst
Organizes user manual content into clear summaries, with attention to model details, product context, and everyday usability.