Home / Security
DMP 1127C PIR Motion Detector Installation Guide
Installation and configuration guide for the DMP 1127C Wireless Wall Mount Curtain PIR. Includes programming steps, battery replacement, mounting instructions, and testing procedures.
Table of contents
Manual images
Click an image to enlargeQuick guide from the manual
The DMP 1127C is a wireless wall-mount curtain PIR detector. Before installation, it is recommended to program zones and connect the receiver to the panel. The device requires a 3.0V CR123 lithium battery. Key configuration settings include Pulse Count (2 or 4) and Sensitivity (Low or High) to manage false alarms. Always perform a walk test after installation to ensure proper coverage.
Programming the PIR in the panel
Refer to your panel programming guide as needed. Follow these steps:
- In ZONE INFORMATION, enter the wireless zone number and zone name.
- Select NT (Night) as the ZONE TYPE and select the AREA.
- At the NEXT ZN? prompt, select NO.
- Select YES when WIRELESS? displays.
- Enter the eight-digit SERIAL# and press CMD.
- Enter the SUPRVSN TIME and press CMD.
- Choose whether to enable DISARM DISABLE (Version 172 and higher). Selecting YES allows the 1127 to be disabled for Night and Exit type zones while the area is disarmed.
- At PULSE COUNT, choose 2 or 4.
- At SENSITIVITY, choose LOW or HIGH.
- At the NEXT ZN? prompt, select YES to finish or NO for additional options.
Battery Installation
Use only 3.0V lithium batteries, DMP Model CR123. Observe polarity when inserting batteries into the holder.
- Remove the front cover.
- Remove existing batteries if present.
- Insert new batteries observing correct polarity.
- Reinstall the front cover.
Caution: Do not recharge, disassemble, heat above 212°F (100°C), or incinerate batteries.
Selecting a Location
For optimal performance, mount the unit on a rigid, vibration-free surface where intruder movement is expected to be across the detection pattern. Avoid the following locations:
- Surfaces exposed to moisture.
- Areas with excessive metallic surfaces.
- Locations exposed to false alarm sources like direct sunlight, heat sources (heaters, radiators), or strong air drafts (fans, air conditioners).
Mounting the Detector
- Remove the front cover.
- Remove the batteries and the PCB from the back cover by pushing on the battery case to slide the PCB toward the top.
- Select appropriate mounting holes for corner or flat wall mounting.
- Attach the back cover to the wall (up to 8' high) using screws and wall anchors. Do not over-tighten.
- Reinstall the PCB in the back cover.
- Reinstall the batteries and front cover.
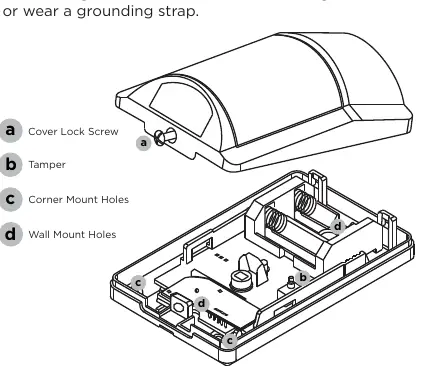
Caution: Ensure you are free of static electricity before handling circuit boards. Touch a grounded, bare metal surface or wear a grounding strap.
Testing the Detector
Walk Test
From the panel's Walk Test menu, select PIR Walk Test to enable the LED for 30 minutes. Thoroughly test the installation to ensure the protection pattern is correct. The test automatically exits after 30 minutes.
Transmission Test
After programming, close the cover to restore the tamper switch. Verify that the keypad display indicates a signal received from the detector.
Maintenance
Perform unit testing annually. Clean the cover and optional bracket with a water-dampened cloth as needed to keep it free of dust and dirt. Always test the unit after cleaning.
Practical help
Common problems
Communication faulty (LED remains on or flashes)
Relocate the detector or receiver until the LED confirms clear communication.
Low battery signal
Replace with 3.0V lithium battery (DMP Model CR123). The unit remains operational for approximately 30 days after the low battery signal.
False alarms
Select LOW sensitivity in the programming menu to reduce false alarms in harsh environments.
Before use
- Program zones and connect the receiver before installing batteries.
- Ensure you have a grounded, bare metal surface or grounding strap to prevent static damage.
- Verify the mounting surface is rigid and vibration-free.
- Ensure the mounting height is up to 8 feet.
Specs in practice
- Frequency Range
- 905-924 MHz.
- Battery Life
- Typical 5 years (up to 7 years with Disarm Disable enabled).
Images and diagrams
- Figure 1: 1127C PIR unit overview.
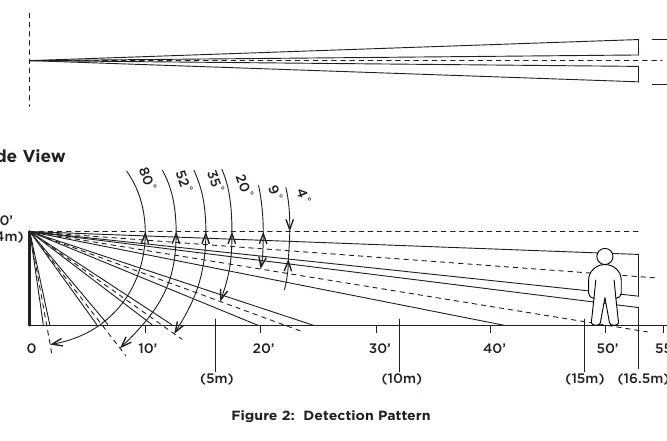
- Figure 2: Detection pattern showing 50' x 10' curtain coverage.
- Figure 3: Exploded view showing cover lock screw, tamper switch, and mounting holes.
Model compatibility
- Compatible with all DMP 1100 Series Wireless Receivers and panels.

Manual page author
David Miller
Documentation analyst
Organizes user manual content into clear summaries, with attention to model details, product context, and everyday usability.