Home Appliances / Refrigerators
Dometic NRX Series Fridge Freezer Installation Guide
Quick installation guide for Dometic NRX series fridge freezers. Includes dimensions, air flow requirements, electrical connection (AC/DC), door reversal, and mounting instructions.
Table of contents
Manual images
Click an image to enlargeQuick Guide
This document provides essential installation instructions for the Dometic NRX series fridge freezers. Proper installation is critical for cooling performance and product longevity. Ensure you follow the specific requirements for air flow, electrical connection, and mounting.
Installation Requirements
Proper ventilation is mandatory to prevent shortened lifespan and reduced cooling performance. Observe the following minimum spacing requirements when installing the refrigerator into furniture:
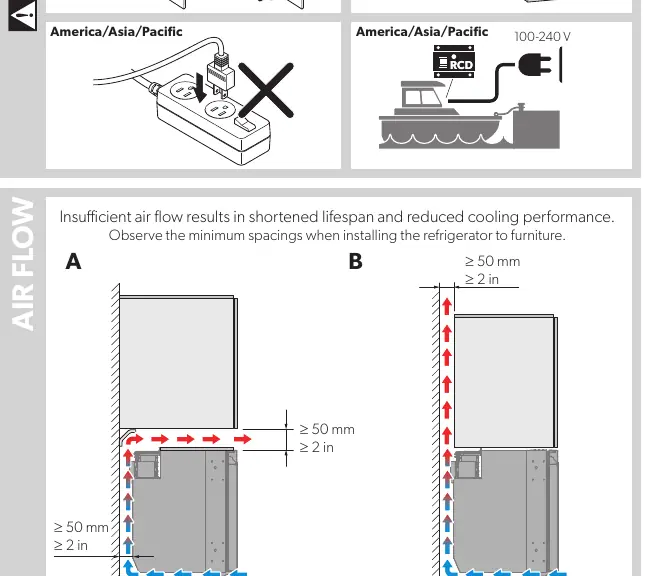
- Minimum clearance: 50 mm (2 in) on all sides.
- Air flow: Ensure unobstructed air circulation around the unit.
Electrical Connection
The unit supports both DC and AC power sources depending on the model configuration.

DC Connection
- Ensure the correct cable cross-section is used based on the distance from the battery to the fridge.
- Use a 15 A fuse for 12 V and 24 V systems.
- Observe correct polarity when connecting to the battery.
AC Connection
- For 100-240 V AC operation, ensure the connection is protected by an RCD (Residual Current Device).
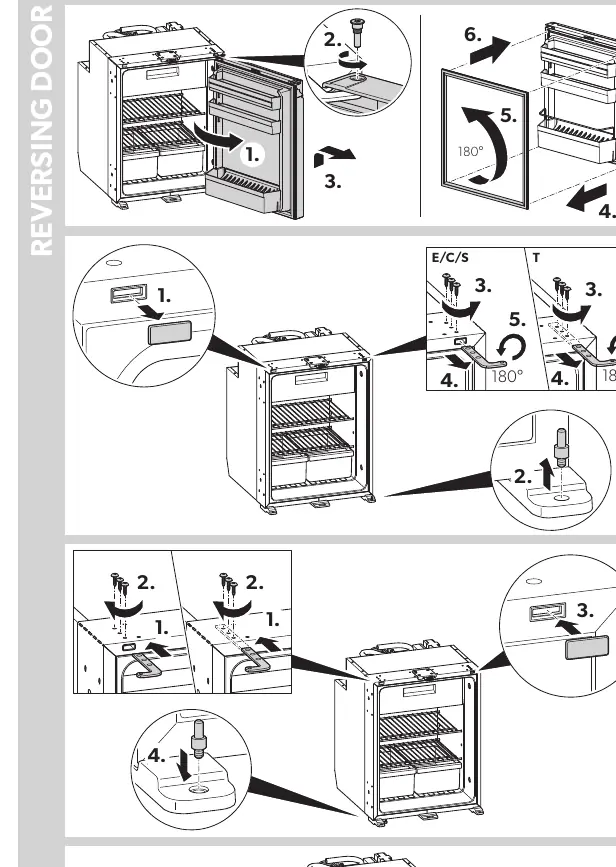
Door Reversal
The door hinge can be reversed to suit your installation needs. Follow the step-by-step procedure in the manual, ensuring all screws are securely fastened after reassembly. Ensure the door seal is tight after reversing.
Mounting and Installation
The manual provides specific procedures for:
- Frame installation: Securing the unit into the furniture housing.
- Fixing: Using the provided hardware to anchor the fridge.
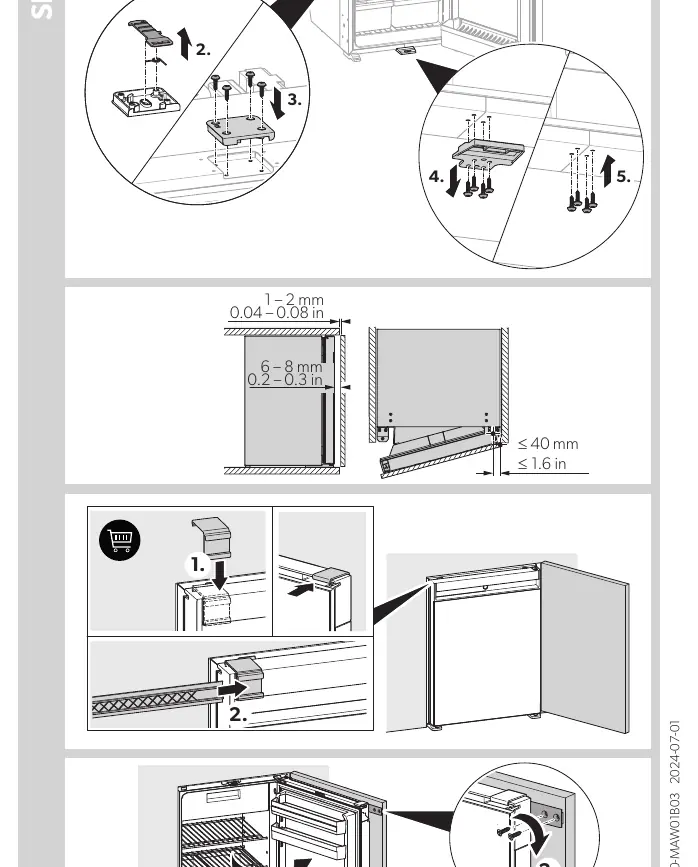
- Sliding hinge: Installing the sliding mechanism for integrated furniture doors.
Ensure the unit is level and the door closes properly with a gap of 1-2 mm (0.04-0.08 in) for the sliding hinge mechanism.
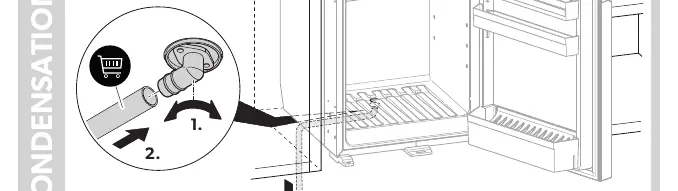
Condensation Drain
Ensure the condensation drain is properly routed and clear of obstructions to prevent water buildup inside the unit.
Manufacturer information
Dometic
Practical help
Common problems
Reduced cooling performance or shortened lifespan
Ensure minimum 50 mm (2 in) air flow clearance around the unit.
Door not closing properly
Check the sliding hinge alignment and ensure the gap is 1-2 mm.
Before use
- Verify the model supports your power source (12/24V DC or 100-240V AC).
- Ensure minimum 50 mm (2 in) ventilation space around the unit.
- Check cable cross-section for DC power based on distance.
- Install an RCD for AC power connections.
- Ensure the condensation drain is clear and properly routed.
Specs in practice
- 100-240 V AC
- Standard mains voltage; requires RCD protection.
Images and diagrams
- Air flow: Illustrates required spacing around the unit for optimal cooling.
- DC Wiring: Shows cable cross-section requirements relative to distance.
- Reversing Door: Step-by-step sequence for changing hinge side.
- Sliding Hinge: Installation steps for integrated furniture doors.
Model compatibility
- Covers NRX 0035, 0050, 0060, 0080, 0115, 0130 series.
- Supports E/C/S/T variants.

Manual page author
Emily Carter
User documentation editor
Prepares concise manual descriptions and highlights the most useful setup, operation, and maintenance information for readers.