Tools / Polishing Tools
Installation and Operation Guide for Draper Luma 2 Projection Screen
Comprehensive installation and operation guide for the Draper Luma 2 projection screen. Includes instructions for removing shipping brackets, mounting methods (wall, suspended, recessed), and proper screen operation.
Quick answers from the manual
Quick answer
- To operate the Luma 2 screen, pull the center of the dowel down to the desired position and hesitate to lock it. To retract, pull down slightly, then give it a quick flick to release the lock, controlling the retraction speed. p. 2
Key actions
- Remove shipping brackets p. 1
- Mount securely p. 3
First start
- Remove shipping brackets before first use. p. 1
Problems and fixes
Screen stops between full up and full down positions and won't retract.
Lower the viewing surface to the full down position and then let it completely retract back into the case without stopping.
p. 2Where to find it in the PDF
- Shipping Bracket Removal p. 1
- Operation p. 2
- Installation Methods p. 3
- Dimensions p. 4
Table of contents
Manual images
Click an image to enlargeQuick Guide: Before You Begin
Before installing or operating your Draper Luma 2 projection screen, you must remove the shipping support brackets located at each end of the dowel. Failure to do so may damage the screen or prevent proper operation. Ensure the mounting surface is strong enough to support the weight of the unit and that all hardware is installed level.
Removing Shipping Brackets
The shipping brackets must be removed before the initial operation and before the screen is operated in the UP direction:
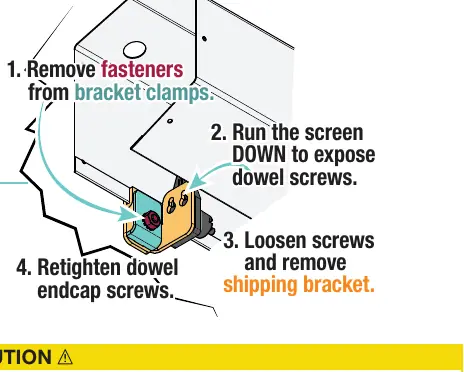
- Remove fasteners from the bracket clamps.
- Run the screen DOWN to expose the dowel screws.
- Loosen screws and remove the shipping bracket.
- Retighten the dowel endcap screws.
- Raise and lower the viewing surface several times to confirm satisfactory operation.
Installation Methods
The Luma 2 screen supports several mounting configurations. Always ensure the screen is securely supported so that vibration or pulling will not cause the case to fall.
Wall Installation
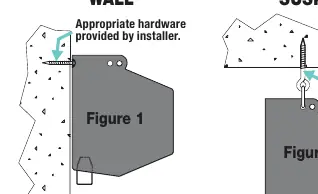
Mount the screen through the holes in the back of the endcaps using appropriate hardware (screws, toggle bolts, molly bolts, or anchors) suitable for your wall type.
Suspended Installation
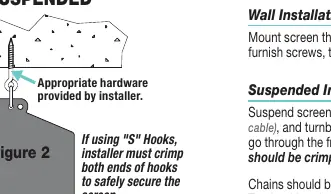
Suspend the screen from the holes in the endcaps using S-hooks, chains, or cables. S-hooks must go through the front holes on the endcaps, and both ends of the S-hooks must be crimped for safety. Adjust turnbuckles to ensure the screen hangs level.
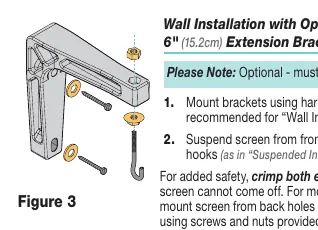
Optional Mounting
- Extension Brackets: Use for wall installation when extra clearance is needed.
- Floating Brackets: Allow for mounting on studs or joists at various points along the case.
- Recessed Installation: Requires the optional Ceiling Opening Trim Kit. Ensure the recess allows access for screen removal.
Operating the Screen
To lower the viewing surface: Grasp the center of the dowel and pull down. Hesitate, then allow the screen to retract very slowly until it locks in place.
To raise the viewing surface: Pull the screen down and, if fully down, slightly outward (at a 20-degree angle). Give the screen a quick flick and allow it to retract, controlling the speed so it does not collide with the case.
Note: If the surface stops between the full up or full down positions, it will not retract completely. Lower the viewing surface to the full down position and then let it retract completely without stopping.
Safety Information
Improper installation can result in serious injury or death. Installation should be performed by an authorized, qualified professional. Never leave the area while operating the unit. Ensure no persons or objects are underneath the unit during testing or operation.
Manufacturer information
Draper Tools
Practical help
Common problems
Screen will not retract completely into the case.
Lower the viewing surface to the full down position, then allow it to retract completely without stopping or slowing it down.
Shipping brackets are still attached.
You must remove the shipping support brackets from the bracket clamps at each end of the dowel before initial operation.
Before use
- Remove shipping support brackets from bracket clamps.
- Verify the wall or ceiling structure is strong enough to hold the unit.
- Ensure all mounting hardware is level and square.
- Inspect the area underneath the screen for persons or objects.
- Test the screen operation by raising and lowering it several times.
Specs in practice
- Retraction Angle
- When raising the screen, pull slightly outward at a 20-degree angle before flicking to retract.
Images and diagrams
- Figure 1 illustrates the removal of shipping brackets from the dowel endcaps.
- Figure 2 shows the difference between Wall and Suspended mounting configurations.
- Figure 3 details the use of optional extension brackets for wall mounting.
- Figure 4 shows the use of floating brackets for stud or joist mounting.
Model compatibility
- Recessed installation requires the optional Ceiling Opening Trim Kit.
- Floating brackets are optional and must be specified.
- Extension brackets are optional and must be specified.

Manual page author
Emily Carter
User documentation editor
Prepares concise manual descriptions and highlights the most useful setup, operation, and maintenance information for readers.