Home Appliances / Dehumidifiers
Eeese Otto 13L Dehumidifier User Manual
Quick guide for the Eeese Otto 13L dehumidifier. Includes setup, operation, Wi-Fi connection, maintenance, and troubleshooting.
Table of contents
Manual images
Click an image to enlargeQuick guide from the manual
Before using the Eeese Otto 13L dehumidifier, ensure it has been standing upright for at least 1 hour. Place the unit on a stable, flat surface with at least 50 cm of clearance on all sides to ensure proper airflow. Check that the power supply matches the specifications on the nameplate and that the outlet is grounded.
Product Description
The Eeese Otto is a dehumidifier designed for domestic use. It features an integrated ionizer for air purification, Wi-Fi connectivity for app control, and an automatic defrost function for operation in cooler temperatures.
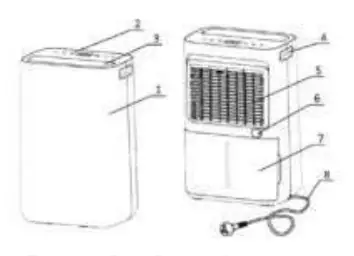
Components
The unit consists of a front casing, control panel, oscillating flaps, handle, air filter frame, continuous drainage outlet, water tank, and power cord.
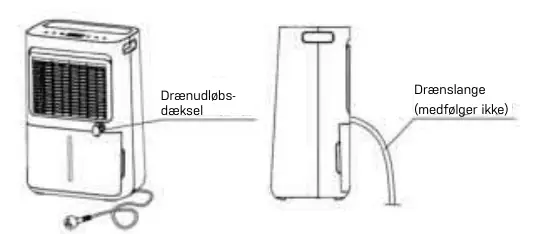
Installation
Ensure the water tank is correctly fitted before switching on the device. For continuous drainage, remove the rubber plug from the drainage outlet and connect a 14 mm inner diameter hose. Ensure the hose is secure, tight, and leads downhill without kinks or blockages.
Operation
Switching On/Off: Use the Power button to turn the unit on or off. It defaults to manual dehumidifying mode.
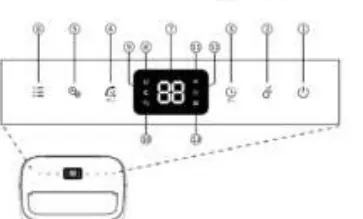
Humidity Control: Press the Manual button to select the desired humidity level (CO for continuous, or 30%-80%). The unit will stop when the target humidity is reached and restart when it rises.
Modes: The unit offers Laundry mode (high fan speed for 6 hours) and Night mode (low fan speed, indicators off). Use the Mode button to cycle through these settings.
Child Lock: Press the Timer button for 2 seconds to activate or deactivate the child lock function. 'LC' will appear on the screen when active.
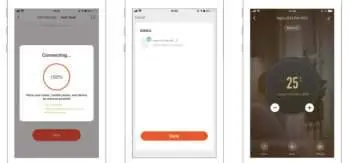
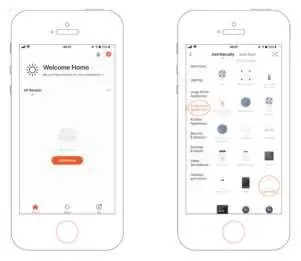
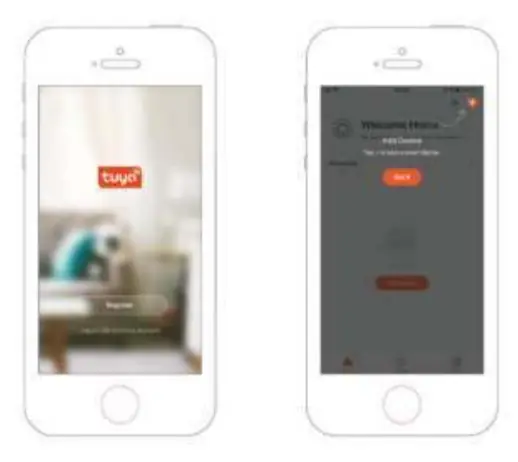
Wi-Fi Connection
To connect to Wi-Fi, download the TuyaSmart app. Ensure your phone is connected to your home Wi-Fi and Bluetooth is enabled. Press the Oscillation button for 2 seconds to enter network configuration mode. Follow the in-app instructions to complete the setup.
Maintenance
Clean the unit at least every two weeks. Switch off and unplug before cleaning. Wipe the housing with a soft, dry cloth. Vacuum the air inlet and outlet grilles. Wash the water tank by hand with a mild detergent. Clean the air filter frame with warm water and mild detergent, then let it dry completely before reinserting.
Troubleshooting
If the unit does not start, check the power connection, ensure the water tank is not full, and verify it is seated correctly. If the unit is noisy, check for blockages or an uneven surface. For error codes E1 (temperature sensor) or E2 (humidity sensor), contact customer service.
Technical Specifications
The unit has a dehumidifying capacity of 13L/day (at 30°C, 80% RH) and 7L/day (at 27°C, 60% RH). It operates within a temperature range of 5-35°C and uses R290 refrigerant.
Safety
Do not use the device in overloaded extension cords. Keep away from open flames or heat sources. Do not cover the unit during operation. If R290 gas leakage is suspected, evacuate the room, open windows, and contact the fire department.
Practical help
Common problems
Dehumidifier will not switch on
Check if the power is connected, the water tank is full, the tank is not seated correctly, or the target humidity level has been reached.
Water removal capacity is too low
Check if the room is too large, there is too much ventilation, the air filter is clogged, or the ambient temperature/humidity is too low.
Unit is noisy
Check if the air filter is blocked, the unit is on an uneven surface, or there are loose particles inside.
Water in tank overflows
Check if the water tank is damaged, the auto-sensor float is missing, or the internal drainage passage is blocked.
Before use
- Check for transport damage.
- Place on a stable, flat surface.
- Ensure 50 cm clearance on all sides.
- Keep upright for at least 1 hour before first use.
- Ensure power supply matches the nameplate.
- Ensure the water tank is correctly fitted.
Specs in practice
- Dehumidifying Capacity
- 13L/day at 30°C/80% RH; 7L/day at 27°C/60% RH.
- Operating Temperature
- 5°C to 35°C.
- Power Consumption
- 145 W.
Images and diagrams
- Components diagram shows the location of the front casing, control panel, air filter frame, and drainage outlet.
- Drainage diagram illustrates the connection of an external hose to the continuous drainage outlet.
Model compatibility
- Requires 220-240V, 50Hz power supply.
- Wi-Fi connection requires the TuyaSmart app.
- Continuous drainage hose (14mm inner diameter) is not included.

Manual page author
David Miller
Documentation analyst
Organizes user manual content into clear summaries, with attention to model details, product context, and everyday usability.