Home / Door Hardware
Emtek Stretto 1.5x5 Passage Installation
Quick installation guide for the Emtek Stretto 1.5x5 Passage door hardware. Includes detailed door preparation, latch installation, strike plate mounting, and trim assembly steps.
Table of contents
Manual images
Click an image to enlargeQuick Installation Overview
This guide provides the necessary steps to install the Emtek Stretto 1.5x5 Passage door hardware. The process involves preparing the door and jamb, installing the latch mechanism, mounting the strike plate, and attaching the interior and exterior trim handles.
Door Preparation
Before installation, ensure the door is prepared according to the following specifications:
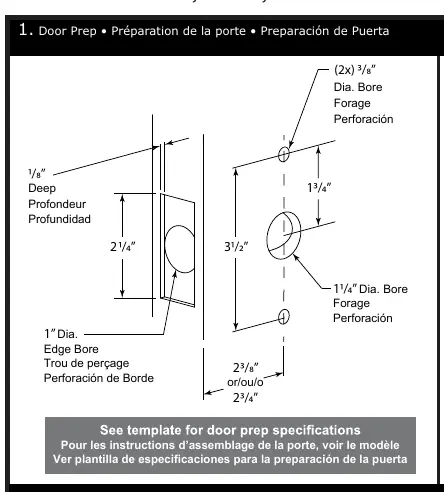
- Edge Bore: Drill a 1-inch diameter hole into the edge of the door.
- Face Bore: Drill a 1-1/4 inch diameter hole through the face of the door.
- Backset: The distance from the edge of the door to the center of the face bore should be either 2-3/8 inches or 2-3/4 inches.
- Depth: The edge bore should be 2-1/4 inches deep.
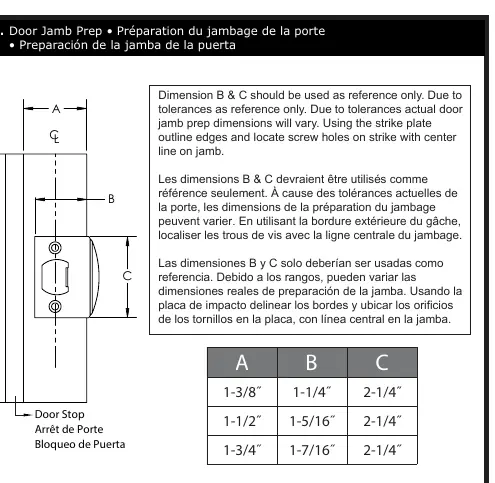
Door Jamb Preparation
The strike plate installation requires precise alignment on the door jamb. Use the strike plate outline to locate the screw holes, ensuring the center line aligns with the jamb. Note that dimensions B and C in the provided reference table are for guidance only, as actual door jamb prep dimensions may vary due to tolerances.
Installation Steps
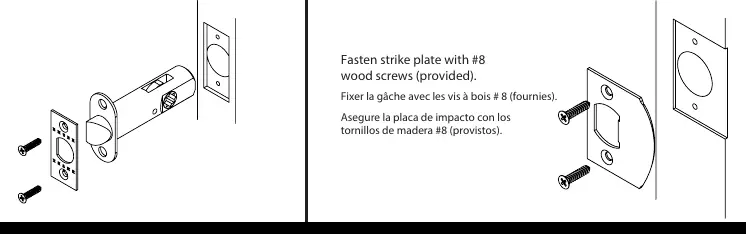
1. Install Latch
Insert the latch mechanism into the edge bore hole. Ensure it is oriented correctly and secured flush with the door edge.
2. Install Strike Plate
Position the strike plate on the door jamb. Secure it firmly using the provided #8 wood screws.
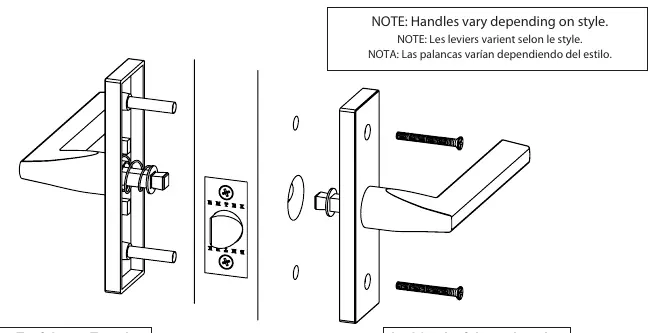
3. Install Outside and Inside Trims
Attach the outside and inside trim handles. Note that the specific installation method for the handles may vary depending on the style of the hardware. Ensure all screws are tightened securely to complete the assembly.
Practical help
Common problems
Door jamb dimensions vary during installation.
Use the strike plate outline to delineate the edges and locate screw holes, aligning the center line on the jamb rather than relying solely on reference dimensions.
Trim installation difficulty.
Note that handle installation may vary depending on the specific style of the hardware; ensure all components are aligned before tightening screws.
Before use
- Verify door thickness (1-3/8", 1-1/2", or 1-3/4").
- Confirm backset measurement (2-3/8" or 2-3/4").
- Ensure you have #8 wood screws for the strike plate.
- Drill 1" diameter edge bore and 1-1/4" diameter face bore.
- Check that the strike plate center line aligns with the door jamb.
Images and diagrams
- Step 1 illustrates the drilling dimensions for the door face and edge.
- Step 2 shows the strike plate alignment on the door jamb.
- Step 5 demonstrates the assembly of the outside and inside trim handles.
Model compatibility
- Compatible with door thicknesses of 1-3/8", 1-1/2", and 1-3/4".
- Supports backsets of 2-3/8" or 2-3/4".

Manual page author
Michael Turner
Technical manual editor
Reviews PDF manuals for structure, safety notes, and practical product details so readers can find the right information quickly.