Computers / Keyboards Input
User Manual for Evolveo LadyErgo Wireless Mouse
Quick guide for the Evolveo LadyErgo wireless ergonomic mouse. Includes installation steps, DPI adjustment, pairing instructions, and technical specifications.
Quick answers from the manual
Quick answer
- To set up the Evolveo LadyErgo mouse, insert 2x AAA batteries, plug the USB nano receiver into your computer, and turn the mouse ON using the switch on the bottom. p. 16, 17
Key actions
- Adjust DPI p. 18
First start
- Insert batteries and plug in receiver p. 16, 17
Problems and fixes
Mouse not paired
Unplug receiver, turn mouse ON while holding A1+A4+A5, wait for LED A6, plug receiver back in.
p. 18Technical specifications
| Parameter | Value | Meaning | Pages |
|---|---|---|---|
| Resolution | 1000/1600/2400 DPI | Adjustable sensitivity | p. 16 |
Where to find it in the PDF
- Product Diagram p. 3
- Technical Specifications p. 16
- Installation p. 17
Table of contents
Manual images
Click an image to enlargeQuick guide from the manual
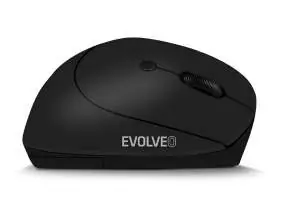
This guide provides essential information for setting up and using your Evolveo LadyErgo wireless mouse. The mouse uses a 2.4 GHz wireless connection via a USB-A nano receiver and requires 2x AAA batteries.
Product Overview
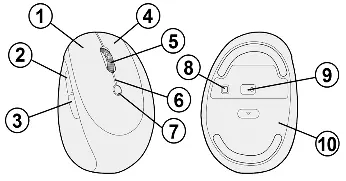
The mouse features the following controls and components:
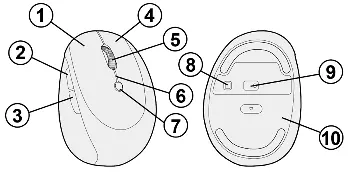
- 1-4: Left, Forward, Reverse, and Right buttons
- 5: Rolling wheel
- 6: LED indicator light
- 7: DPI change button
- 8: ON/OFF switch
- 9: Optical sensor
- 10: Battery compartment cover
Technical Specifications
- Connection: 2.4 GHz wireless
- Resolution: 1000/1600/2400 DPI
- Power Supply: 2x 1.5 V AAA batteries
- Operating Range: Up to 10 m
- Compatibility: Windows & macOS
- Dimensions: 93 x 67 x 52 mm
Installation
- Remove the USB nano receiver located inside the battery compartment at the bottom of the mouse.
- Insert the receiver into a free USB-A port on your computer or laptop.
- Insert 2x AAA batteries into the battery compartment, ensuring correct polarity.
- Turn the mouse on using the switch (A8) to the ON position.
- Wait for the drivers to install automatically.
Warning: If connecting the receiver to a USB hub, ensure the hub and the computer port can provide sufficient power for all connected devices.
DPI Adjustment
To change the mouse sensitivity, press the DPI button (A7) on the top of the mouse. Repeatedly pressing this button cycles through the available resolutions: 1000 DPI, 1600 DPI, and 2400 DPI.
Troubleshooting: Pairing the Receiver
If the mouse is not functioning or the receiver is unpaired, follow these steps:
- Remove the USB receiver from the computer.
- Turn the mouse ON while simultaneously holding down the Left (A1), Right (A4), and Scroll wheel (A5) buttons.
- The LED (A6) will light up for 15 seconds.
- Insert the USB receiver back into the computer within these 15 seconds.
- Correct pairing is confirmed when the LED (A6) turns off.
Warranty and Disposal
The warranty does not cover mechanical damage, damage from natural influences, normal wear and tear, or unauthorized repairs. The battery capacity warranty is 6 months. Please dispose of electronic waste and batteries according to local regulations for separated waste.
Practical help
Common problems
Mouse is not responding or unpaired
Unplug the USB receiver, turn the mouse ON while holding buttons A1+A4+A5, wait for the LED to light up, and plug the receiver back in within 15 seconds.
Insufficient power when using a USB hub
Ensure the USB hub has an external power supply if it cannot provide enough current for the mouse.
Before use
- Insert 2x AAA batteries into the compartment
- Remove the USB nano receiver from the battery compartment
- Plug the receiver into a USB-A port
- Switch the mouse to the ON position
Images and diagrams
- Buttons 1-4: Standard mouse buttons
- Button 7: DPI adjustment button
- Switch 8: Power ON/OFF
- LED 6: Status indicator
Model compatibility
- Compatible with Windows and macOS operating systems.

Manual page author
David Miller
Documentation analyst
Organizes user manual content into clear summaries, with attention to model details, product context, and everyday usability.