Automotive / Utility Vehicle Accessories
Installation Guide for Falcon Ridge Massimo MSU500 Full Cab Enclosure
Step-by-step installation guide for the Falcon Ridge Massimo MSU500 Full Cab Enclosure. Includes instructions for Velcro application, door and window panel setup, roof installation, and proper cleaning and storage techniques.
Table of contents
Manual images
Click an image to enlargeImportant Installation Information
For the best installation results, ensure the ambient temperature is 70°F or warmer. The temperature significantly affects the adhesive Velcro. If conditions are colder, store the adhesive Velcro at room temperature prior to installation to ensure proper adhesion. Do not smoke inside the cab or expose the enclosure to direct flames, as the material is flammable.
Parts and Preparation
Before beginning, unpack the enclosure on a large, clean, flat surface. Verify that all parts are included:
- 32 x 3" Adhesive Velcro Hook Strips
- 1 x 40" Adhesive Velcro Hook Strip
- 4 x 6" Adhesive Velcro Hook Strips
- 2 x 70" Para Cords
- 4 x Snap Screw Studs
- 4 x Webbing Straps with Velcro
- 2 x Webbing Straps with Grommet
- 4 x Cab Enclosure Panels
Door Installation
The door is primarily held in place by double-sided Velcro strips. To install:
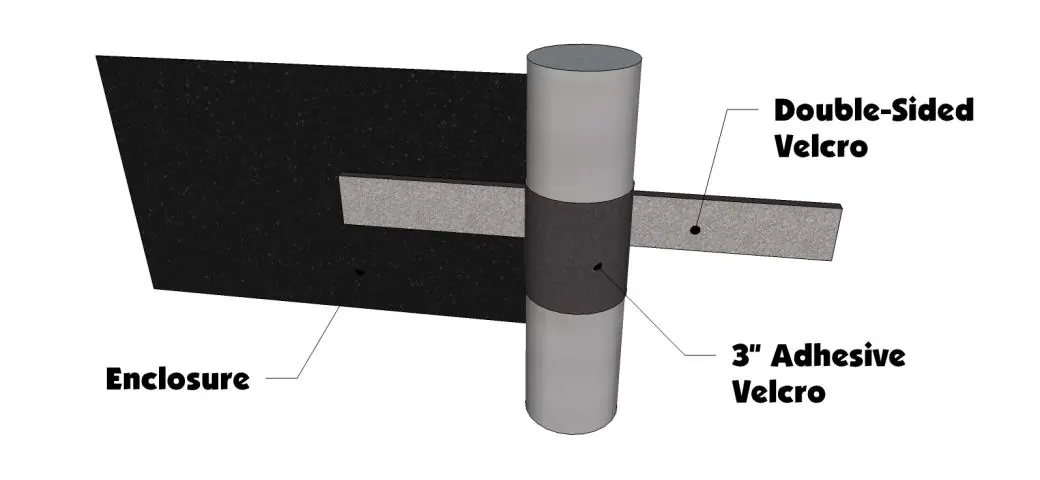
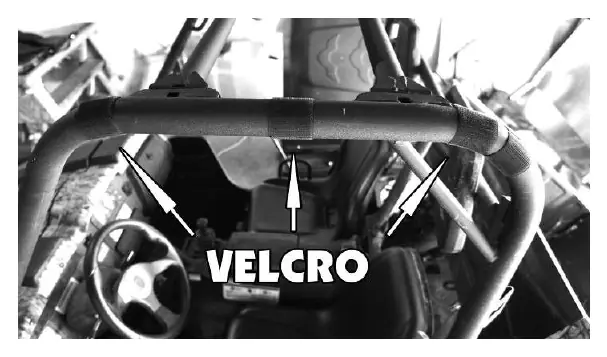
- Wrap the roll cage with a 3" adhesive Velcro strip first.
- Wrap the double-sided Velcro (sewn to the door edges) around the adhesive strip to provide a secure hold.
- Begin by placing 3" adhesive strips on the roll cage across the top of the door.
- Work your way down the front and then the back of the door.
- Once all Velcro is in place, the bottom of the door should fall into place with the magnets. The front of the door goes to the inside of the factory half door, and the rear portion goes to the outside.
Rear Window Installation
- Install the 40" adhesive Velcro strip along the top of the top bar, running from side to side.
- Install the Velcro straps sewn to the sides at the top and bottom. You may need to remove the strap on the door to position the adhesive Velcro correctly.
- Snap the bottom of the Rear Window to the plastic panels behind the seats. Raise the bed, screw the snap studs into the plastic where the snaps line up, snap the panel in place, and lower the bed.
- Wrap a 6" strip of adhesive Velcro to the roll cage slightly less than halfway up the rear bar. Wrap the double-sided strip with the strap sewn to it around the adhesive strip, with the webbing strap facing the top of the vehicle.
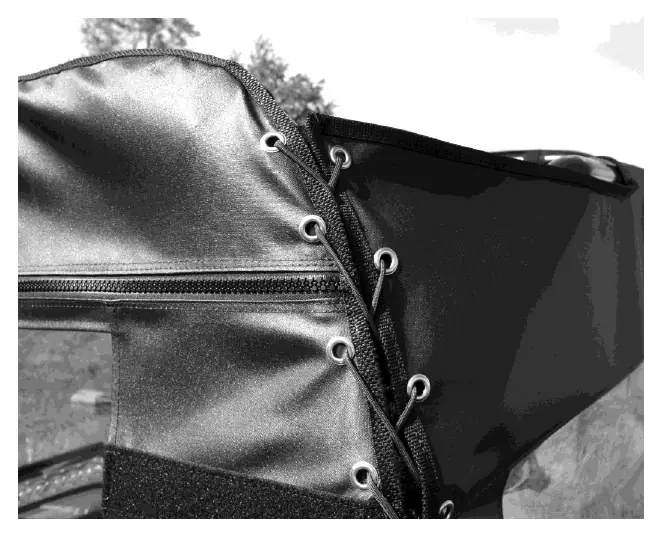
- Lace the Door Panel to the Rear Window using the 70" cords. Run the cord through the top holes from the inside out, then lace down the remaining holes like a pair of shoes. Tie off the ends and melt them to prevent fraying.
Roof Panel Installation
- Install the Lexan Windshield first (refer to the specific instructions included with the windshield).
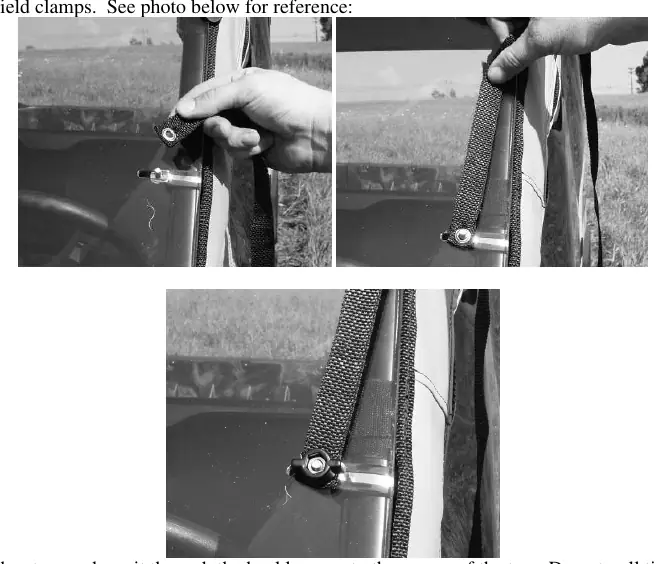
- Attach the webbing straps with grommet holes to the middle bolt of the windshield clamps.
- Run the strap through the buckle sewn to the corner of the top. Do not pull tight until all straps are attached.
- Move to the rear of the vehicle and attach the webbing straps with double-sided Velcro to the rear bar between the rear door and the rear window.
- Once all straps are attached, pull them tight. If diagonal waves appear across the top, it indicates one corner is pulled tighter than another; adjust as necessary.
- Install the top brace by poking an 'x' through the fabric where each hole is located and installing as shown in the windshield instructions.
Cleaning and Storage
Proper maintenance extends the life of your enclosure:
- Cleaning: Clean with a soft rag or sponge using a mild liquid detergent soap and warm water. Never rub the windows with a dry cloth or rag to avoid scratching. Let the cab dry thoroughly before storage.
- Storage: Always roll the cab for storage; do not fold it, as folding will damage the windows. Fold the doors over the rear panel, interleave the top and windshield, and roll into a cylinder approximately 8 inches in diameter. Store at room temperature.
Practical help
Common problems
Diagonal waves appear across the top
This indicates one corner is pulled tighter than another. Loosen and tighten the straps as you go to ensure the top is centered.
Velcro not sticking
Ensure the installation temperature is 70°F or warmer. If it is cold, store the adhesive Velcro at room temperature before applying.
Window scratching
Never rub windows with a dry cloth. Use a soft rag or sponge with mild liquid detergent and warm water.
Before use
- Ensure ambient temperature is 70°F or warmer.
- Clean the vehicle surface thoroughly before applying adhesive.
- Verify all parts are present according to the parts list.
- Have a small knife ready for the top brace installation.
- Ensure you have the separate Lexan Windshield instructions available.
Specs in practice
- Storage Method
- Roll the cab into an 8-inch diameter roll. Do not fold.
- Adhesive Velcro
- Must be applied to the roll cage first to provide a base for the double-sided Velcro on the enclosure.
Images and diagrams
- Velcro Application: Wrap the roll cage with the 3" adhesive strip, then wrap the double-sided Velcro around it.
- Lacing: Lace the Door Panel to the Rear Window like a pair of shoes, starting from the top holes.
Model compatibility
- Designed for Massimo MSU500.
- Requires separate Lexan Windshield for full installation.

Manual page author
Emily Carter
User documentation editor
Prepares concise manual descriptions and highlights the most useful setup, operation, and maintenance information for readers.