Lighting / Stage Lighting
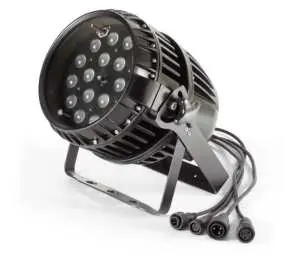
User Manual for Flash LED PAR 64 18x15W 6in1 RGBWA+UV Zoom IP65
Quick guide for the Flash LED PAR 64 18x15W 6in1 RGBWA+UV Zoom IP65 (F7100323). Includes installation, DMX channel modes, safety warnings, and technical specifications.
Quick answers from the manual
Quick answer
- The Flash LED PAR 64 is a professional stage light. Installation requires secure mounting with safety cables, proper DMX signal termination, and connection to a stable power source. Always protect the lens from direct sunlight. p. 2, 3
Key actions
- Securely mount the fixture using two clamps and a safety cable. p. 2, 3
- Connect DMX signal using XLR cables and terminate the last fixture. p. 3
First start
- Check for transport damage, verify power voltage, and ensure secure mounting before powering on. p. 2, 3
Problems and fixes
Light is dark
Check voltage stability (±10%) and allow 20 minutes for cooling.
p. 4Maintenance and reset
- Disconnect power before servicing. Do not use organic solvents for cleaning. p. 2, 7
Technical specifications
| Parameter | Value | Meaning | Pages |
|---|---|---|---|
| Power Consumption | 180 W | Power usage | p. 3 |
| Weight | 9.2 kg | Net weight of the unit | p. 3 |
Where to find it in the PDF
- Safety Information p. 2
- Installation p. 3
- DMX Channel Lists p. 5, 9
Table of contents
Manual images
Click an image to enlargeQuick guide from the manual
This document provides essential instructions for the Flash LED PAR 64 18x15W 6in1 RGBWA+UV Zoom IP65. Key safety requirements include ensuring the unit is securely mounted, using a safety cable, and protecting the lens from direct sunlight or strong light sources to prevent fire hazards. The device must be connected to a stable power supply and grounded properly.
Safety Information
- Mounting: Always use two clamps to rig the fixture. Do not hang the fixture from only one clamp. Lock each clamp with both 1/4-turn fasteners.
- Lens Protection: Position or shade the head so that the front lens is not exposed to sunlight or any other strong light source from any angle, even for a few seconds, to avoid fire hazards.
- Environment: Do not use in high humidity. Operating temperature range is -10°C to +35°C.
- Maintenance: Disconnect main power before servicing. Do not attempt to repair the fixture yourself.
Installation
The unit should be mounted via its screw holes on the bracket. Ensure the structure can support 10 times the unit's weight. Always use a safety cable that can hold 12 times the weight of the unit. The equipment must be fixed by professionals in a location out of reach of people.
Connections
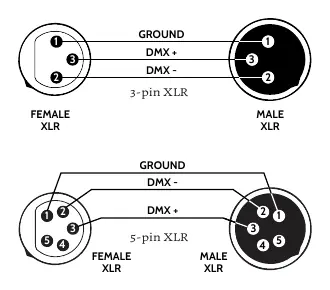
The device is equipped with DMX (in/out) via XLR 3(5)-pin sockets and power (in/out) via powerCON sockets. When connecting DMX, use a cable with XLR-female to XLR-male plugs. At the last fixture in the chain, the DMX signal must be terminated with a 120Ω resistor between signal (-) and signal (+) in an XLR plug.
Operation and DMX
The fixture supports 11-channel and 7-channel DMX modes. The menu allows for various settings, including color brightness (Red, Green, Blue, White, Amber, UV), zoom lens position, and built-in effects like gradual, pulse, and jump changes. Sound control sensitivity is also adjustable.
Practical help
Common problems
Light is dark or dim
Check if the power voltage is within ±10% of requirements. If the voltage is too high, it shortens the light's life; if too low, the lamp will be dark. Restart after turning off for 20 minutes to allow full cooling.
Display damaged
Do not point strong light output from other fixtures at the LED PAR 64, as intense illumination can damage the display.
Base moves during operation
The pan motor has high torque. Ensure the base is securely fastened to a surface or rigging hardware before applying power.
Before use
- Check for transportation damage before use.
- Verify power supply voltage and frequency (110/240V, 50-60Hz).
- Ensure the yellow/green conductor is grounded.
- Verify the mounting structure can support 10x the unit's weight.
- Attach a safety cable capable of holding 12x the unit's weight.
- Ensure the front lens is not exposed to direct sunlight.
Images and diagrams
- XLR Wiring: Shows pinout for 3-pin and 5-pin DMX connections (Ground, DMX+, DMX-).
- Lens Warning: Illustrates that lenses can focus sunlight, creating a fire hazard.
Model compatibility
- Requires DMX 512 controller for external control.
- Compatible with 3-pin and 5-pin XLR DMX cables.
- Requires powerCON power cables.

Manual page author
Emily Carter
User documentation editor
Prepares concise manual descriptions and highlights the most useful setup, operation, and maintenance information for readers.