Electronics / Audio Interfaces
User Guide for Focusrite Scarlett 18i20 Audio Interface
Comprehensive user guide for the Focusrite Scarlett 18i20 audio interface. Learn about hardware features, software installation, DAW setup, low latency monitoring, and technical specifications.
Quick answers from the manual
Quick answer
- The Scarlett 18i20 is a professional audio interface. Install Focusrite Control first, then connect the unit via USB. It supports up to 192 kHz sample rates and offers 18 inputs and 20 outputs. p. 3, 5, 9
Key actions
- Install software p. 5
- Connect hardware p. 9
First start
- Register at focusrite.com/register, download Focusrite Control, install, restart, then connect. p. 5
Problems and fixes
Musicians hear themselves twice (echo)
Ensure your DAW software is not set to route any inputs to any outputs while recording.
p. 13Technical specifications
| Parameter | Value | Meaning | Pages |
|---|---|---|---|
| Sample rates | 44.1 kHz to 192 kHz | Supported digital audio sample rates. | p. 21 |
| Inputs | 18 | 8 analogue, 8 ADAT, 2 S/PDIF | p. 21 |
| Outputs | 20 | 10 analogue, 8 ADAT, 2 S/PDIF | p. 21 |
Where to find it in the PDF
- Front Panel p. 6, 7
- Rear Panel p. 8
- Specifications p. 21, 22, 23
Table of contents
Manual images
Click an image to enlargeQuick guide from the manual
To ensure proper operation of your Scarlett 18i20, you must install the Focusrite Control software before connecting the interface to your computer. The device does not require separate USB drivers for Mac; for Windows, the necessary drivers are included in the Focusrite Control installer. Always register your product at focusrite.com/register to access the software bundle and updates.
Hardware features
The Scarlett 18i20 features a comprehensive set of inputs and outputs for professional audio recording:
- Front Panel: Includes two combo inputs (Mic/Line/Instrument) with gain controls, 48V phantom power switches, pad switches, and instrument switches. It also houses input meters, monitor level control, dim/mute switches, and two headphone outputs.
- Rear Panel: Features six additional combo inputs (Mic/Line), ten balanced line outputs, ADAT optical I/O, S/PDIF I/O, MIDI I/O, and Word Clock output.
Software installation and setup
Follow these steps to get started:

- Go to focusrite.com/register and enter your serial number and bundle code.
- Download and install the Focusrite Control software.
- Restart your computer after installation.
- Connect the Scarlett 18i20 to your computer using the supplied USB cable.
- Power on the unit using the front panel switch.
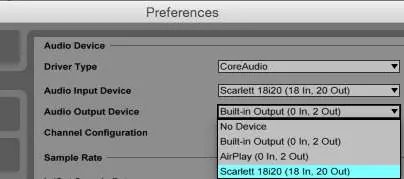
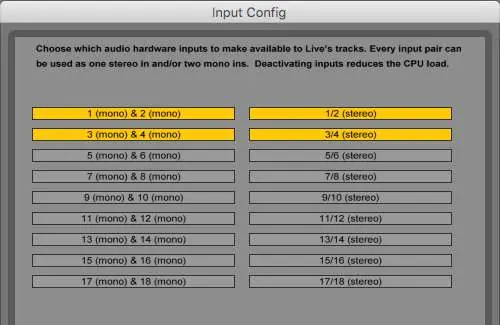
Audio setup in your DAW
Once connected, ensure your DAW is configured to use the Scarlett 18i20 as the audio device. In your DAW's audio preferences, select the Scarlett 18i20 (or Focusrite USB 2.0 driver on Windows). You may need to enable specific input and output channels within your DAW's I/O preferences to make them available for recording and playback.
Low latency monitoring
To avoid latency issues during recording, use the Focusrite Control software to route input signals directly to the headphone outputs. This allows performers to hear themselves in real-time without the delay caused by the computer's processing buffer. Ensure your DAW is not routing the same inputs to outputs simultaneously to avoid echo.
Working with surround sound
The Scarlett 18i20 supports multichannel formats like 5.1 or 7.1 surround sound. Use Focusrite Control to route DAW monitor outputs to the appropriate physical outputs corresponding to your speaker configuration (e.g., Left, Right, Centre, LFE, Surround channels).
ADAT and stand-alone usage
The ADAT optical port allows for expansion using external preamplifiers (e.g., Focusrite OctoPre MkII). Additionally, the unit can function as a stand-alone mixer. You can configure a mix in Focusrite Control, upload it to the hardware, and use the interface to control levels of connected sources (like keyboards) without a computer.
Technical specifications
The interface supports sample rates up to 192 kHz. It provides 18 inputs (8 analogue, 8 ADAT, 2 S/PDIF) and 20 outputs (10 analogue, 8 ADAT, 2 S/PDIF). All analogue inputs feature high-quality pre-amplifiers with 50 dB of gain range.
Official resources from the manual
Manufacturer information
Focusrite
Practical help
Common problems
Audio feedback loop
Turn off or turn down monitoring loudspeakers while recording, and use headphones when overdubbing.
Latency during recording
Use Focusrite Control to enable 'low latency monitoring' to route inputs directly to headphones.
Device not recognized
Ensure Focusrite Control is installed before connecting the USB cable. Verify the unit is powered on.
Before use
- Register your product at focusrite.com/register.
- Download and install Focusrite Control.
- Restart your computer.
- Connect the USB cable.
- Power on the unit.
Specs in practice
- Sample rates
- Supports 44.1 kHz, 48 kHz, 88.2 kHz, 96 kHz, 176.4 kHz, and 192 kHz.
Images and diagrams
- Front panel controls include gain, phantom power, and monitor levels.
- Rear panel provides connectivity for ADAT, S/PDIF, MIDI, and Word Clock.
- Focusrite Control GUI allows routing and mixing configuration.
Model compatibility
- Requires USB 2.0 or 3.0 port.
- Mac OS X 10.10 or 10.11.
- Windows 7, 8.1, or 10.

Manual page author
Emily Carter
User documentation editor
Prepares concise manual descriptions and highlights the most useful setup, operation, and maintenance information for readers.