Automotive / RV Appliances
User Manual for Furrion 14" 12V Vent Fan with Electronic Lid
Comprehensive user guide for the Furrion 14" 12V Vent Fan with Electronic Lid. This manual covers installation procedures for existing and new roof openings, electrical wiring requirements, remote control and keypad operation, maintenance...
Table of contents
Manual images
Click an image to enlargeQuick guide from the manual
This document provides installation and operation instructions for the Furrion 14" 12V Vent Fan. Before starting, ensure you have a 14" x 14" roof opening and a 12V DC power source. Safety Warning: Always disconnect the main vehicle power before connecting the fan. Do not use solvent-based sealants as they can damage the plastic flange.
Installation
The fan can be installed in an existing roof vent opening or a new opening. Ensure the opening is 14" x 14" (356mm x 356mm). If the roof thickness is less than 2", build up the thickness using wood or suitable material.
- Roof Preparation: Remove the old vent and all old caulking compound for at least 2" around the opening.
- Sealing: Apply a continuous strip of butyl tape to the bottom surface of the flange, ensuring screw holes are covered.
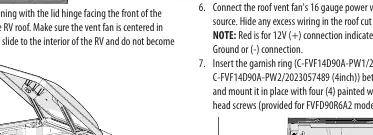
- Mounting: Position the fan with the lid hinge facing the front of the vehicle. Secure it to the roof using the provided screws. Do not overtighten.
- Sealing the Exterior: Apply a bead of sealant around the outside edge of the flange and over every exposed screw head.
Electrical Requirements
The fan requires a minimum 12V / 5A service. Connect the 16-gauge power wires to the vehicle's 12V power source:
- Red wire: 12V (+) connection.
- Black wire: Ground (-) connection.
Operation
The vent fan can be operated in three ways:
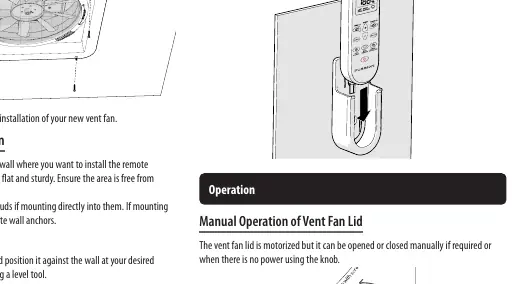

- Manual Operation: If power is unavailable, pull the knob to unlock it, then rotate it to open or close the lid. Push the knob back in to lock it.
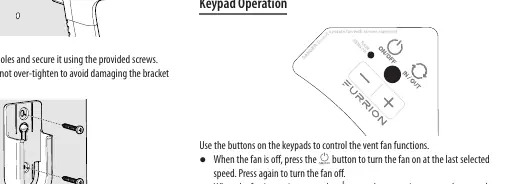
- Keypad Operation: Use the buttons on the fan unit to turn the fan on/off, adjust speed, change airflow direction (intake/exhaust), and activate the rain sensor (long press for 3 seconds).
- Remote Control: Provides full control including fan speed adjustment, rain sensor toggle, and lid operation.
Maintenance and Cleaning
Warning: Always turn the fan off and disconnect 12V power before cleaning. Do not operate the fan without the insect screen.
- Clean components using only mild soap and water.
- Do not use caustic or solvent-based chemicals, as these can cause cracking and product failure.
- To remove the insect screen, rotate it counterclockwise until the tabs align with the notches, then lift to remove.
Manufacturer information
Furrion
Practical help
Common problems
Lid will not open or close
Check if the fan has 12V power. If power is lost, use the manual knob to operate the lid.
Rain sensor not activating
Ensure the rain sensor is activated by performing a long press (3 seconds) on the rain sensor button on the keypad or remote.
Fan not running
Verify the 12V DC power supply and check the vehicle's fuse panel.
Before use
- Verify 12V DC power supply (10-14.6V).
- Ensure roof opening is 14" x 14".
- Check for obstructions (wires/pipes) inside the RV roof.
- Ensure sealant is compatible with plastic (no solvents like Xylene or Acetone).
- Confirm roof thickness is within the supported range (2"-5" or 2"-7" depending on garnish ring).
Specs in practice
- Input Voltage
- 12V DC (10-14.6V operating range).
- Power Rating
- 36W total power consumption.
Images and diagrams
- Wiring: Red wire is 12V (+), Black wire is Ground (-).
- Manual Knob: Pull to unlock, rotate clockwise to open, counterclockwise to close.
Model compatibility
- Requires 14" x 14" roof opening.
- Compatible with 4" or 6" garnish rings depending on roof thickness.

Manual page author
David Miller
Documentation analyst
Organizes user manual content into clear summaries, with attention to model details, product context, and everyday usability.