Garden / Outdoor Cooking
User Manual for Char-Broil Performance Series 2-Burner Gas Grill
Comprehensive user guide for the Char-Broil Performance Series 2-Burner Gas Grill. Includes assembly instructions, safety guidelines, LP cylinder installation, cleaning procedures, and troubleshooting steps.
Quick answers from the manual
Quick answer
- This manual provides assembly, operation, and maintenance instructions for the Char-Broil Performance Series 2-Burner Gas Grill. It includes critical safety warnings regarding LP gas handling and leak testing. p. 1, 2, 3, 4
Key actions
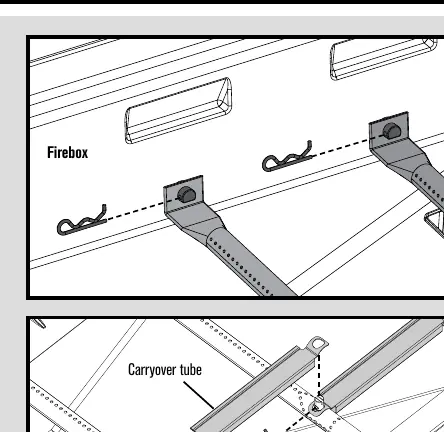
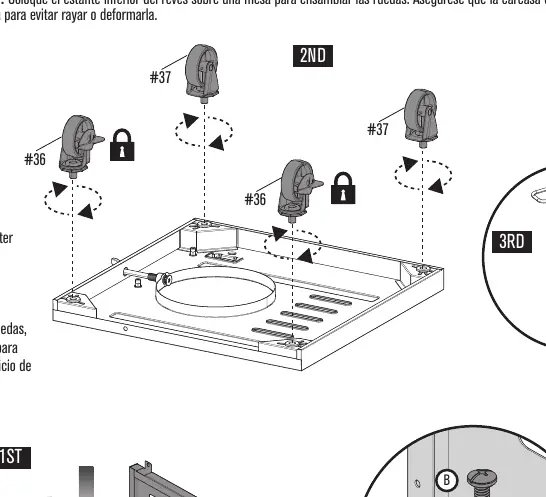
- Assembly p. 37, 38, 39, 40
- Leak Testing p. 5, 6, 15, 16
- Lighting the Grill p. 8, 18, 28
First start
- Ensure the grill is fully assembled, perform a leak test on all gas connections, and check burner tubes for obstructions before the first use. p. 5, 6, 10
Problems and fixes
Burner won't light
Check gas supply, burner obstruction, and ignition system.
p. 46, 47, 48, 49
Gas leak
Turn off gas at source, check connections, perform leak test.
p. 46, 48, 50Maintenance and reset
- Clean burner tubes and ensure proper engagement with valve openings. p. 10, 20, 30
Technical specifications
| Parameter | Value | Meaning | Pages |
|---|---|---|---|
| Battery | AAA, 1.5V | Battery type required for electronic ignition. | p. 6, 16, 26 |
Where to find it in the PDF
- Assembly p. 37, 45
- Use and Care p. 4, 10
- Troubleshooting p. 46, 47
Table of contents
Manual images
Click an image to enlargeQuick guide from the manual
This guide provides essential instructions for the safe assembly, operation, and maintenance of your Char-Broil Performance Series 2-Burner Gas Grill. Before using the grill, ensure you have performed a leak test on all gas connections and that the grill is placed in a well-ventilated outdoor area. Always keep the grill clean to prevent grease fires.
Safety Information
DANGER: If you smell gas, immediately shut off the gas supply, extinguish any open flames, and open the lid. If the odor persists, move away from the appliance and call your gas supplier or fire department.
- Outdoor Use Only: Never use the grill in enclosed spaces like garages, porches, or under overhead structures.
- Grease Fires: Do not use water on a grease fire. Keep the grill clean to prevent grease buildup.
- LP Cylinder Safety: Never store a spare LP cylinder under or near the grill. Never fill a cylinder beyond 80% capacity.
LP Cylinder Installation
Your grill is designed for use with LP (propane) gas only. The cylinder must meet specific requirements (12" diameter x 18" tall, 20 lb. capacity).
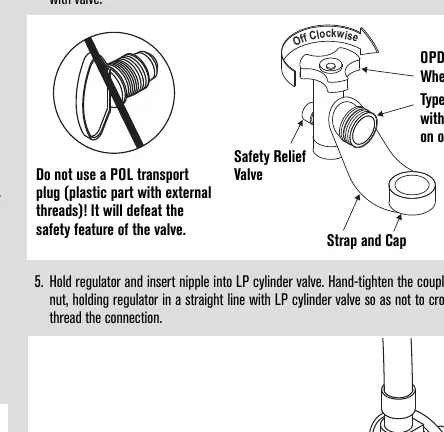
Connecting the Regulator
- Ensure all control knobs are in the OFF position.
- Turn the LP cylinder valve clockwise to the full stop position.
- Remove the safety cap from the cylinder valve.
- Insert the regulator nipple into the cylinder valve and hand-tighten the coupling nut. Do not use tools.
- Tighten the coupling nut clockwise until it stops, then turn an additional 1/2 to 3/4 turn.
Leak Testing
Perform a leak test every time the LP cylinder is exchanged or refilled. Use a 50/50 solution of mild soap and water. Brush the solution onto all gas connections. If "growing" bubbles appear, there is a leak. Do not use the grill until the leak is corrected.
Operation
Ignitor Lighting
- Turn all control knobs to OFF.
- Open the lid.
- Turn ON the gas at the LP cylinder.
- Push and turn the IGNITION BURNER knob to HIGH.
- Immediately push and hold the ELECTRONIC IGNITOR button until the burner lights.
- If ignition does not occur in 5 seconds, turn the burner controls off, wait 5 minutes, and repeat.
Match Lighting
If the electronic ignitor fails, you can use a long-stem match. Place the lit match through the match light hole on the side of the grill, then turn the burner knob to HIGH.
Maintenance and Cleaning
General Cleaning
- Cooking Grates: Clean after each use.
- Plastic Parts: Wash with warm soapy water. Do not use abrasive cleaners.
- Stainless Steel: Wash with mild detergent and warm water. Use a stainless steel grill cleaner if necessary.
Burner Assembly
If you have trouble igniting the grill, clean the burner tubes. Remove the burners and use a stiff wire (like a coat hanger) or a flexible bottle brush to clear obstructions from the tubes. Ensure the burner tubes are properly re-engaged with the valve openings after cleaning.
Troubleshooting
If you experience issues, consult the troubleshooting section for solutions regarding gas flow, ignition, and flame quality. Common issues include burner obstruction, empty LP cylinder, or loose connections.
Practical help
Common problems
Burner will not light using ignitor
Check for gas flow, ensure burner is engaged with the valve, check for obstructions in the burner, or replace the battery.
Gas leak detected
Immediately turn off gas at the source, check all connections, and perform a leak test with soapy water.
Low flame or sudden drop in gas flow
Check if the LP cylinder is empty or if the excess flow valve has tripped. Disconnect and reconnect the regulator.
Before use
- Perform a leak test on all gas connections.
- Ensure all control knobs are in the OFF position.
- Verify the LP cylinder is upright and secured.
- Check burner tubes for obstructions like spider webs.
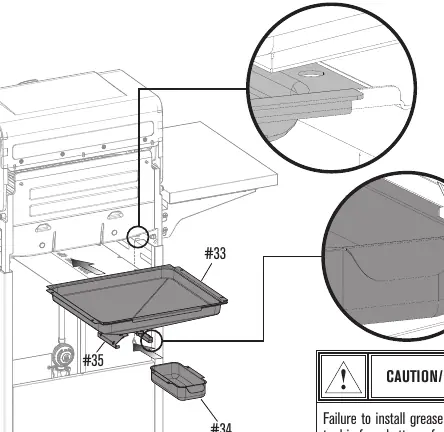
- Ensure the grease tray is installed.
Images and diagrams
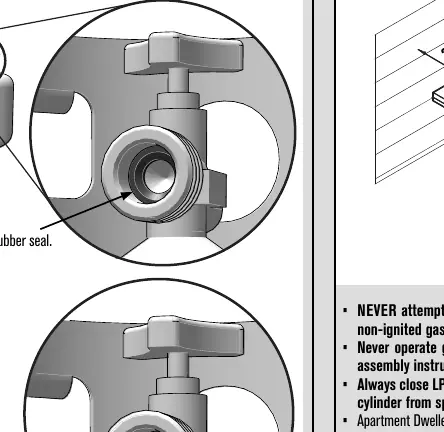
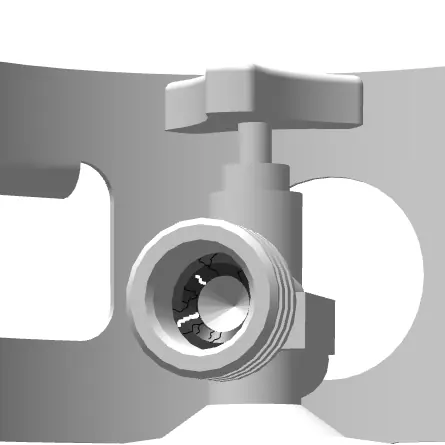
- LP Cylinder Valve: Shows the proper connection of the regulator to the cylinder valve.
- Burner Assembly: Illustrates the correct engagement between the burner tube and the valve opening.
Model compatibility
- For outdoor use only.
- Designed for LP gas only.
- Not intended for installation on boats or RVs.

Manual page author
Michael Turner
Technical manual editor
Reviews PDF manuals for structure, safety notes, and practical product details so readers can find the right information quickly.