Garden / Outdoor Cooking
User Manual for Char-Broil Professional 2-Burner Gas Grill 463675016
Comprehensive user guide for the Char-Broil Professional 2-Burner Gas Grill (model 463675016). Includes assembly instructions, safety precautions, LP cylinder handling, lighting procedures, cleaning, and troubleshooting.
Quick answers from the manual
Quick answer
- To light the grill, ensure the gas is on at the LP cylinder, open the lid, and turn the burner knob to HIGH while pressing the electronic ignitor button. If it fails to light, wait 5 minutes before trying again. p. 7
Key actions
- Perform a leak test p. 6
- Clean the burner assembly p. 9
First start
- Assemble the grill according to the provided steps, perform a leak test on all connections, and ensure the LP cylinder is properly secured. p. 5, 6
Maintenance and reset
- Clean burner tubes and venturis to prevent flashback. p. 9
Technical specifications
| Parameter | Value | Meaning | Pages |
|---|---|---|---|
| LP Cylinder Size | 12" diameter x 18" tall | Required dimensions for the LP cylinder. | p. 4 |
Where to find it in the PDF
- Safety Information p. 2, 3
Table of contents
Manual images
Click an image to enlargeQuick Guide from the Manual
This manual provides essential instructions for the assembly, safe operation, and maintenance of your Char-Broil Professional 2-Burner Gas Grill. Before using the grill, ensure you have performed a leak test, checked all connections, and verified that the LP cylinder is properly installed. Always operate the grill outdoors in a well-ventilated area.
Safety Information
DANGER: If you smell gas, shut off the gas supply, extinguish any open flames, and open the lid. If the odor persists, move away from the appliance and contact your gas supplier or fire department immediately.
- For outdoor use only. Do not use for commercial cooking.
- Do not store gasoline or other flammable liquids near the grill.
- Never cover grates with aluminum foil, as this blocks ventilation and creates a fire hazard.
- Keep the grill at least 3 feet away from walls or surfaces and 10 feet from ignition sources.
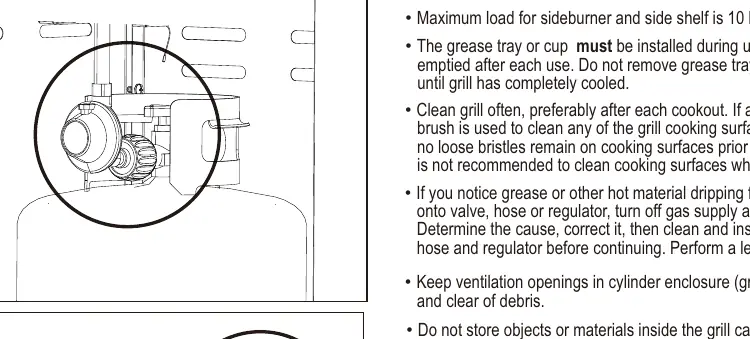
LP Cylinder Handling
The grill is designed for use with a standard 20 lb. LP cylinder. Always keep the cylinder in an upright position during use, transit, or storage. Never fill the cylinder beyond 80% capacity. Always use the provided safety cap when the cylinder is disconnected.

Lighting Instructions
Ignitor Lighting
- Turn all burner control valves to OFF.
- Open the lid.
- Turn ON the gas at the LP cylinder.
- Push and turn the burner knob to HIGH. Immediately push and hold the ELECTRONIC IGNITOR button until the burner lights.
- If ignition does not occur within 5 seconds, turn the burner controls off, wait 5 minutes, and repeat the procedure.
Match-Lighting
- Turn all burner control valves to OFF.
- Open the lid.
- Turn ON the gas at the LP cylinder.
- Place a match into the match holder (hanging from the side panel). Light the match and place it through the match light hole on the side of the grill.
- Push and turn the burner knob to HIGH.
Cleaning and Maintenance
Regular cleaning is essential to prevent grease fires and ensure proper performance.
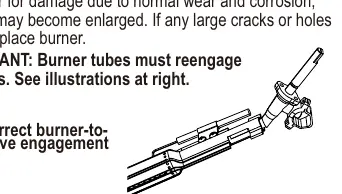
- Burner Assembly: If the grill is hard to light or the flame is weak, clean the venturis and burners. Remove burners, use a stiff wire or bottle brush to clean the tubes, and ensure ports are clear.
- General Cleaning: Use a mild detergent and warm water for most surfaces. For stainless steel, use a soft cloth and avoid abrasive pads.
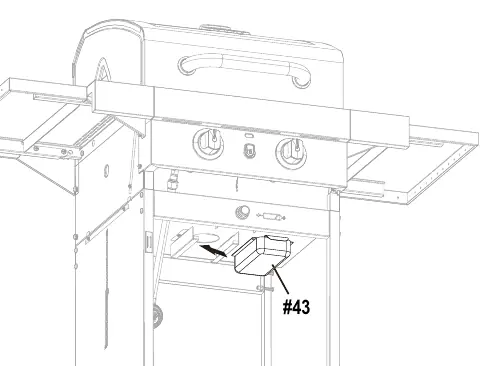
- Grease Tray: Always install the grease tray before use and empty it after each use once the grill has cooled.
Troubleshooting
If you encounter issues, consult the troubleshooting section for solutions regarding gas flow, ignition problems, or flame quality. Common issues like low flame or sudden drops in gas flow often relate to the excess flow valve or LP cylinder levels.
Practical help
Common problems
Burner will not light using ignitor
Check battery orientation, ensure wires are connected, clean electrodes, or replace the battery.
Sudden drop in gas flow or low flame
Check if the LP cylinder is empty or if the excess flow valve has tripped. Disconnect and reconnect the regulator.
Grease fire
Turn off knobs and LP cylinder valve. Leave the lid open and let the fire burn out. Clean the grill thoroughly after it cools.
Gas leak
Perform a leak test using a 50/50 soap and water solution on fittings. If a leak is detected, stop immediately and contact a professional.
Before use
- Perform a leak test on all gas connections.
- Ensure the LP cylinder is upright and properly secured.
- Check that burner tubes are free of spider webs or debris.
- Verify the grease tray is installed.
- Ensure all control knobs are in the OFF position before turning on the gas.
Specs in practice
- LP Cylinder Capacity
- Maximum 20 lb. (9 kg) capacity.
- Side Shelf Load Limit
- Maximum 10 lbs. Do not exceed this weight.
Images and diagrams
- Assembly steps show the sequence for attaching casters, side shelves, the grill head, and the grease tray.
- Burner engagement diagram illustrates how the burner tube must correctly fit over the valve opening.
- Leak test diagram indicates the specific fittings to brush with soapy water.
Model compatibility
- For outdoor use only.
- Not intended for installation in or on a boat or RV.
- Do not attach to a self-contained LP gas system of a camper trailer or motor home.

Manual page author
David Miller
Documentation analyst
Organizes user manual content into clear summaries, with attention to model details, product context, and everyday usability.