Computers / Laptops
AORUS 15X Laptop User Manual
Quick setup and recovery guide for the AORUS 15X laptop. Learn how to connect power, use hotkeys, and perform system recovery.
Table of contents
Manual images
Click an image to enlargeQuick Start Guide
Follow these steps to set up your AORUS 15X laptop for the first time:
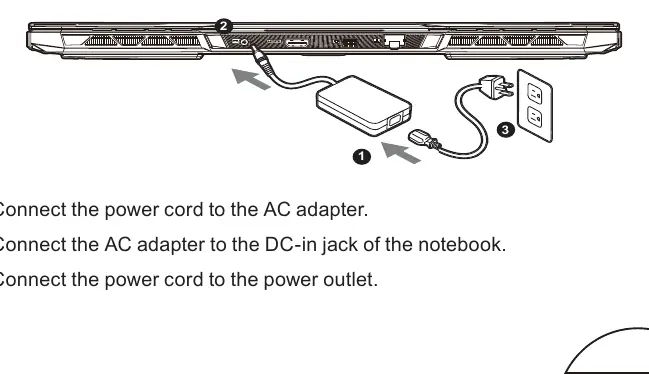
- Connect the power cord to the AC adapter.
- Connect the AC adapter to the DC-in jack on the notebook.
- Connect the power cord to a grounded power outlet.
Important: Do not turn off the notebook during the first boot until the operating system configuration is complete. Audio volume will not function until Windows setup is finished.
Notebook Tour
The AORUS 15X features various ports and controls:
- Microphone & Webcam: Located at the top of the display panel.
- USB Ports: Includes USB 3.2 (Type-A) and Thunderbolt 4 (USB Type-C).
- Video Output: HDMI 2.1 and Mini DisplayPort 1.4.
- Connectivity: Ethernet (LAN) port.
- Audio: Combo audio jack.
- Reset: Battery reset hole located on the bottom.
Hotkeys
Use the Fn key in combination with other keys to control system functions:
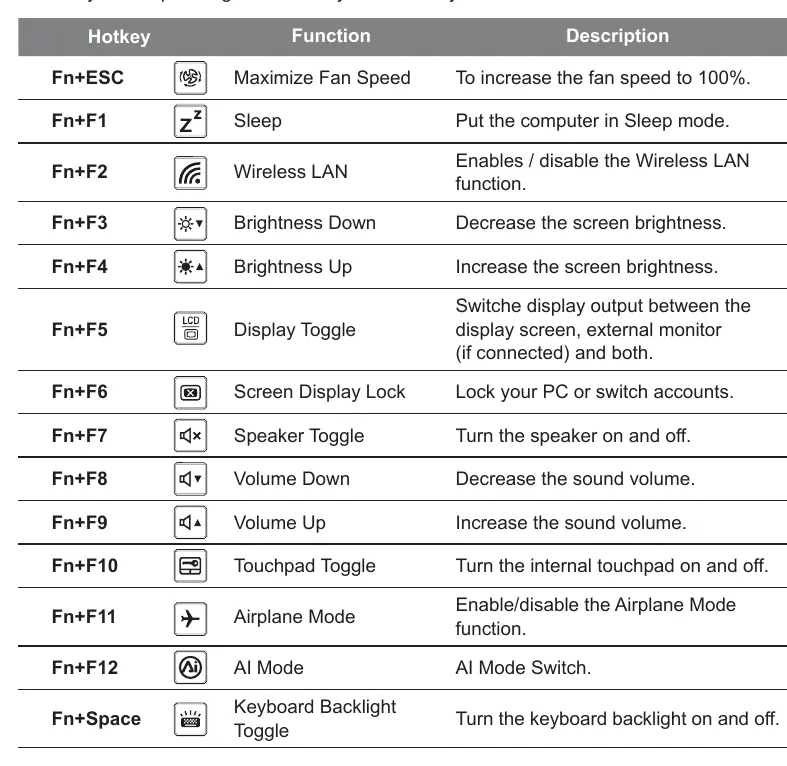
- Fn+ESC: Maximize Fan Speed.
- Fn+F1: Sleep mode.
- Fn+F2: Wireless LAN toggle.
- Fn+F3/F4: Decrease/Increase screen brightness.
- Fn+F5: Display toggle.
- Fn+F7: Speaker toggle.
- Fn+F8/F9: Volume down/up.
- Fn+F10: Touchpad toggle.
- Fn+F11: Airplane mode.
- Fn+F12: AI Mode switch.
- Fn+Space: Keyboard backlight toggle.
System Recovery
If the operating system encounters issues, you can use the built-in recovery partition to restore factory settings.
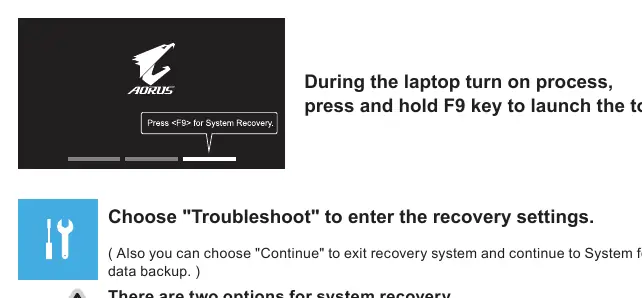
- Turn off and restart the laptop.
- During the boot process, press and hold the F9 key to launch the recovery tool.
- Select Troubleshoot to enter recovery settings.
- Choose between Reset this PC (keep or remove files) or Smart Recovery (restore factory defaults).
- Follow the on-screen instructions. Ensure the AC adapter is connected during this process.
Safety and Maintenance
- Do not remove the built-in lithium battery.
- Avoid using the laptop on sloped surfaces or areas prone to vibration.
- Do not store in temperatures exceeding 45°C (112°F).
- Ensure ventilation vents (on the side or bottom) are not blocked to prevent overheating.
Manufacturer information
Gigabyte Technology Co., Ltd.
Practical help
Common problems
System hangs or becomes unresponsive
Power off the notebook, remove AC power, insert a straightened paperclip into the battery reset hole for 4 seconds, wait 15 seconds, then reconnect AC power and turn on.
Audio volume not working after first boot
Note that audio volume will not function until the Windows setup process is fully completed.
Before use
- Ensure the laptop is connected to a grounded power adapter.
- Verify the power outlet is near the unit and easily accessible.
- Check that the input/output rating on the laptop matches the power adapter.
Specs in practice
- Input voltage
- 100-240Vac, suitable for global power standards.
- Input frequency
- 50-60Hz.
- Rating output
- 20V, 14A.
Images and diagrams
- The power connection diagram illustrates the sequence: power cord to adapter, adapter to laptop, then to wall outlet.
- The notebook tour diagram identifies all physical ports, including USB, HDMI, and audio jacks.
Model compatibility
- System recovery is only available on devices with a pre-installed OS.
- Devices with EFI SHELL do not support the built-in recovery function.

Manual page author
David Miller
Documentation analyst
Organizes user manual content into clear summaries, with attention to model details, product context, and everyday usability.