Home Appliances / Air Purifiers
User Manual for W1 Plus Remote Control
Quick guide for the W1 Plus 2.4GHz voice remote with air mouse and QWERTY keyboard. Learn how to pair, use voice commands, adjust cursor speed, and program IR learning.
Quick answers from the manual
Quick answer
- The W1 Plus is a 2.4GHz voice remote with an air mouse and QWERTY keyboard. It supports IR learning and connects via a USB Nano receiver. p. 1
Key actions
- Pairing the remote p. 4
- IR Learning p. 5
- Adjusting cursor speed p. 4
First start
- Insert the Nano receiver into the USB port, bring the remote within 3cm, and hold [Volume +] and [Volume -] for 3 seconds. p. 4
Problems and fixes
Remote not responding
Wake it up by pressing any button.
p. 6
Low battery
Replace or charge batteries.
p. 5, 6Maintenance and reset
- The remote enters standby mode after 15 seconds of inactivity. p. 6
Where to find it in the PDF
- Front and Back View p. 1
- Key Function Definitions p. 2
- Keyboard Layout p. 3
Table of contents
Manual images
Click an image to enlargeQuick guide from the manual
The W1 Plus is a multifunctional 2.4GHz remote control featuring an air mouse, a mini QWERTY keyboard, and IR learning capabilities. It is designed for use with Android TV Boxes, Smart TVs, and Smart Projectors. Key operations include pairing via the Nano receiver, voice assistant activation, and cursor speed adjustment.
Device overview
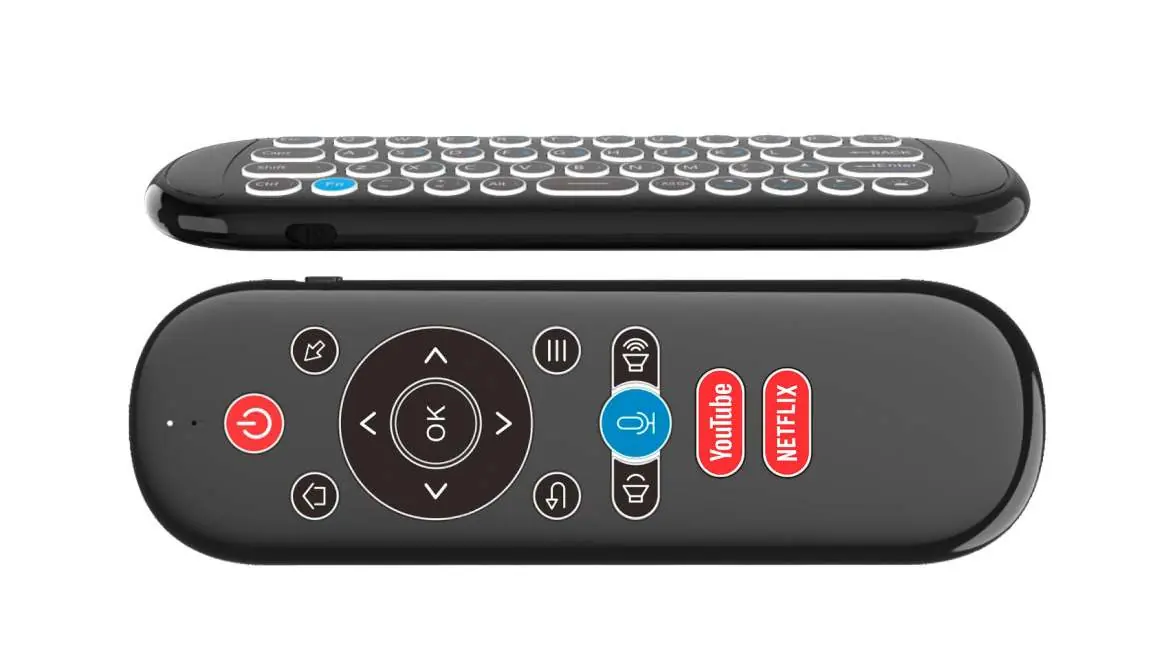
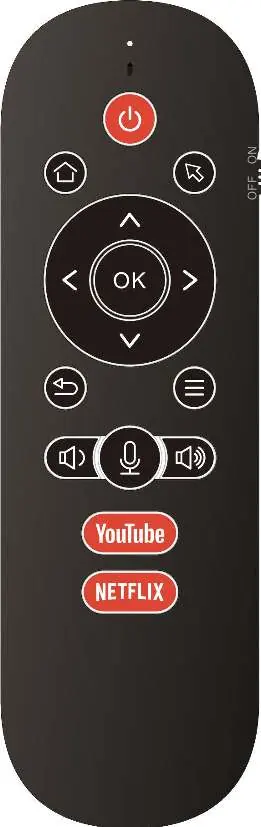
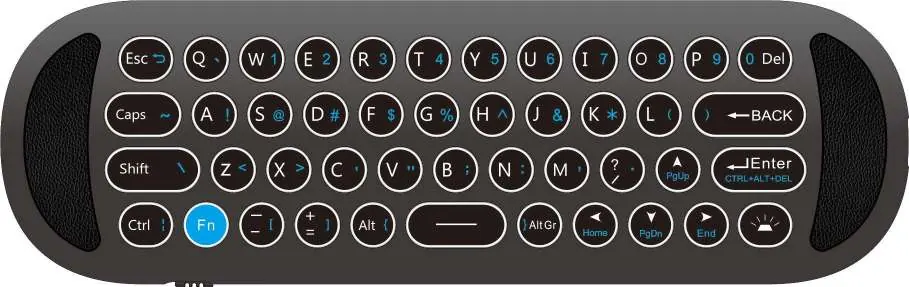
The remote features a dual-sided design. The front side contains navigation, volume, voice, and media control buttons. The back side features a full QWERTY keyboard for text input. The device includes a backlight function that activates automatically based on which side is facing up.
Pairing instructions
To pair the remote with your device:
- Insert the Nano receiver into the USB port of your Android TV Box or Smart TV.
- Move the remote control close to the receiver (within 3cm).
- Press and hold the [Volume +] and [Volume -] buttons simultaneously for 3 seconds.
- The indicator light will change from slow flashing to steady, indicating pairing mode.
- If successful, the indicator light will flash 3 times. If unsuccessful, it will flash after 30 seconds.
Voice control
The remote supports the Google ATV protocol. Press and hold the [Voice] button to activate the voice assistant on your device. The indicator light will turn on while the button is pressed. Release the button to stop the voice input.
Air mouse and cursor speed
To toggle the air mouse function, press the [Air mouse] button. The air mouse function automatically stops when the QWERTY keyboard side is facing up.
To adjust the cursor speed (CPI):
- Speed up: Press [OK] and [Volume +] for about 3 seconds until the indicator light blinks.
- Slow down: Press [OK] and [Volume -] for about 3 seconds until the indicator light blinks.
IR learning function
You can program the W1 Plus to learn functions from other infrared remotes:
- Press and hold [OK] and [Air-Mouse] simultaneously for 3 seconds until the indicator light stays on.
- Press the button on the W1 Plus you wish to program; the indicator light will blink slowly.
- Keep the two remotes 1-5cm apart and press the corresponding button on the source infrared remote.
- Once successful, the indicator light will blink 3 times and then stay on.
- Press the [Air-mouse] button to exit learning mode and save data.
Backlight and anti-loss features
The remote features automatic backlighting. When the QWERTY keyboard is facing up, the front side backlight turns off, and vice versa. The backlight enters standby mode after 5 seconds of inactivity.
The anti-loss function allows you to locate the remote. Press the "Search" button on the Nano receiver, and the remote will emit a sound. Press any button on the remote to stop the sound.
Troubleshooting and status indicators
- Standby mode: If the remote is inactive for 15 seconds, it enters standby mode. Press any button to wake it up.
- Low battery: If the remote blinks 5 times quickly during use, the battery is low.
- No response: If buttons are held for more than 2 minutes, the remote enters standby mode.
Practical help
Common problems
Remote does not respond
The remote may be in standby mode. Press any button to wake it up.
Pairing fails
Ensure the Nano receiver is plugged in, the remote is within 3cm of the receiver, and you hold [Volume +] and [Volume -] for 3 seconds.
IR learning fails
Ensure the distance between the two remotes is 1-5cm and that you are in learning mode (indicator light on).
Before use
- Insert the Nano receiver into the USB port of the host device.
- Ensure the remote is within 3cm of the receiver for initial pairing.
- Check if the remote is in standby mode if it does not respond.
Specs in practice
- Nano Receiver
- USB dongle required for 2.4GHz wireless connection.
Images and diagrams
- The front panel contains navigation, volume, voice, and media buttons.
- The back panel features a full QWERTY keyboard.
Model compatibility
- Supports Android TV Box, Smart TV, and Smart Projector.

Manual page author
Michael Turner
Technical manual editor
Reviews PDF manuals for structure, safety notes, and practical product details so readers can find the right information quickly.