Lighting / Fixtures
Assembly Instructions for Golden Lighting 1067-O3P/1067-OSF Flush Mount Light
A comprehensive assembly and installation guide for the Golden Lighting 1067-O3P/1067-OSF fixture. Includes step-by-step instructions for both pendant and semi-flush mounting, wiring identification, and safety guidelines.
Table of contents
Manual images
Click an image to enlargeImportant Information
This document provides assembly and installation instructions for the Golden Lighting 1067-O3P and 1067-OSF fixtures. The fixture can be installed as either a pendant or a semi-flush mount. All installation work must be performed by an accredited professional. Always shut off the power supply at the fuse or circuit breaker before beginning.
Installation Preparation
Carefully remove the fixture from the carton and locate the yellow bag containing all parts. Remove the old fixture from the wall, including the old mounting strap. Decide on your preferred installation method (pendant or semi-flush) before proceeding, as the steps differ.
Pendant Installation
- Attach the mounting strap assembly to the junction box using mounting screws.
- Unscrew the canopy loop collar and test the height of the canopy. Adjust the nipple and canopy loop height as needed.
- Measure the required chain length, remove excess links if necessary, and attach chain connectors.
- Feed fixture wires through the nipple, top loop, chain, canopy loop collar, and canopy.
- Connect the fixture wires to the power supply wires (see Wiring section).
- Push the canopy to the ceiling and secure it with the canopy loop collar.
- Install glass shades and light bulbs (not included).
Semi-Flush Installation
- Attach the mounting strap to the junction box.
- Hold the canopy up to the mounting strap to test the fit of the mounting screws.
- Feed fixture wires through the nipple and nipple cover.
- Connect the fixture wires to the power supply wires (see Wiring section).
- Push the canopy to the ceiling until mounting screws protrude through the holes.
- Secure the canopy with decorative nuts.
- Install glass shades and light bulbs (not included).
Wiring Instructions
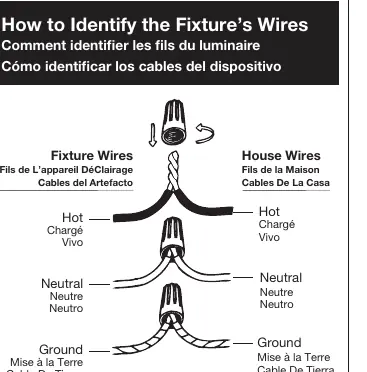
Have an assistant support the fixture's weight during wiring. Connect the wires as follows:
- Hot to Hot: Transparent wire with black inner thread, black wire, or smooth wire.
- Neutral to Neutral: Transparent wire with white inner thread, white wire, or ribbed wire.
- Ground to Ground: Transparent wire with green inner thread, green wire, or copper wire.
Twist the ends of the wire pairs together and secure with a wire connector. If there is no house ground wire, wrap the fixture's ground wire around the ground screw on the mounting bracket.
Finishing and Maintenance
After installing the fixture, apply a clear silicone rubber caulking to seal the gap between the canopy and the mounting surface. Ensure you do not exceed the maximum recommended wattage for the bulbs. For customer service or replacement parts, contact the place of purchase.
Manufacturer information
Golden Lighting
Practical help
Common problems
Canopy does not sit flush against the ceiling
Apply clear silicone rubber caulking to seal the gap between the canopy and the mounting surface.
Fixture wires are not taut
Ensure wires are pulled taut through the nipple and canopy before securing.
Before use
- Shut off power at the circuit breaker.
- Verify all parts are present in the yellow bag.
- Decide between pendant or semi-flush installation.
- Identify Hot, Neutral, and Ground wires.
- Ensure you have the correct bulbs (do not exceed max wattage).
Specs in practice
- Neutral Wire
- Ribbed, white, or transparent with white inner thread.
Images and diagrams
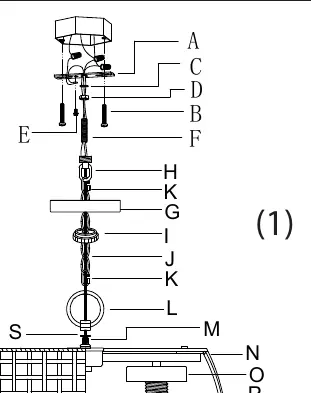
- Diagram (1) illustrates the assembly steps for pendant installation.
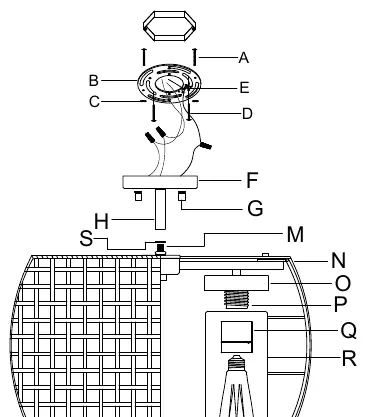
- Diagram (2) illustrates the assembly steps for semi-flush installation.
Model compatibility
- Use only specified bulbs; do not exceed maximum wattage.

Manual page author
Michael Turner
Technical manual editor
Reviews PDF manuals for structure, safety notes, and practical product details so readers can find the right information quickly.