Lighting / Fixtures
Installation Manual for Golden Lighting 2073-OFM Flush Mount Ceiling Fixture
A comprehensive installation guide for the Golden Lighting 2073-OFM flush mount ceiling fixture. This manual provides step-by-step instructions for wiring, assembly, and mounting, along with safety precautions and placement recommendations.
Quick answers from the manual
Quick answer
- This manual provides instructions for installing the Golden Lighting 2073-OFM flush mount ceiling fixture, including wiring, assembly, and safety guidelines. p. 3, 4
Key actions
- Shut off power at the circuit breaker before starting installation. p. 3
- Connect fixture wires to house wires (Hot to Hot, Neutral to Neutral, Ground to Ground). p. 3
Where to find it in the PDF
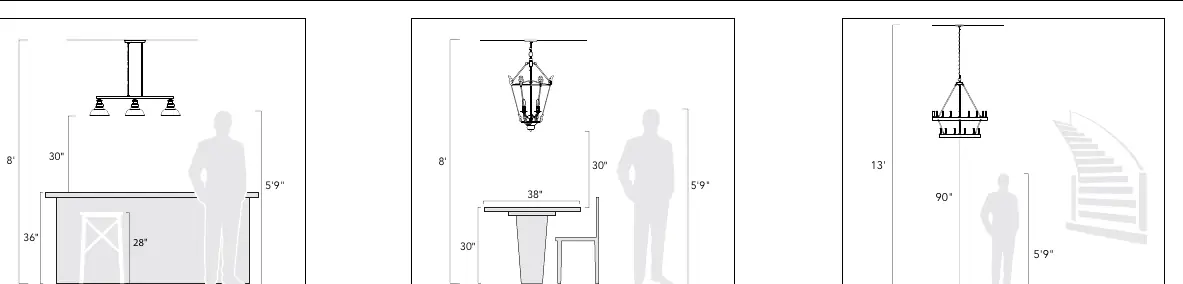
- Lighting Placement Guide p. 1
- Wiring and Assembly Diagrams p. 2
- Installation Instructions (English) p. 3
- Installation Instructions (Spanish) p. 4
Table of contents
Manual images
Click an image to enlargeQuick guide from the manual
This manual provides instructions for the installation of the Golden Lighting 2073-OFM flush mount ceiling fixture. Key requirements include having the installation performed by an accredited professional, shutting off the power supply at the circuit breaker before starting, and using only specified bulbs without exceeding the maximum wattage.
Preparation for installation
Before beginning, ensure the power is off at the circuit breaker. Remove the old fixture and the old mounting strap. Locate the parts bag and identify the mounting strap (B). Ensure the mounting screws (A & D) are attached to the strap and that the strap fits the junction box spacing. Tighten nuts (C) to secure the screws if necessary.
Wiring the fixture
Have an assistant support the fixture's weight during wiring. Connect the fixture wires to the house supply wires from the junction box:

- Hot: Connect to Hot (transparent wire with black inner thread, black, or smooth wire).
- Neutral: Connect to Neutral (transparent wire with white inner thread, white, or ribbed wire).
- Ground: Connect to Ground (transparent wire with green inner thread, green wire, or copper).
Twist the ends of the wire pairs together and secure with a wire connector, ensuring all twists are in the same direction. If there is no house ground wire, wrap the fixture's ground wire around the ground screw (E) on the mounting bracket.
Assembly and installation
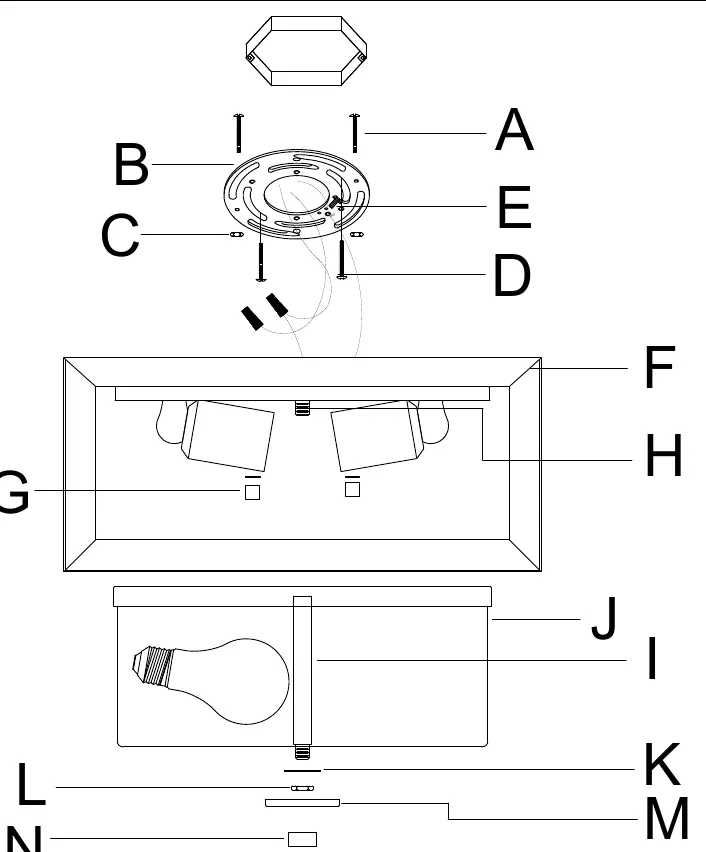
- Lift the canopy (F) over the mounting strap (B) so the mounting screws (A) protrude through the holes.
- Thread the decorative nuts (G) onto the screws to secure the canopy against the ceiling.
- Install the light bulbs (not provided) according to the fixture's specifications.
- Thread the rod (I) into the post (H) until secure.
- Lift the glass shade (J) up to the canopy (F) until the rod (I) protrudes through the hole.
- Secure the glass shade (J) using the washer (K), hex nut (L), cap (M), and finial (N) in the order shown in the diagram.
- Apply clear silicone rubber caulking to seal the gap between the enclosure and the mounting surface.
Manufacturer information
Golden Lighting
Practical help
Common problems
Fixture weight is too heavy to hold while wiring.
Have an assistant support the fixture's weight while you complete the wiring connections.
No house ground wire available.
Locate the ground screw (E) on the mounting bracket/strap and wrap the fixture's ground wire around it, then tighten.
Gap between fixture and ceiling.
Apply a clear silicone rubber caulking to seal the gap between the enclosure and the mounting surface after installation.
Before use
- Shut off power supply at the fuse or circuit breaker.
- Verify the mounting strap (B) matches the junction box hole spacing.
- Ensure you have an assistant to help hold the fixture.
- Check that you have the correct bulbs (do not exceed max wattage).
- Ensure all wire connections are secure and twisted in the same direction.
Specs in practice
- Neutral Wire
- Transparent wire with white inner thread, white wire, or ribbed wire.
Images and diagrams
- The wiring diagram illustrates the correct connection of Hot, Neutral, and Ground wires using wire connectors.
- The assembly diagram (Page 2) labels parts A through N, showing the sequence for mounting the canopy and securing the glass shade.
Model compatibility
- Use only specified bulbs.
- Do not exceed the maximum recommended wattage.

Manual page author
Emily Carter
User documentation editor
Prepares concise manual descriptions and highlights the most useful setup, operation, and maintenance information for readers.