Lighting / Fixtures
Installation Guide for Golden Lighting 1648-M1L Pendant Light
A comprehensive installation and wiring guide for the Golden Lighting 1648-M1L pendant light. Includes step-by-step assembly instructions, wire identification, and safety precautions.
Table of contents
Quick Guide from the Manual
This document provides essential instructions for installing the Golden Lighting 1648-M1L pendant light. Important: All installation work should be performed by an accredited professional. Always shut off the power supply at the fuse or circuit breaker before beginning any work. Ensure you use only the specified bulbs and do not exceed the maximum recommended wattage.
Preparing for Installation
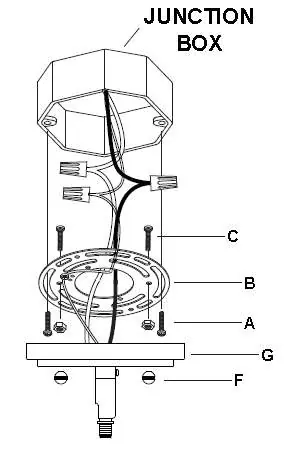
Before starting, carefully remove the new fixture from the carton and locate the yellow bag containing all parts. Ensure the old fixture and mounting strap are removed from the wall or ceiling. Prepare the mounting strap (B) by attaching the mounting screws (A & D) and tightening the nuts (C) to hold them in place. Test the canopy (G) against the mounting strap to ensure proper fit before final installation.
Assembling the Fixture
- Determine the desired hanging height and calculate the number of rods (I) needed.
- Feed the fixture wires from the column (L) through the desired number of rods (I).
- Thread the assembled rods (I) onto the column (P).
- Thread the top of the assembled rods (I) into the swivel (H) and out through the canopy (G).
- Pull the wires until taut and trim the remaining fixture wires to the desired length, leaving 8 to 10 inches for installation.
Wiring Connections
Have an assistant support the fixture's weight while you complete the wiring. Connect the fixture wires to the power supply wires from the junction box as follows:
- Hot to Hot: Connect the transparent wire with black inner thread, black wire, or smooth wire to the house hot wire.
- Neutral to Neutral: Connect the transparent wire with white inner thread, white wire, or ribbed wire to the house neutral wire.
- Ground to Ground: Connect the transparent wire with green inner thread, green wire, or copper wire to the house ground wire.
Twist the ends of the wire pairs together and secure them with a wire connector. If there is no house ground wire, wrap the fixture's ground wire around the ground screw (E) on the mounting bracket and tighten it.
Finishing the Installation
Push the canopy (G) up to the ceiling over the mounting strap (B) until the mounting screws (D) protrude through the holes. Thread the deco nuts (F) onto the exposed threads of the mounting screws (D) and tighten until the canopy is snug against the ceiling. Hold the shade (M) over the socket threads at the bottom of the column (L) and secure it using the socket cover (N). Install the light bulb (not included) and turn the power back on to test the fixture.
Lighting Tips
To ensure the best lighting in your space, consider layering your lighting to provide both task and ambient light. Coordinating fixtures like sconces, flush mounts, and pendants can help achieve a cohesive aesthetic. Using dimmers is recommended to control light output levels.
Manufacturer information
Golden Lighting
Practical help
Common problems
Fixture is too long or too short
Adjust the number of rods (I) used during the assembly phase to achieve the desired hanging height.
No house ground wire available
Locate the ground screw (E) on the mounting bracket/strap and wrap the fixture's ground wire around it, then tighten with a screwdriver.
Before use
- Shut off power at the circuit breaker.
- Ensure installation is performed by an accredited professional.
- Verify all parts are present in the yellow bag.
- Check that the junction box is secure.
- Confirm the light bulb wattage does not exceed the maximum recommended.
Specs in practice
- Neutral Wire
- Ribbed, white, or transparent wire with white inner thread.
Images and diagrams
- Wiring Diagram: Illustrates the correct connection of Hot, Neutral, and Ground wires using wire nuts.
- Assembly Diagram: Shows the sequence of rods, canopy, and shade attachment to the fixture column.
Model compatibility
- Requires an accredited professional for installation.
- Compatible with dimmers for adjustable light output.

Manual page author
David Miller
Documentation analyst
Organizes user manual content into clear summaries, with attention to model details, product context, and everyday usability.