Lighting / LED Drivers
Installation Manual for Halcyon EX801 Exterior Surface Mount Spot
Quick installation and maintenance guide for the Halcyon EX801 exterior surface mount spotlight. Includes wiring diagrams, mounting instructions for concrete and wood, and cleaning tips.
Table of contents
Manual images
Click an image to enlargeQuick Guide
The Halcyon EX801 is an exterior surface mount spotlight. This document provides essential installation and maintenance instructions. Please note that the light source is not replaceable; when it reaches the end of its life, the entire luminaire must be replaced. Installation must be performed by a qualified Registered Electrician to ensure safety and prevent damage.
Installation
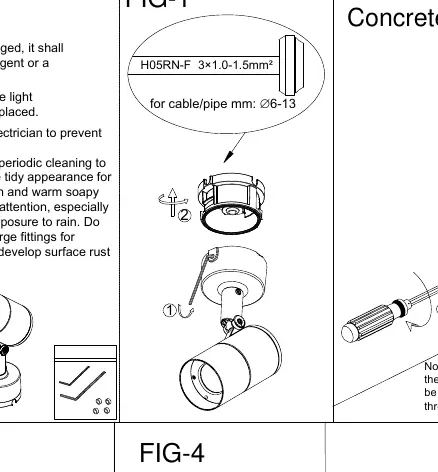
Before beginning, ensure the power is switched off. The input cable must be H05RN-F 3x1.0-1.5mm² with a diameter of 6-13mm.
Mounting
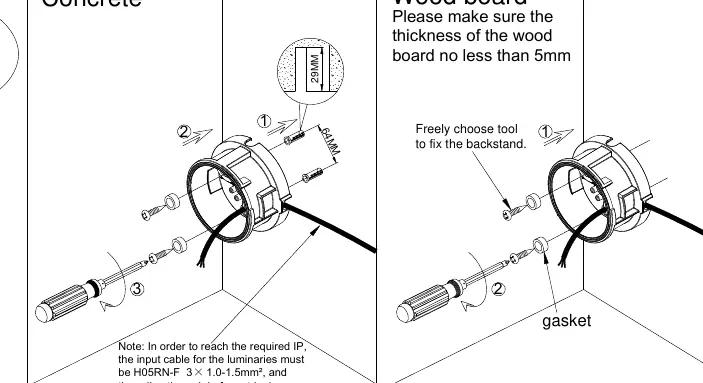
- Concrete: Use the provided anchors to secure the backstand.
- Wood: Ensure the wood board thickness is no less than 5mm.
Wiring
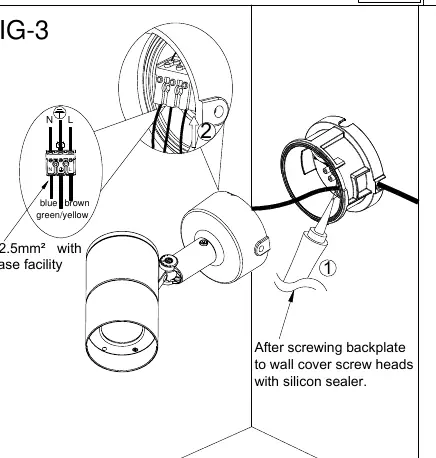
Connect the wires according to the markings:
- L: Brown
- N: Blue
- Earth: Green/Yellow
After screwing the backplate to the wall, ensure the screw heads are covered with silicon sealer to maintain the IP rating.
Adjustment
The fixture can be adjusted for optimal lighting direction:
- Rotation: 355°
- Tilt: 90°
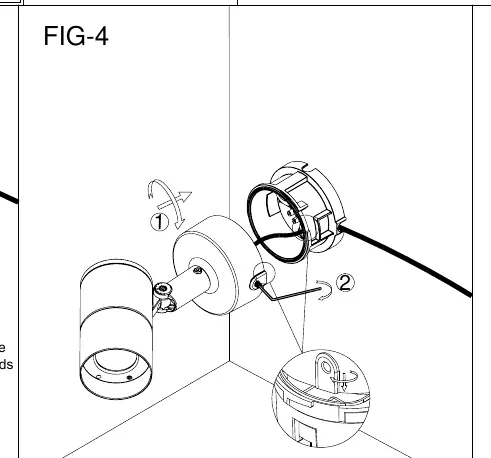
To adjust, loosen the screw on the side of the fixture, position the light as desired, and then fasten the screw securely.
Maintenance
Periodic cleaning is required to protect the surface and coating from corrosion, especially in coastal areas. Wash with care using a soft brush and warm soapy water with a neutral detergent. Do not use a water blaster or high-pressure hose, and do not submerge the fitting for extended periods.
Manufacturer information
Halcyon Lighting Ltd
Practical help
Common problems
Surface rust or tea staining
Clean periodically with a soft brush and warm soapy water. Coastal areas require extra attention to prevent corrosion.
Light source failure
The light source is not replaceable. The entire luminaire must be replaced when the light source reaches the end of its life.
Before use
- Ensure installation is performed by a qualified Registered Electrician.
- Verify the input cable is H05RN-F 3x1.0-1.5mm².
- For wood mounting, ensure the board thickness is at least 5mm.
- Ensure power is switched off before starting installation.
- Apply silicon sealer to screw heads after mounting.
Specs in practice
- Cable requirement
- H05RN-F 3x1.0-1.5mm² cable with a diameter of 6-13mm is required to maintain the IP rating.
- Adjustment range
- The fixture supports 355° rotation and 90° tilt.
Images and diagrams
- FIG-1: Cable preparation and specifications.
- FIG-2-A/B: Mounting instructions for concrete and wood surfaces.
- FIG-3: Wiring diagram showing Neutral, Live, and Earth connections.
- FIG-4: Sealing the backplate with silicon.
- FIG-5: Adjusting the fixture position.
Model compatibility
- Not suitable for submersion in water.
- Not compatible with high-pressure cleaning equipment.

Manual page author
Michael Turner
Technical manual editor
Reviews PDF manuals for structure, safety notes, and practical product details so readers can find the right information quickly.