Lighting / Fixtures
MFL Elwood LED 12V Ground Light Installation Guide
Installation guide for MFL Elwood LED 12V Ground Light (SKU 237002, 237003). Includes wiring diagrams, cut-out dimensions, and step-by-step mounting instructions for both ground and wall installation.
Table of contents
Manual images
Click an image to enlargeQuick guide from the manual
This document provides installation instructions for the MFL Elwood LED 12V Ground Light. Please note that this fitting requires a 12V transformer or LED driver (SELV type), which is sold separately. Installation must be performed by a licensed electrician in accordance with local and national wiring rules. The fitting is IP67 rated, which must be maintained during installation.
Installation requirements
- Must be installed by a licensed electrician.
- Ensure power to the circuit is switched OFF before starting.
- The fitting is IP67 rated; ensure this rating is maintained during installation. Additional silicone glue may be required.
- Check all components for damage before installation.
- For spring installation, the wall thickness must be greater than 30mm.
Installation using moulded box
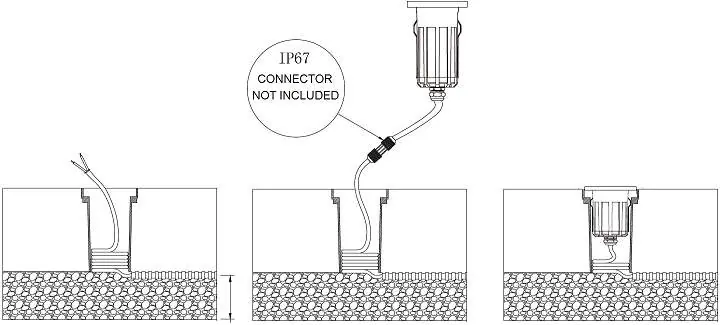
- Turn OFF the power to the transformer or LED driver.
- Remove the moulded box from the fitting.
- Cut out a hole in the installation area according to the specification section.
- Secure the moulded box into the installation area and seal it with concrete. The face of the fitting should be level with the ground surface.
- Connect the transformer output cable and LED fitting to the IP67 rating connector (not included).
- Press the LED fitting into the moulded box, ensuring the springs go through the slots.
- Turn ON the power.
Installation using springs
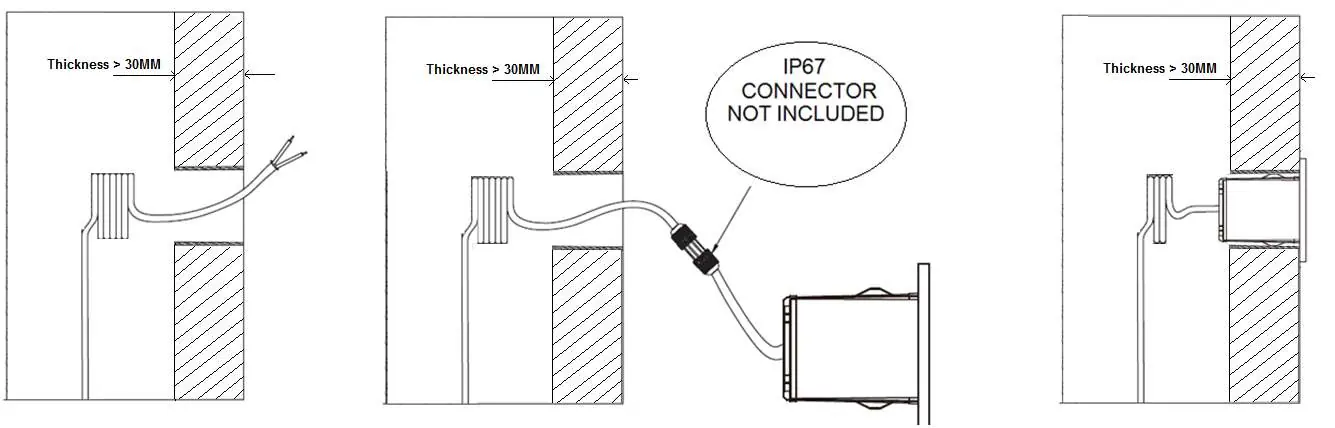
- Turn OFF the power to the transformer or LED driver.
- Remove the concrete can from the fitting.
- Cut out a hole in the installation area (ensure wall thickness is >30mm).
- Connect the transformer output cable and LED fitting to the IP67 rating connector (not included).
- Press the springs and install the LED fitting into the hole so the top lip sits on the wall.
- Turn ON the power.
Wiring
The wiring connections are as follows:
- Negative: Black
- Positive: Red
- Input voltage: +12VDC
Safety tips
- Always ensure power is OFF and the fitting has cooled down before maintenance or cleaning.
- Select a location away from hazards.
- Do not allow the fitting to come into contact with corrosive chemicals.
Specifications
- SKU 237002: Round, 0.75kg
- SKU 237003: Square, 0.785kg
- Rated Voltage: 12V
- Rated Wattage: 8W Max
- LED: CREE LEDS, 3000K, 500lm
- IP Rating: IP67
- IK Rating: IK08
Practical help
Common problems
Fitting not working after installation
Verify that the 12V transformer or LED driver is connected correctly and that the power is switched ON.
IP67 rating compromised
Ensure the fitting is sealed correctly. Additional silicone glue may be required during installation to maintain the IP67 rating.
Fitting damaged during transport
Do not install or operate the product. Return the complete product to the place of purchase for inspection or replacement.
Before use
- Ensure power to the circuit is switched OFF.
- Verify you have a 12V transformer or LED driver (SELV type) available (sold separately).
- Check that the installation location is suitable and away from hazards.
- Confirm all components are present and undamaged.
- Ensure a licensed electrician is available for installation.
Images and diagrams
- The manual provides two installation methods: using a moulded box for ground installation and using springs for wall/surface mounting.
- Wiring requires connecting the negative (black) and positive (red) cables to the 12V supply.
Model compatibility
- Requires a 12V transformer or LED driver (SELV type), which is sold separately.
- Wall thickness must be greater than 30mm for spring installation.

Manual page author
David Miller
Documentation analyst
Organizes user manual content into clear summaries, with attention to model details, product context, and everyday usability.