Lighting / Outdoor Landscape
User Manual for Harbor Breeze 2-CT 15 Lumen Solar Path Lights
Quick guide for Harbor Breeze 2-CT 15 Lumen Solar Path Lights (RM9P-P2-AGB-2). Includes installation steps, battery maintenance, troubleshooting, and operating modes.
Quick answers from the manual
Quick answer
- The Harbor Breeze 2-CT 15 Lumen Solar Path Lights feature two operating modes (6H and 10H) and require 10-12 hours of direct sunlight for initial charging. p. 1, 2
Key actions
- Charge the solar light for 10-12 hours in full sunlight before first use. p. 1
- Replace the battery with a 3.2V 14430 Lithium Phosphate rechargeable battery (min 400mAh). p. 1
First start
- Ensure the light is placed in full sunlight and allowed to charge for 10-12 hours. p. 1
Problems and fixes
Light does not turn on at night
Ensure the solar panel is clean, located in full sunlight, and not near other light sources. Replace batteries if old.
p. 1Maintenance and reset
- Keep the solar panel clean and free of debris/snow. Replace batteries when they reach the end of their life. p. 1
Technical specifications
| Parameter | Value | Meaning | Pages |
|---|---|---|---|
| Battery Type | 3.2V 14430 Lithium Phosphate | Rechargeable battery, minimum 400mAh capacity. | p. 1 |
Where to find it in the PDF
- Safety, Troubleshooting, and Maintenance p. 1
- Package Contents and Installation p. 2
Table of contents
Manual images
Click an image to enlargeQuick guide from the manual
The Harbor Breeze 2-CT 15 Lumen Solar Path Lights are designed for outdoor landscape lighting. For optimal performance, the solar light must be installed in an area that receives full, direct sunlight every day. Before first use, charge the light for 10-12 hours. It is recommended to allow the light to run through 8-12 complete charging and discharging cycles to reach the batteries' maximum capacity.
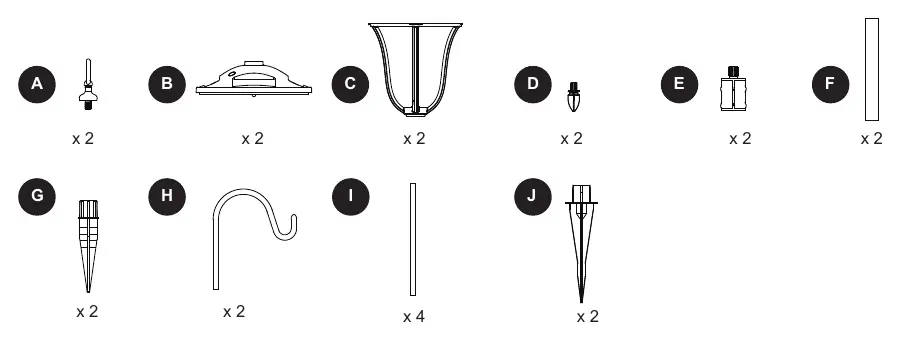
Package Contents
The package includes the necessary components for assembly, including the solar light head, poles, and ground stakes. No tools are required for assembly.
Installation
There are two installation methods provided in the manual:
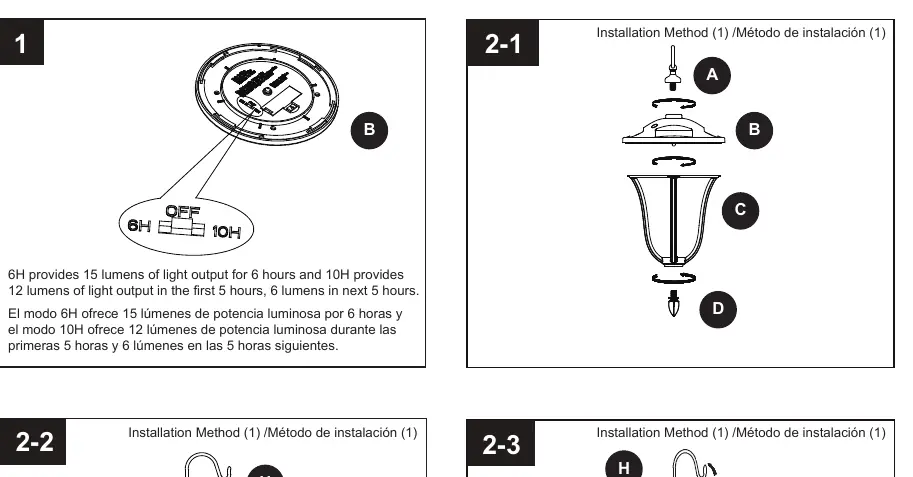
- Method 1: Assemble the stake (J), two poles (I), and the light head assembly (A, B, C, D).
- Method 2: Assemble the stake (J), pole (F), connector (E), and the light head assembly (B, C, D).
Operating Modes
The light features two operating modes controlled by a switch:
- 6H Mode: Provides 15 lumens of light output for 6 hours.
- 10H Mode: Provides 12 lumens of light output for the first 5 hours, followed by 6 lumens for the next 5 hours.
Maintenance and Battery Replacement
To ensure the solar panel functions correctly, keep it clean and free of debris or snow. If the light performance decreases, the battery may need replacement:
- Battery Type: 3.2V 14430 Lithium Phosphate rechargeable battery (minimum capacity of 400mAh).
- Procedure: Remove the battery compartment cover, replace the old battery with a new one of the specified type, and reattach the cover.
- Winter Tips: If lights are covered by snow for an extended period, allow the batteries to recharge in full, direct sunlight for at least 10-12 hours to maintain capacity.
Troubleshooting
If the solar light does not turn on at night or the run time is short, ensure the solar panel is clean and located in an area with maximum sunlight. Check if the light is installed too close to other light sources, which may prevent automatic activation. If the issue persists, the batteries may have reached the end of their useful life and should be replaced.
Practical help
Common problems
Solar light does not turn on at night or run time is short
Ensure the solar panel is clean and receives maximum direct sunlight. Check for nearby light sources that may interfere with automatic activation. Replace old batteries if necessary.
Before use
- Verify all parts are present according to the package contents list.
- Install the light in an area with full, direct sunlight.
- Charge the light for 10-12 hours before first use.
- Allow 8-12 complete charge/discharge cycles for maximum battery capacity.
Images and diagrams
- The manual provides two assembly methods using the included stakes, poles, and light head components.
- The light head assembly consists of the solar top (B), lens (C), and housing (D).
Model compatibility
- Do not mix alkaline, standard (carbon zinc), or rechargeable (NiCad, NiMH) batteries.
- Do not attempt to replace the LEDs.

Manual page author
Emily Carter
User documentation editor
Prepares concise manual descriptions and highlights the most useful setup, operation, and maintenance information for readers.