Tools / Power Tools
User Manual for Bauer 6 Inch Dual Action Polisher 1814E-B
Comprehensive user guide for the Bauer 1814E-B 6-inch dual action polisher. Includes setup instructions, safety warnings, polishing and sanding techniques, maintenance, and troubleshooting.
Quick answers from the manual
Quick answer
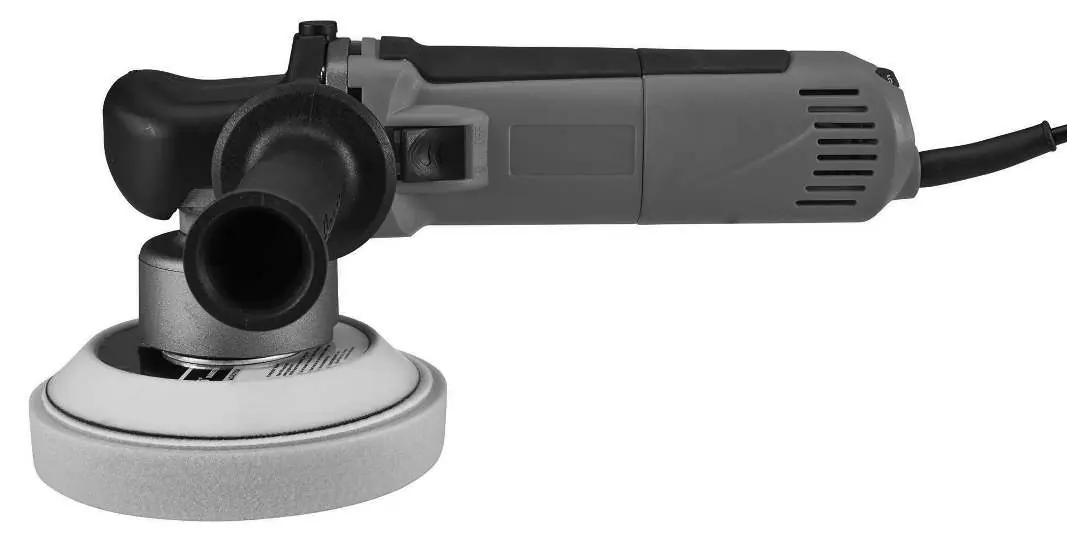
- The Bauer 1814E-B is a 6-inch dual action polisher. It is intended for sanding or polishing operations. Always grip with both hands, use the side handle, and ensure accessories are rated for at least 6,400 OPM. p. 1, 9
Key actions
- Installing Side Handle p. 9
- Installing Accessory p. 10
First start
- Ensure switch is OFF, plug in, grip firmly with both hands, press trigger, and allow tool to reach full speed before contacting surface. p. 11, 12
Problems and fixes
Tool will not start
Check cord, power outlet, circuit breaker, or thermal reset button.
p. 13Maintenance and reset
- Clean motor vents periodically using dry compressed air. p. 12
Technical specifications
| Parameter | Value | Meaning | Pages |
|---|---|---|---|
| Electrical Rating | 120VAC / 60Hz / 5.7A | Power requirements | p. 9 |
| No Load Speed | 6,400 OPM | Operating speed | p. 9 |
| Spindle Thread | 5/16" - 24 UNF | Accessory mounting thread | p. 9 |
Where to find it in the PDF
- Safety Information p. 2, 3, 4, 5
- Specifications p. 9
- Assembly and Operation p. 9, 10, 11, 12
- Parts List and Diagram p. 14, 15
Table of contents
Manual images
Click an image to enlargeQuick Guide from the Manual
The Bauer 1814E-B is a 6-inch dual action polisher designed for sanding and polishing tasks. Before use, ensure the tool is unplugged and the switch is in the OFF position. Always grip the tool firmly with both hands and use the side handle for control. Accessories must be rated for at least 6,400 OPM and be no larger than 6 inches in diameter.
Assembly and Setup
Installing the Side Handle: The side handle can be installed on either side of the gear housing. Screw the threaded end of the handle into the desired position and tighten securely before use.
Installing a Threaded Accessory:
- Use the included wrench to prevent the spindle from turning.
- Thread the disc accessory firmly onto the spindle.
- Remove the wrench before operating the tool.
Polishing Instructions
Preparation: Wash the work surface thoroughly to remove dirt and debris. Apply about two tablespoons of wax evenly onto a clean foam pad.
Operation:
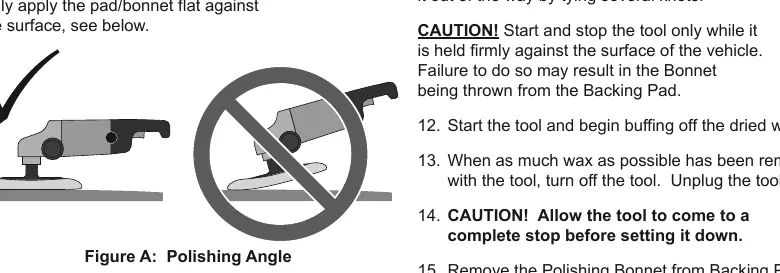
- Start and stop the tool only while it is held firmly against the vehicle surface.
- Keep pressure off the tool; the foam pad should lightly contact the surface.
- Apply wax to flat surfaces using broad, sweeping strokes in a crisscross pattern.
- Keep the pad flat against the surface to prevent damage.
- After applying wax, allow it to dry, then replace the foam pad with a clean polishing bonnet to buff off the wax.
Sanding Instructions
Wipe the work surface clean of all dirt and debris. Attach the desired grit sanding disk to the backing pad. Start the tool and wait until it reaches full speed before gently contacting the surface. Move the tool in a uniform pattern (up and down or side to side) to ensure even sanding. Periodically stop the tool to check for disc wear.
Maintenance and Troubleshooting
Cleaning: Before each use, inspect for loose hardware, damaged cords, or cracked parts. Periodically blow dust and grit out of the motor vents using dry compressed air.
Troubleshooting:
- Tool will not start: Check power connection, circuit breaker, or thermal reset button.
- Tool operates slowly: Reduce pressure on the workpiece or check for an inadequate extension cord.
- Overheating: Clean motor vents and ensure you are not forcing the tool.
Manufacturer information
Harbor Freight Tools
Practical help
Common problems
Tool will not start
Check that the cord is plugged in, verify power at the outlet, check the circuit breaker, or press the thermal reset button on the tool.
Tool operates slowly
Decrease pressure applied to the workpiece and ensure you are not using an undersized or excessively long extension cord.
Overheating
Allow the tool to work at its own rate, clean blocked motor housing vents, and eliminate the use of an extension cord if possible.
Tool does not sand effectively
Confirm the accessory arbor is correct, ensure the outer flange/arbor nut is tight, and check that the disc is not worn or the wrong type.
Before use
- Inspect the tool for loose hardware, damaged cords, or cracked parts.
- Ensure the power switch is in the OFF position before plugging in.
- Verify the accessory is rated for at least 6,400 OPM.
- Ensure the accessory is no larger than 6 inches in diameter.
- Wear ANSI-approved eye protection and appropriate safety gear.
- Secure the workpiece with clamps or a vise.
Images and diagrams
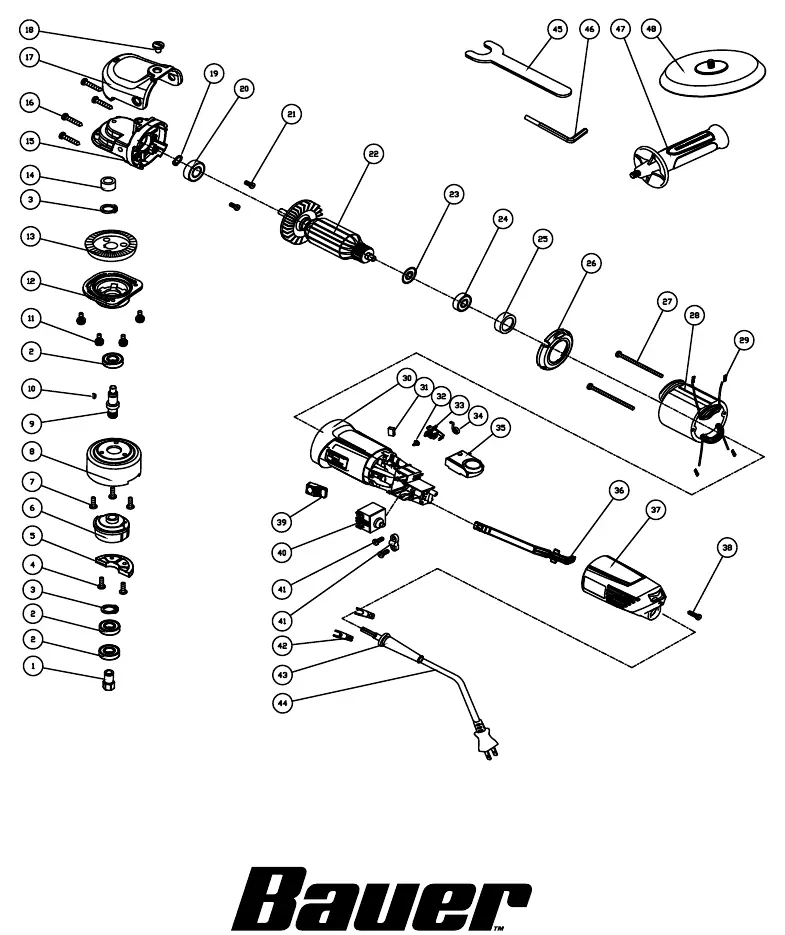
- The Assembly Diagram (Page 15) identifies all internal components and parts for reference.
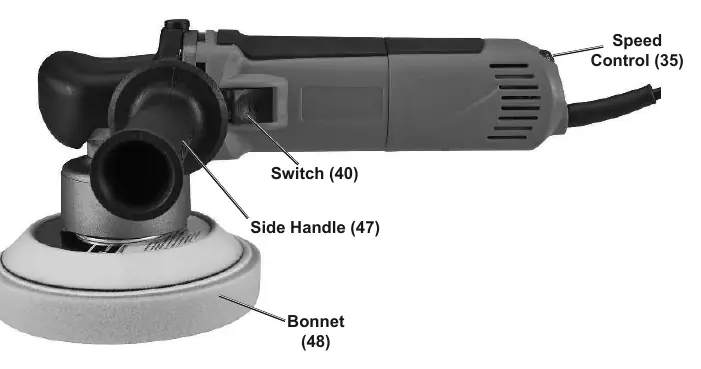
- The Functions diagram (Page 9) highlights the location of the switch, speed control, side handle, and bonnet.
Model compatibility
- Accessories must be rated for at least 6,400 OPM.
- Accessories must be no larger than 6 inches in diameter.
- Threaded opening must be 5/16" - 24 UNF.

Manual page author
Emily Carter
User documentation editor
Prepares concise manual descriptions and highlights the most useful setup, operation, and maintenance information for readers.