Tools / Power Tools
User Manual for Maddox Flaring Tool Kit 58147
Comprehensive user guide for the Maddox Flaring Tool Kit 58147. Includes step-by-step instructions for creating double and bubble flares, maintenance procedures, and safety guidelines for copper, aluminum, soft steel, and brass tubing.
Quick answers from the manual
Quick answer
- The Maddox Flaring Tool Kit (58147) is used to create double and bubble flares on copper, aluminum, soft steel, and brass tubing. Always wear safety gear and inspect the tool for damage before use. p. 1, 2, 3
Key actions
- Perform Double Flaring p. 2
- Perform Bubble Flaring p. 3
First start
- Inspect the tool for any damage, misalignment, or binding parts before the first use. p. 3
Problems and fixes
Crooked flare
Ensure the tubing is cut cleanly, deburred, and straightened before starting.
p. 2, 3Maintenance and reset
- Clean external surfaces after use, dry, and lubricate all moving parts. Do not use solvents. p. 3
Technical specifications
| Parameter | Value | Meaning | Pages |
|---|---|---|---|
| Double SAE | 3/16", 1/4", 5/16", 3/8", 1/2" | Supported sizes | p. 2 |
| Double Metric | 4mm, 4.75mm, 6mm, 8mm, 10mm | Supported sizes | p. 2 |
| Bubble Flare | 4.75mm, 6mm, 8mm, 10mm | Supported sizes | p. 2 |
Where to find it in the PDF
- Safety and Overview p. 1
- Specifications and Double Flaring p. 2
- Bubble Flaring and Maintenance p. 3
Table of contents
Manual images
Click an image to enlargeQuick Guide from the Manual
The Maddox Flaring Tool Kit is designed for creating double and bubble flares on copper, aluminum, soft steel, and brass tubing. Before use, ensure you are wearing ANSI-approved safety goggles and heavy-duty work gloves. Always inspect the tool for damage or binding parts before starting. The quality of the flare depends on the preparation of the tubing; ensure it is cut cleanly, deburred, and straightened.
Specifications
- Double SAE: 3/16", 1/4", 5/16", 3/8", and 1/2"
- Double Metric: 4mm, 4.75mm, 6mm, 8mm, and 10mm
- Bubble Flare: 4.75mm, 6mm, 8mm, 10mm
Double Flaring Instructions
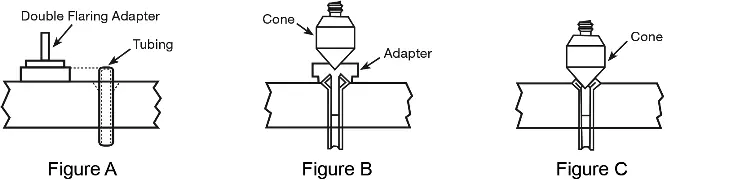
- Straighten the tubing and make a clean, straight cut. Deburr the inner and outer edges.
- Insert the tubing into the correct sized hole on the Flaring Bar.
- Place the same-sized Flaring Adapter on the surface of the Flaring Bar, flat side down.
- Adjust the tubing height so the end aligns with the step on the Flaring Adapter.
- Hand-tighten the wing nuts, starting with the one closest to the tubing, until it cannot slip.
- Insert the stem of the Flaring Adapter into the tubing end.
- Position the Flaring Yoke over the Flaring Bar so the cone enters the depression in the adapter.
- Turn the handle to force the cone down until the adapter rests flat against the bar.
- Back off the yoke and remove the adapter.
- Reposition the Flaring Cone over the tubing and screw the yoke down until the tubing folds back on itself, forming a 45-degree double flare.
- Loosen the yoke and wing nuts to remove the tool.
Bubble Flaring Instructions
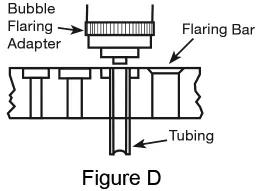
- Straighten and deburr the tubing.
- Insert the tubing into the correct sized hole on the Flaring Bar until it is flush with the top.
- Hand-tighten the wing nuts until the tubing cannot slip.
- Remove the cone from the Yoke and thread the correct-sized bubble flaring adapter onto the Yoke screw.
- Position the Yoke over the Flaring Bar so the adapter stem enters the tubing.
- Turn the handle to force the adapter down until it rests flat against the clamping assembly.
- Back off the Yoke and remove the adapter.
- Loosen the Yoke and wing nuts to remove the tool.
Maintenance and Servicing
Before each use: Inspect the tool for misalignment, binding, cracks, or broken parts. Do not use damaged equipment.
After use: Clean external surfaces, dry, and lubricate all moving parts. Do not use solvents.
Storage: Keep the tool and accessories in the carrying case in a clean, dry, and safe location.
Parts List
The kit includes the following components:
- Double Flare Adapters (10)
- Bubble Flare Adapters (4)
- Flaring Bar
- Tube Cutter
- Yoke
- Tube Reamer
Manufacturer information
Harbor Freight Tools
Practical help
Common problems
Crooked flare
Ensure the tubing is cut cleanly, deburred, and straightened before starting.
Tubing slips from the bar
Ensure wing nuts are hand-tightened firmly, starting with the one closest to the tubing.
Before use
- Inspect tool for damage or binding parts
- Wear ANSI-approved safety goggles
- Wear heavy-duty work gloves
- Ensure work area is clean and well-lit
- Straighten tubing
- Deburr inner and outer edges of tubing
Specs in practice
- Double Metric
- Supported sizes for double flares in metric units
- Bubble Flare
- Supported sizes for bubble flares
Images and diagrams
- Figure A: Aligning tubing with the double flaring adapter
- Figure B: Positioning the yoke to force the cone into the adapter
- Figure C: Forming the final 45-degree double flare
- Figure D: Setup for bubble flaring
Model compatibility
- Compatible with Copper, Aluminum, Soft Steel, and Brass tubing.

Manual page author
Michael Turner
Technical manual editor
Reviews PDF manuals for structure, safety notes, and practical product details so readers can find the right information quickly.