Toys / RC Models & Drones
User Manual for HGLRC Petrel 120X FPV Racing Drone
Quick setup and configuration guide for the HGLRC Petrel 120X FPV Racing Drone. Includes wiring diagrams, Betaflight configuration, receiver setup, and troubleshooting steps.
Table of contents
Manual images
Click an image to enlargeQuick guide from the manual
This document provides essential setup and configuration instructions for the HGLRC Petrel 120X FPV Racing Drone. Before operating, ensure you understand the polarity of connections and always disconnect power when modifying wiring. Important: Always remove propellers before performing bench testing or motor configuration to prevent injury.
Product Specifications
- Model: Petrel 120X FPV Racing Drone
- Frame Kit: Petrel 120X Freestyle Frame Kit
- Flight Controller: Zeus13 AIO Flight Controller
- VTX: Zeus nano 350mW
- Motor Options: 1202.5 Motor (3S KV5600, 4S KV4500, 6S KV2500)
- Supported Receivers: SBUS, DSMX, i.BUS
- Input Voltage: 3-6S Lipo
- Weight: 70.6g
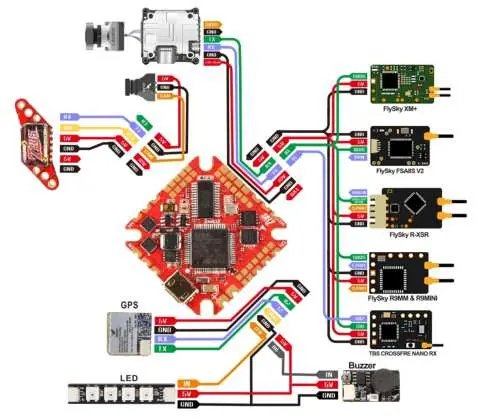
Interface and Wiring
The flight controller features specific pads for various components. Refer to the wiring diagram to connect your GPS, LED strips, buzzer, and receiver correctly. Ensure all connections are secure and polarity is correct before applying power.

Flight Controller Setup
To set up the flight controller, you must install the necessary drivers. If the system does not automatically install the driver when connected via USB, download and run the ImpulseRC_Driver_Fixer. Once the driver is installed, open the Betaflight Configurator, enter DFU mode, and select the appropriate firmware version (ZEUSF722_AIO) to flash the controller.
Configuration and Calibration
After flashing, connect the drone to Betaflight to perform initial configuration:
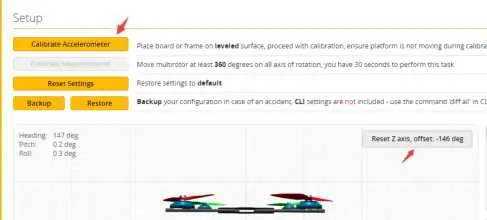
- Calibration: Place the aircraft on a level surface and click "Reset Z axis" and "Calibrate Accelerometer".
- UART Ports: Configure UART ports based on your setup (e.g., UART1 for receiver, UART2 for GPS, UART3 for VTX/DJI).
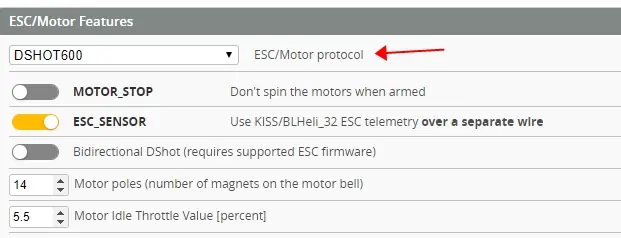
- ESC Protocol: Select the appropriate ESC protocol, typically DSHOT600.
- Receiver Setup: In the Receiver tab, select the correct serial provider (SBUS, i.BUS, or CRSF) based on your hardware.
OSD and LED Settings
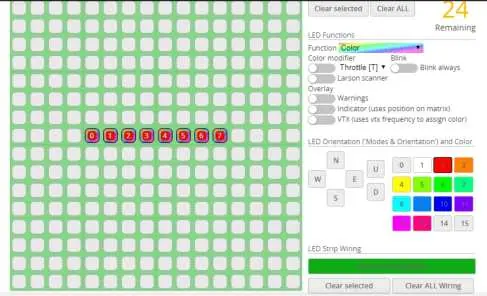
The Betaflight OSD allows you to monitor battery voltage and mAh consumption during flight. You can access the OSD menu using transmitter stick commands (throttle centered, yaw left, pitch forward). Within the OSD menu, you can adjust VTX settings, PIDs, and screen layout. LED strips can be configured in the LED tab by turning on LED support and setting the wire ordering mode.
Troubleshooting
If you encounter issues, check the following:
- Garbled OSD: Open Betaflight, go to the OSD tab, click "Font Manager", and select "Upload Font".
- No self-test sound: Check if the ESC protocol is configured correctly.
- Aircraft spinning: Verify that the propellers are installed correctly and the motor direction is set properly in the software.
Official resources from the manual
Practical help
Common problems
OSD displays garbled characters
Open Betaflight, navigate to the OSD tab, click 'Font Manager', and select 'Upload Font' to update.
Aircraft does not pass self-test (no 'BBB' sound)
Check if the ESC protocol/agreement is configured correctly in Betaflight.
Aircraft spins uncontrollably
Verify that propellers are installed in the correct orientation and check that motor direction is set correctly in the software.
Before use
- Check polarity carefully before connecting power supply.
- Remove all propellers before bench testing or motor configuration.
- Ensure flight controller drivers are installed (use ImpulseRC_Driver_Fixer if needed).
- Verify ESC protocol is set to DSHOT600.
- Ensure the aircraft is on a level surface when calibrating the accelerometer.
Specs in practice
- Input Voltage
- Supports 3S to 6S Lipo batteries.
- Flight Controller
- Zeus13 AIO Flight Controller.
Images and diagrams
- Wiring diagram illustrates connections for GPS, LED, Buzzer, and various receiver types (FlySky, TBS Crossfire).
- OSD menu navigation requires specific transmitter stick commands: throttle centered, yaw left, pitch forward.
Model compatibility
- Supports SBUS, DSMX, and i.BUS receiver protocols.
- Compatible with 3S, 4S, and 6S LiPo batteries.
- VTX supports remote configuration via SmartAudio (TBS Unify) or IRC Tramp Telemetry.

Manual page author
Michael Turner
Technical manual editor
Reviews PDF manuals for structure, safety notes, and practical product details so readers can find the right information quickly.