Tools / Drills
User Manual for HiKOKI DH 12DD Cordless Rotary Hammer
Quick guide for the HiKOKI DH 12DD Cordless Rotary Hammer. Includes setup, operation, maintenance, safety warnings, and troubleshooting.
Table of contents
Manual images
Jump to the sectionQuick Guide
The HiKOKI DH 12DD is a cordless rotary hammer designed for drilling anchor holes, concrete, and tile, as well as drilling in steel or wood (with optional accessories) and tightening screws. Always ensure the battery is charged and the tool is in the OFF position before inserting the battery.
Safety Warnings
WARNING: Read all safety warnings and instructions. Failure to follow them may result in electric shock, fire, or serious injury. Always wear ear protection and use the auxiliary handle if supplied. Hold the tool by insulated gripping surfaces when performing operations where the cutting accessory may contact hidden wiring.
Names of Parts
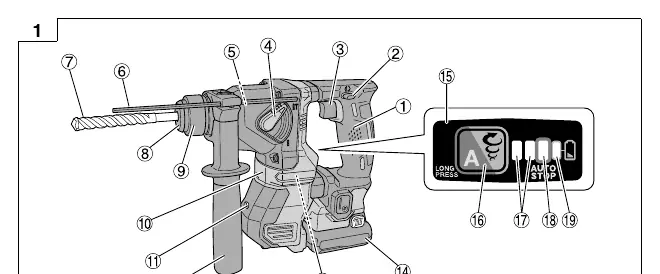
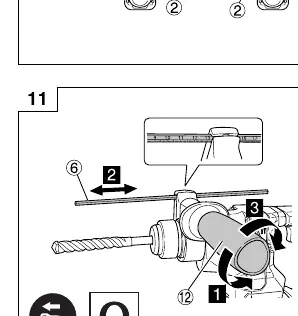
Key components include the handle, switch trigger, change lever, depth gauge, drill bit, LED light, and battery. Refer to the diagrams in the manual (Fig. 1) for the exact location of these parts.
Mounting and Operation
Key operations include:
- Removing/Inserting Battery: Use the latch to remove or insert the battery.
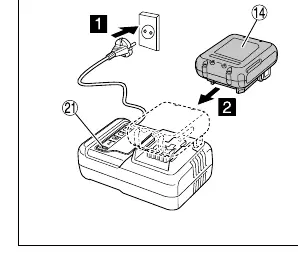
- Charging: Connect the charger to a power source, insert the battery, and monitor the pilot lamp (Table 1).
- Installing/Removing Side Handle: Adjust as needed for better control.
- Inserting/Removing SDS-plus Tools: Clean the shank and pull on the bit to check latching.
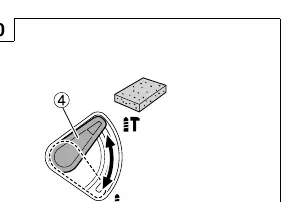
- Selecting Operation Mode: Use the changeover switch to select rotation speed (Low/Normal) and auto stop mode.
Auto Stop Function
This function supports continuous drilling. It features a memory mode to store the work time from switch ON to switch OFF. From the second drilling onwards, the motor stops automatically if the work exceeds the stored time.
Reactive Force Control (RFC)
The RFC feature reduces jerking of the tool body if the bit is suddenly overburdened. If the motor stops due to RFC, release the switch, remove the cause of the overburden, and resume operation.
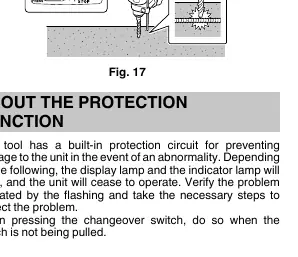
Protection Function
The tool has a built-in protection circuit. If the display lamp and indicator lamp flash, the unit has ceased operation due to an abnormality (e.g., high temperature or sudden overburdening). Verify the cause and take necessary steps to correct it.
Maintenance and Inspection
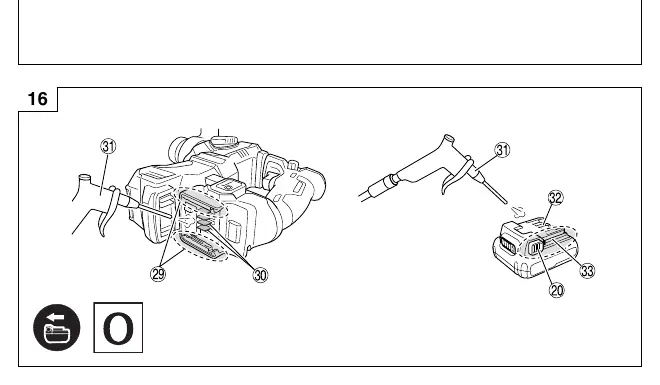
Regularly inspect the tool, mounting screws, and motor. Keep terminals clean of swarf and dust. Clean the outside with a soft dry cloth or soapy water. After drilling concrete, clean the battery installation compartment and battery with an air gun or dry cloth.
Troubleshooting
If the tool does not operate normally, check the following:
- Tool doesn't run: Check battery charge, ensure it is securely attached, and clean terminals of concrete dust.
- Tool suddenly stopped: Check for overburdening (RFC activated) or battery overheating.
- Tool bits fall off: Ensure the correct SDS-plus bit is used and properly latched.
Manufacturer information
HiKOKI
Practical help
Common problems
Tool doesn't run
Charge the battery, ensure it is securely attached until a click is heard, and clean concrete dust from the battery terminals and sliding grooves.
Tool suddenly stopped
The tool was overburdened (RFC activated) or the battery is overheated. Release the switch and let the battery cool down.
Tool bits cannot be attached or fall off
Ensure the bit shank matches the SDS-plus type and is within the designated diameter range.
Before use
- Charge the battery
- Check for buried electric cables or conduits in the wall/floor/ceiling
- Ensure the power switch is in the OFF position
- Clean battery installation compartment and battery terminals
- Check bit latching by pulling on the drill bit
Images and diagrams
- Fig 1: Overview of parts and controls
- Fig 3: Battery charging procedure
- Fig 10: Selecting operation mode
- Fig 11: Adjusting drilling depth
- Fig 17: Reactive Force Control (RFC) activation
Model compatibility
- Use only genuine HiKOKI batteries (BSL12xx series)
- Use only SDS-plus shank bits

Manual page author
Emily Carter
User documentation editor
Prepares concise manual descriptions and highlights the most useful setup, operation, and maintenance information for readers.