Tools / Power Tool Accessories
Operating Instructions for Hilti C 4/12-50 Battery Charger
Quick guide for the Hilti C 4/12-50 battery charger. Includes setup, charging procedures, LED indicator meanings, safety warnings, and troubleshooting steps.
Table of contents
Manual images
Click an image to enlargeQuick guide from the manual
This document provides essential operating instructions for the Hilti C 4/12-50 battery charger. Always read the full safety instructions before first use. Ensure the charger is used in a clean, cool, and dry environment. Do not operate the charger inside a closed container to allow for proper heat dissipation.
Product overview
The charger consists of the following main components:
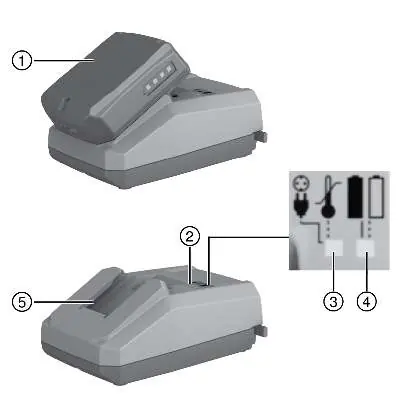
- Battery
- Operating status indicator and battery state of charge indicator
- LED 1
- LED 2
- Battery interface
Intended use
This product is a battery charger specifically designed for Hilti Li-ion batteries with a rated voltage of 10.8 volts. It is intended for connection to AC power outlets (100-127V or 220-240V, depending on the version).
Charging procedure
- Ensure the battery contacts and charger contacts are clean and dry.
- Plug the charger into a power outlet. LED 1 will show green.
- Push the battery into the charger until it engages with an audible click.
- Check that the battery is seated securely.
- The charger will automatically begin the charging process.
LED indicators
The status of the charger and battery can be determined by the LED indicators:
- LED 1 Off, LED 2 Off: No AC supply or charger defective.
- LED 1 Flashes red, LED 2 Off: Battery too hot or too cold.
- LED 1 Shows green, LED 2 Off: Charger ready for use.
- LED 1 Shows green, LED 2 Flashes green: Battery is charging.
- LED 1 Shows green, LED 2 Shows green: Battery fully charged.
- LED 1 Shows red, LED 2 Off: Charger malfunction.
Care and maintenance
Always unplug the supply cord before performing any maintenance. Clean the air vents with a dry, soft brush. Use only a slightly damp cloth to clean the housing; do not use silicone-based cleaning agents. If the product shows signs of damage, do not use it and contact Hilti Service for repairs.
Transport and storage
Always store the charger with the supply cable unplugged in a dry place, out of reach of children. Do not transport the charger with a battery installed.
Disposal
Do not dispose of electric equipment or batteries as household waste. Follow local regulations for recycling or return the product to a Hilti Store.
Manufacturer information
Hilti Corporation
Practical help
Common problems
LED 1 shows green, LED 2 is off
The battery may be defective. Remove the battery from the charger. If no LED shows on the battery after checking its state of charge indicator, the battery is defective. Have it checked by Hilti Service.
LED 1 flashes red, LED 2 is off
The battery is too hot or too cold. The charger will automatically switch to charging mode as soon as the battery reaches the required temperature.
LED 1 and LED 2 are off
The charger is defective. Have the tool repaired by Hilti Service.
LED 1 shows red, LED 2 is off
Charger malfunction. Unplug the appliance and plug it back in. If the LED still does not light up, take the charger to Hilti Service.
Before use
- Ensure the charger is connected to a compatible power outlet.
- Verify that battery contacts and charger contacts are clean and dry.
- Ensure the battery is in perfect working order.
- Confirm the battery is a compatible Hilti Li-ion battery (10.8V).
Specs in practice
- Output voltage
- 10.8 V
- Output power
- 50 W
Images and diagrams
- 2: Operating status indicator and battery state of charge indicator
- 5: Battery interface
Model compatibility
- Designed for Hilti Li-ion batteries with a rated voltage of 10.8 volts.

Manual page author
Emily Carter
User documentation editor
Prepares concise manual descriptions and highlights the most useful setup, operation, and maintenance information for readers.