Tools / Power Tool Accessories
Operating instructions for Hilti NCR 120C-A22 Crimping Tool
Quick guide for the Hilti NCR 120C-A22 crimping tool. Includes setup, operation, maintenance, safety warnings, and troubleshooting steps.
Table of contents
Manual images
Click an image to enlargeQuick guide from the manual
The Hilti NCR 120C-A22 is an uninsulated, cordless, electro-hydraulic crimping and pressing tool designed for copper or aluminum connection material. Important: This tool is not insulated. When working in the vicinity of electrically live lines, you must wear appropriate personal protective equipment and ensure adequate insulation or air gaps. Always inspect the black coating on the tool head before use; if the red inner layer is visible or warning symbols are illegible, do not use the tool.
Product overview
The tool consists of the following main components:
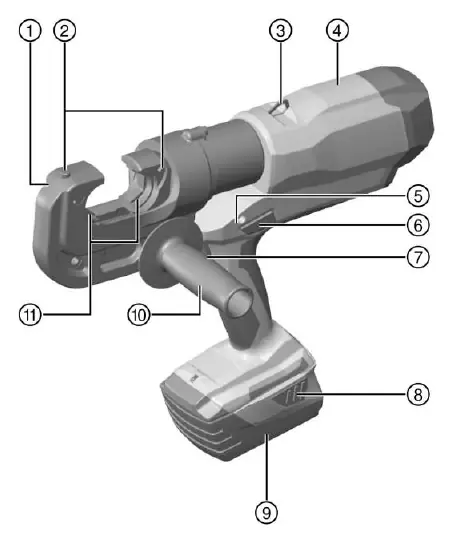
- Crimping/pressing head
- Crimping tool release buttons
- Key ring
- Casing
- Servicing and fault indicator (red LED)
- Manual piston return switch
- Control switch
- Battery release button
- Battery
- Grip (optional)
- Crimping/pressing die
- White LED for work area illumination
Operation
Battery usage: Use only Hilti B 22 series Li-ion batteries. Charge the battery fully before first use. Push the battery into the tool until it engages with an audible click.
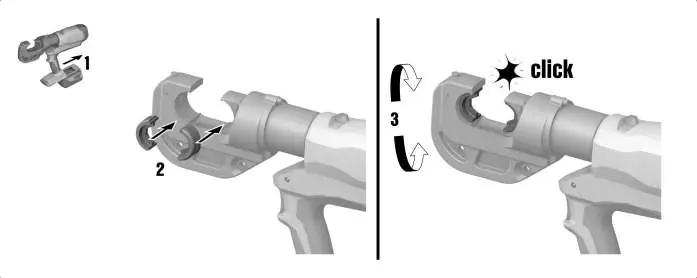

Fitting the crimping die: Remove the battery before inserting, changing, or removing the die. Push the dies in until they engage. Rotate the head to the desired working position.
Crimping procedure:
- Insert the connector into the open crimping die.
- In cold weather, perform 5 to 10 empty operations to warm up the hydraulic oil.
- Press and hold the control switch until the piston has retracted.
- If necessary, repeat the operation starting from A and moving in the direction of arrow B.
Care and maintenance
Always remove the battery before performing maintenance. Clean the housing with a slightly damp cloth; do not use silicone-based cleaning agents. Keep air vents clean using a dry, soft brush. If the battery is soaked by moisture, treat it as damaged and contact Hilti Service.
Troubleshooting
The tool features LED indicators on the battery and a red LED on the tool for status and fault reporting. If the red LED lights continuously with a warning tone, a technical problem has occurred; contact Hilti Service. If the tool overheats, allow it to cool down.
Manufacturer information
Hilti Corporation
Practical help
Common problems
Battery LEDs do not light up
Check if the battery is inserted correctly or if it is discharged/too hot/cold.
Battery runs down quickly
Very low ambient temperature; allow the battery to warm up slowly to room temperature.
Red LED lights continuously with warning tone
Technical problem; contact Hilti Service.
Red LED blinks at short intervals with warning tone
Battery charge too low to complete the cycle; change and charge the battery.
Before use
- Inspect the black coating on the tool head for damage or aging.
- Ensure the battery is fully charged.
- Check that the locking pin is pushed in all the way and securely engaged.
- Wear appropriate personal protective equipment (gloves, footwear, clothing).
- Ensure the work area is free of concealed electric cables or gas/water pipes.
Specs in practice
- Rated voltage
- 21.6 V
- Max. crimping force
- 120 kN
- Crimping time
- 8 s to 9 s
Images and diagrams
- 1: Crimping/pressing head
- 2: Crimping tool release buttons
- 6: Manual piston return switch
- 7: Control switch
Model compatibility
- Use only Hilti B 22 series Li-ion batteries.
- Use only Hilti-approved battery chargers.

Manual page author
David Miller
Documentation analyst
Organizes user manual content into clear summaries, with attention to model details, product context, and everyday usability.