Home Appliances / Food Processing Equipment
Hobart 1812RS Slicer with Retail Scale User Manual
Quick guide for the Hobart 1812RS Slicer with Retail Scale. Learn about installation, safe operation, cleaning procedures, knife sharpening, and maintenance to keep your slicer in top condition.
Quick answers from the manual
Quick answer
- This manual provides instructions for the installation, operation, cleaning, maintenance, and lubrication of the Hobart 1812RS Slicer with Retail Scale. p. 1, 2
Key actions
- Slicing operation: Place product on carriage tray, secure with meat grip, turn on, adjust thickness with index knob, and push carriage back and forth. p. 4
- Cleaning: Unplug machine, remove top knife cover and deflector, clean ring guard, and wash knife surfaces. p. 5, 6
- Sharpening: Unplug, remove top cover, plug in, start machine, lift sharpener handle, pull forward for 5 seconds, then release. p. 7
First start
- Installation and Assembly: Unpack, verify electrical service, assemble carriage tray, assemble scale platform and platter, and clean/sanitize before first use. p. 3
Maintenance and reset
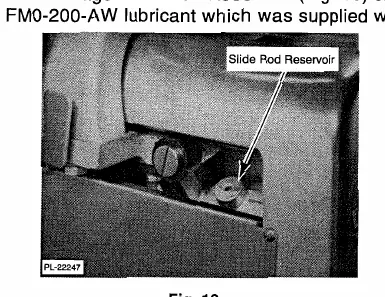
- Lubrication: Fill the carriage slide rod reservoir monthly with Lubriplate FM0-200-AW lubricant. p. 8
Technical specifications
| Parameter | Value | Meaning | Pages |
|---|---|---|---|
| Scale Capacity | 6.06 lbs | Maximum weight capacity of the retail scale | p. 5 |
| Scale Increments | 0.01 lb | Weight measurement resolution | p. 5 |
Where to find it in the PDF
- Title Page p. 1
- General Information p. 2
- Installation p. 3
- Operation p. 4
- Retail Scale and Cleaning p. 5
- Cleaning and Sharpener p. 6
- Maintenance p. 7
- Lubrication and Adjustment p. 8
Table of contents
Manual images
Click an image to enlargeQuick guide from the manual
The Hobart 1812RS Slicer with Retail Scale is a professional-grade appliance. Key safety and operational features include:
- Power Interrupt: The slicer must be manually restarted after any power interruption.
- Gauge Plate Interlock: The carriage tray cannot be removed unless the carriage is in the HOME position and the gauge plate is closed.
- HomeStart: The carriage must be in the HOME position before the slicer can be started.
- AutoShutoff: Automatically turns the slicer off if a full stroke of the carriage is not made within a specific time interval (factory installed option).
Installation and Assembly
Upon unpacking, inspect for shipping damage and contact the carrier within 15 days if necessary. Ensure the electrical service matches the machine data plate.
- Locate the lubricant provided and store it safely.
- Remove the carriage tray from its shipping location and place it on the slicer.
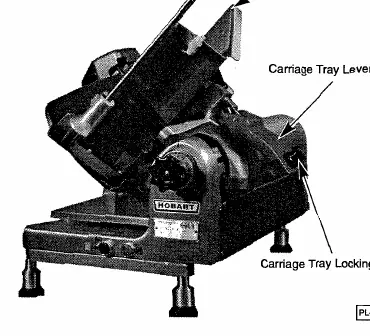
- Secure the carriage tray by lowering the Carriage Tray Lever Arm and tightening the Carriage Tray Locking Knob.
- Assemble the scale platform and platter according to the instructions on page 5.
- Connect the slicer cable to the peripheral printer unit (e.g., Hobart SP80/SP1500/SP21500).
Operation
Safety Warning: The knife is extremely sharp. Always use the Meat Grip to keep hands away from the blade. Unplug the power cord before cleaning or moving the machine.
Slicing Procedure:
- Pull the carriage toward you until it stops.
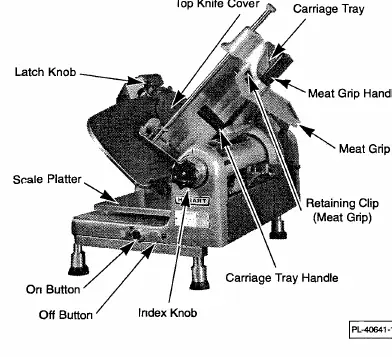
- Place the product on the carriage tray and set the Meat Grip against it.
- Press the ON button.
- Adjust the gauge plate using the Index Knob to set the desired slice thickness.
- Use the Carriage Tray Handle to push the carriage back and forth.
- Press the OFF button when finished.
Using the Retail Scale
The scale has a capacity of 6.06 pounds with .01 lb increments. Ensure the nylon scale platform is properly seated on the pedestal and leveled so the bubble appears in the middle of the circle. Place the stainless steel platter on the nylon platform, ensuring the backslash faces the rear and the pins fit the holes.
Cleaning and Sanitizing
The machine must be cleaned and sanitized after each day's operation or if not used for an extended period.
- Warning: Always unplug the power cord and turn the Index Knob fully clockwise before cleaning.
- Use a mild detergent and hot water solution with a clean cloth.
- Remove the Top Knife Cover and Deflector for washing.
- Clean the Ring Guard by inserting a thin cloth soaked in detergent between the knife and the guard, working it around the circumference.
- Wash and rinse both sides of the knife by wiping outward from the center. Never use steel pads.
Maintenance
Knife Sharpening:
- Unplug the machine and turn the Index Knob fully clockwise.
- Remove the Top Knife Cover.
- Plug in the machine and press the ON button.
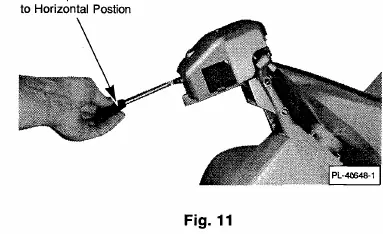
- Lift the sharpener handle to a horizontal position.
- Pull the sharpener handle toward you and apply pressure for 5 seconds.
- Release the handle, press the OFF button, and unplug the machine.
- Wipe away any grinding particles and replace the Top Knife Cover.
Lubrication:
The carriage slide rod reservoir should be filled monthly with Lubriplate FM0-200-AW lubricant. Do not use vegetable oil. Occasionally coat the gauge plate slide rods with the same lubricant. Do not lubricate the meat grip slide rod.
Manufacturer information
Hobart
Practical help
Common problems
Slicer will not start
Ensure the carriage is in the HOME position (HomeStart feature) and the Gauge Plate is closed.
Slicer stops during operation
The Power Interrupt feature may have been triggered; manually restart the slicer.
Cannot remove the carriage tray
The Gauge Plate must be closed and the carriage must be in the HOME position to disengage the interlock.
Before use
- Ensure the machine is properly grounded.
- Clean and sanitize all food contact surfaces.
- Verify the carriage is in the HOME position.
- Ensure the Gauge Plate is closed.
- Check that the Top Knife Cover is secured.
Specs in practice
- Power Interrupt
- Safety feature requiring manual restart after power loss.
- Gauge Plate Interlock
- Prevents carriage removal unless the gauge plate is closed.
Images and diagrams
- Fig 2-3: Assembly of carriage tray and sharpener.
- Fig 4-5: Operation controls and safety features.
- Fig 11-12: Knife sharpening procedure.
- Fig 13-14: Lubrication points.
Model compatibility
- Designed for connection to Hobart SP80 / SP1500 / SP21500 System Printers.

Manual page author
David Miller
Documentation analyst
Organizes user manual content into clear summaries, with attention to model details, product context, and everyday usability.