Toys / RC Models & Drones
User Manual for HobbyZone AeroScout S 2 1.1m RC Airplane
Comprehensive user guide for the HobbyZone AeroScout S 2 1.1m RC airplane. Includes assembly instructions, transmitter setup, SAFE flight mode explanations, pre-flight checks, and troubleshooting tips.
Table of contents
Manual images
Click an image to enlargeQuick Start Guide
The HobbyZone AeroScout S 2 1.1m is a sophisticated RC airplane designed for hobbyists. Before your first flight, ensure the battery is fully charged, the center of gravity is correct, and you have performed a range test. Always activate the throttle cut on your transmitter before arming the motor to prevent accidental injury.
Assembly
Landing Gear: Slide the main landing gear into the slots on the fuselage until it locks. Insert the nose gear into the collar and tighten the set screw against the flat spot on the wire.
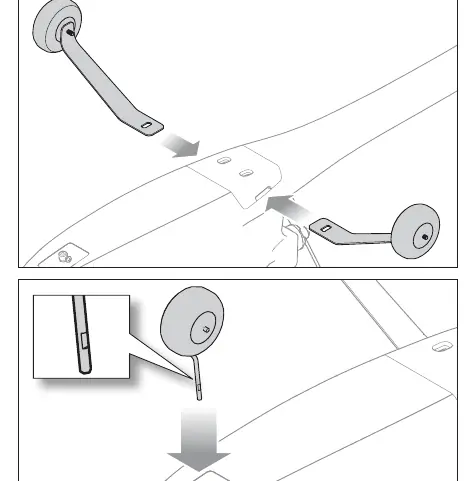
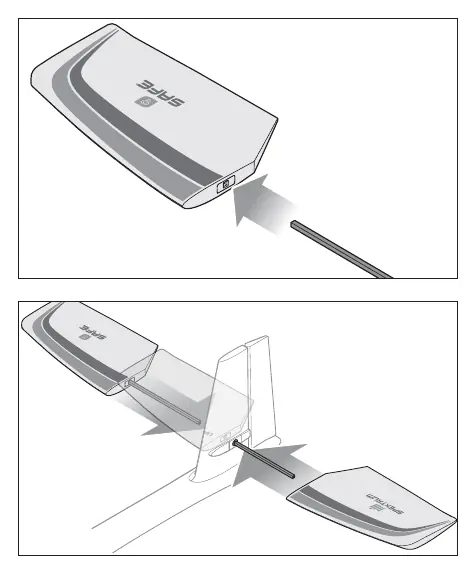
Tail Assembly: Slide the long carbon fiber rod through the hole in the vertical tail. Slide the horizontal stabilizers onto the rod until they are flush against the fuselage. Ensure decals face upward.
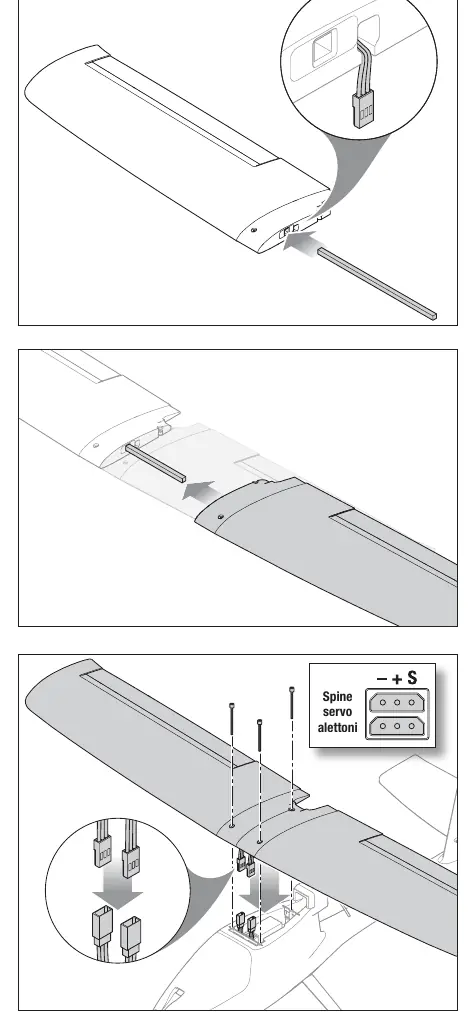
Wing Assembly: Slide the wing joiner into one wing panel. Connect the aileron servo wires to the Y-harness in the fuselage. Center the wing and secure it using the included 50mm screws. Do not overtighten.
Transmitter Setup
The included DXS transmitter comes pre-bound. If binding is required: 1. Power off the transmitter. 2. Connect the flight battery to the ESC. 3. Insert the bind plug into the bind port on the receiver. 4. Power on the receiver and press the bind button on the transmitter. 5. Once bound, remove the bind plug.
Flight Modes (SAFE Technology)
- Beginner (Position 0): Limits pitch and roll angles, provides self-leveling, and assists with takeoff/landing.
- Intermediate (Position 1): Less restrictive flight envelope, no self-leveling.
- Experienced (Position 2): No flight envelope limits, full control for aerobatics.
- Panic Recovery: Press and hold the BIND/Panic button to instantly level the aircraft if you lose orientation.
Pre-Flight and Flight
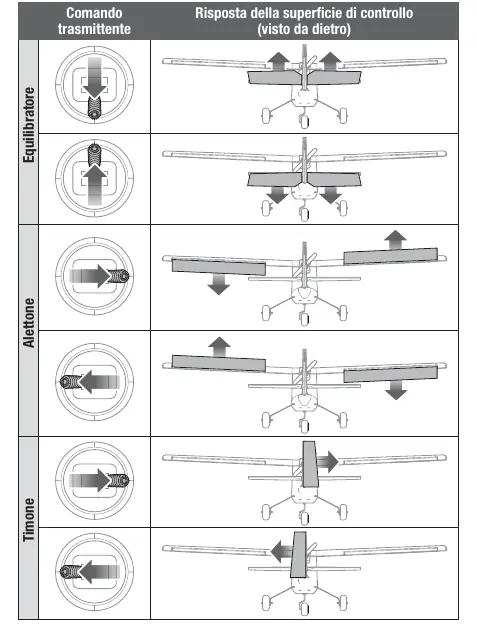
Always perform a control direction check before flying. Ensure the model is facing into the wind for takeoff. For hand launches, hold the fuselage behind the main gear, increase throttle to 100%, and launch into the wind with the nose slightly up. During landing, reduce throttle to 50%, align with the runway, and flare gently just before touchdown.
Maintenance and Troubleshooting
After flying, disconnect and remove the battery. Store LiPo batteries at half capacity. If the model vibrates, check the propeller and motor for damage. If the model pulls to one side, adjust the trim or manually adjust the control linkages. For AS3X issues, ensure the model is stationary during initialization.
Manufacturer information
HobbyZone
Practical help
Common problems
Model not functioning
Check battery charge, ensure transmitter and receiver are bound, and verify all electrical connections.
Model pulls to one side
Adjust trim on the transmitter or manually adjust the control linkages on the ailerons/rudder.
Short flight time
Ensure the battery is fully charged and avoid flying at full throttle constantly.
Model won't bind
Ensure the transmitter is at least 1 meter away from the receiver during binding and away from large metal objects.
Before use
- Charge flight battery fully.
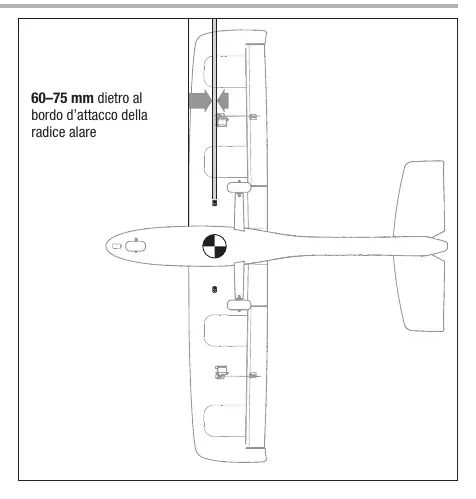
- Check center of gravity (CG) at 60-75mm behind the wing leading edge.
- Verify control surface directions.
- Perform a radio range test.
- Ensure transmitter throttle cut is active before arming the motor.
Images and diagrams
- Landing gear installation: Slide main gear into fuselage slots.
- Tail assembly: Insert carbon rod through fuselage, slide stabilizers on.
- Wing assembly: Connect servo wires to Y-harness, secure with screws.
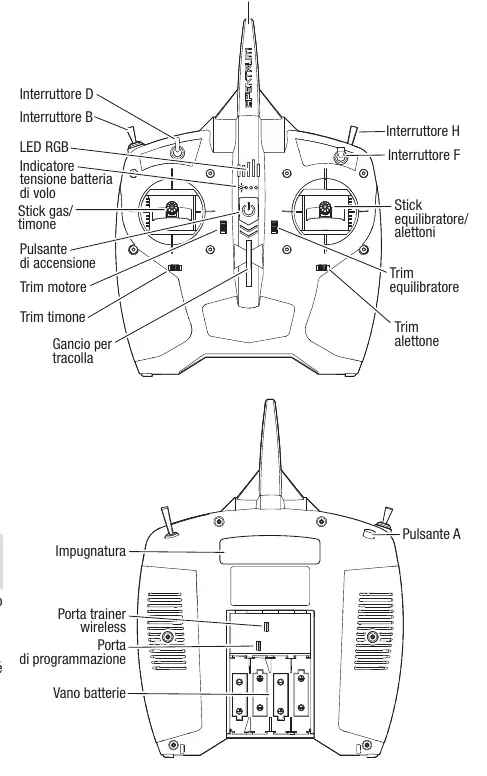
- Transmitter layout: Identifies switches for flight modes, rates, and throttle cut.
Model compatibility
- Battery: 3S 11.1V 1300–2200 mAh 30C LiPo with IC3 or EC3 connector.

Manual page author
Michael Turner
Technical manual editor
Reviews PDF manuals for structure, safety notes, and practical product details so readers can find the right information quickly.