Automotive / Parts & Accessories
Installation Manual for Hooke Road BXG.3060-S Side Steps
Quick installation guide for Hooke Road BXG.3060-S side steps. Includes parts list, required tools, and step-by-step mounting instructions for driver and passenger sides.
Table of contents
Manual images
Click an image to enlargeQuick Guide
The installation of the Hooke Road side steps takes approximately 40 minutes and may require 1-2 people depending on your mechanical skill level. Please verify all parts are present before beginning the installation.
Tools Required
- Drive Socket Ratchet Wrench
- 12mm Deep Socket
- 3mm & 4mm Hex Bit Socket
Parts List
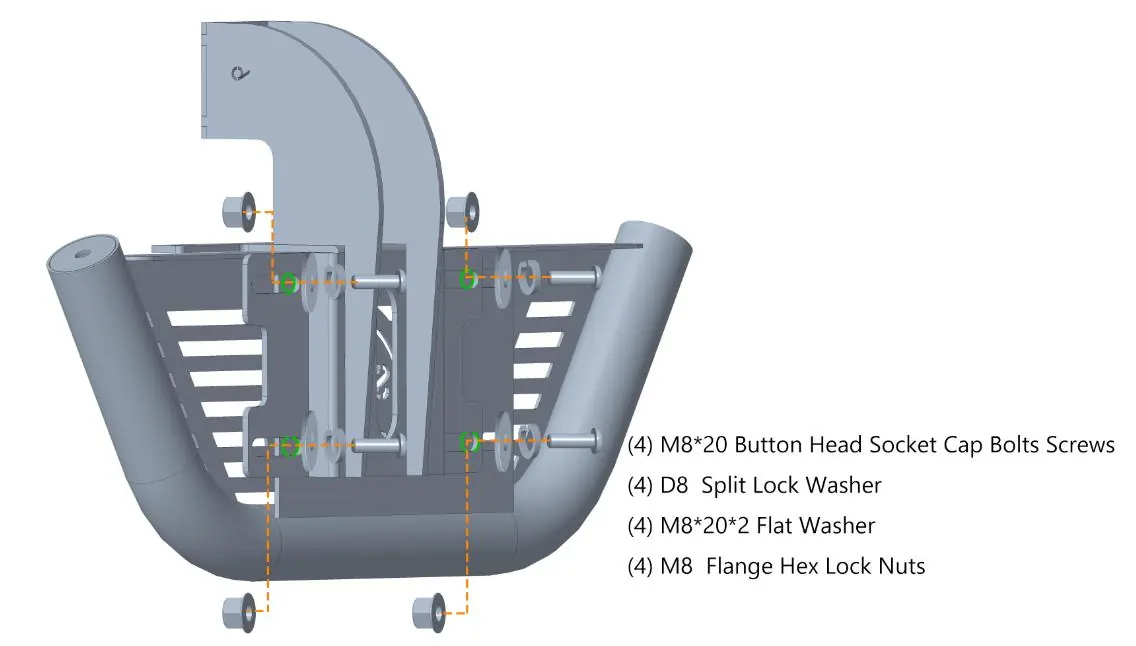
- Hex Bolts (M8*20)
- Button Head Socket Cap Bolts Screws (M6*20, M8*20)
- Split Lock Washers (D6, D8)
- Flat Washers (M6*16*1.5, M8*20*2)
- Flange Hex Lock Nuts (M6, M8)
- U Nut Fastener (M8)
Installation Instructions
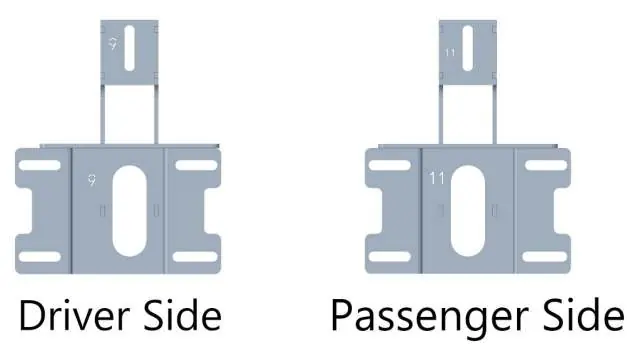
Preparation: Distinguish the mounting brackets by the number stamped on them. Mounting bracket 9 is for the driver side, and mounting bracket 11 is for the passenger side.


- Assemble the mounting bracket with the M8*20 Button Head Socket Cap Bolts Screws groups. Do not tighten these bolts yet.
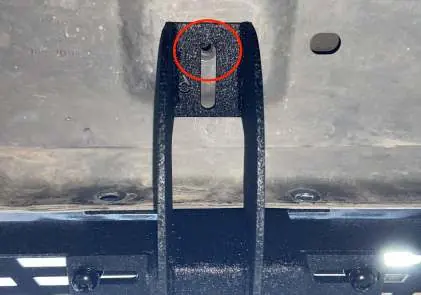
- Lift the side step into position. Ensure the mounting locations are correct. If the inside hole in your vehicle is not threaded, install using the provided U-nut fastener.
- Install the M8*20 Button Head Socket Cap Bolts Screws groups. If your vehicle has an M6 screw hole, use the M6 screw groups instead.
- Use the M8*20 Hex Bolts, D8 Split Lock Washer, and M8*20*2 Flat Washer in the inside holes.
- Adjust the side step position and tighten all bolts.
- Repeat the installation method for the passenger side.
- Adjust the main body left and right to a comfortable position.
Important Notes
Product parts in this instruction may differ slightly from the actual product contents, but this generally does not affect the installation. Please contact your distributor if you have any questions regarding your purchase.
Practical help
Common problems
Inside hole in vehicle is not threaded
Use the provided U-nut fastener to secure the bolt.
Vehicle has M6 screw holes
Use the M6 screw groups provided in the kit instead of the standard M8 groups.
Before use
- Verify all parts are present before starting.
- Ensure you have a 12mm deep socket and hex bit sockets.
- Identify brackets 9 (driver side) and 11 (passenger side).
- Have a second person available to assist with lifting the side step into position.
Specs in practice
- Installation time
- Approximately 40 minutes.
Images and diagrams
- The manual provides diagrams for bracket identification and bolt assembly.
- Step-by-step photos show the correct placement of bolts and washers.
Model compatibility
- Designed for 2-door vehicles.
- Installation may vary based on vehicle hole threading (M6 vs M8).

Manual page author
Michael Turner
Technical manual editor
Reviews PDF manuals for structure, safety notes, and practical product details so readers can find the right information quickly.